
1. Wprowadzenie
This manual provides detailed instructions for the setup, operation, and maintenance of your Crony ZXTL-13A Digital LED Table and Wall Clock. This device displays time, date, day, and temperature, and includes alarm and radio functions. Please read this manual thoroughly before using the product to ensure proper function and longevity.
2. Informacje dotyczące bezpieczeństwa
- Nie wystawiaj urządzenia na działanie ekstremalnych temperatur, bezpośredniego światła słonecznego i wysokiej wilgotności.
- Unikaj upuszczania i narażania urządzenia na silne uderzenia.
- Nie próbuj samodzielnie demontować ani naprawiać urządzenia. Wszelkie czynności serwisowe zlecaj wykwalifikowanemu personelowi.
- Przechowywać w miejscu niedostępnym dla dzieci.
- Use only the specified power adapter and battery type (AAA).
3. Koniec produktuview
The Crony ZXTL-13A is a versatile digital clock designed for both desk and wall mounting. It features a clear LED display and multiple functions.
3.1 Główne cechy
- Digital LED Display for Time, Date, Day, and Temperature
- Built-in Alarm Function
- Built-in Radio Function
- Desk & Shelf or Wall Mountable
- Durable Metal Material Construction
- Battery Powered (AAA) and AC Power Option
3.2 Clock Components

Rycina 1: Przód View of the Crony ZXTL-13A Clock. This image shows the main display area with segments for AM/PM, current time, alarm status, day of the week, month, temperature in Celsius, and week number.
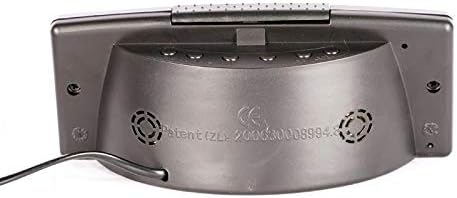
Rysunek 2: Tył View of the Crony ZXTL-13A Clock. This image illustrates the rear panel, typically where control buttons for setting time, alarm, and mode selection are located, along with the power input port and possibly a battery compartment.
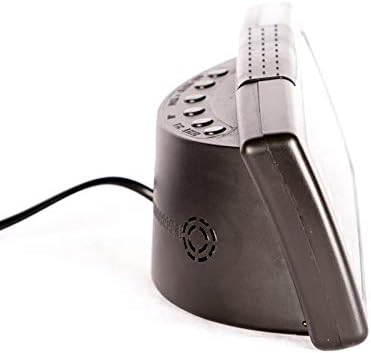
Rysunek 3: Strona View of the Crony ZXTL-13A Clock. This image highlights the clock's profile, demonstrating its integrated stand for desk placement and the connection point for the power cable.
4. Konfiguracja
4.1 Włączanie zegara
The Crony ZXTL-13A clock can be powered by either AAA batteries or an AC power adapter.
- Montaż baterii: Locate the battery compartment on the back of the clock (refer to Figure 2). Insert the required number of AAA batteries, ensuring correct polarity (+/-).
- Zasilanie prądem zmiennym: Connect the provided power adapter to the DC input port on the back of the clock (refer to Figure 2 and 3). Plug the adapter into a standard wall outlet.
- For continuous operation and full functionality, it is recommended to use the AC power adapter. Batteries serve as a backup in case of power outage or for portability.
4.2 Opcje montażu
- Desk/Shelf Placement: Utilize the integrated stand at the base of the clock for stable placement on any flat surface.
- Montaż na ścianie: The clock features mounting holes on the back for secure attachment to a wall. Use appropriate screws and wall anchors (not included) for installation.
5. Instrukcja obsługi
The control buttons are typically located on the back of the clock (refer to Figure 2). Common buttons include MODE, UP/+, DOWN/-.
5.1 Ustawianie czasu
- Naciśnij i przytrzymaj TRYB Naciskaj przycisk, aż cyfry godziny zaczną migać.
- Użyj W GÓRĘ/+ or W DÓŁ/- przyciski do regulacji godziny.
- Naciskać TRYB again to move to the minute digits, then adjust with W GÓRĘ/+ or W DÓŁ/-.
- Kontynuuj naciskanie TRYB to cycle through 12/24-hour format and AM/PM settings (if applicable), adjusting each with W GÓRĘ/+ or W DÓŁ/-.
- Naciskać TRYB ostatni raz lub poczekaj kilka sekund, aż ustawienia zostaną zapisane automatycznie.
5.2 Setting Date and Day
- W trybie wyświetlania czasu normalnego naciśnij TRYB button repeatedly until the date or year digits flash.
- Używać W GÓRĘ/+ or W DÓŁ/- aby ustawić rok, następnie naciśnij TRYB.
- Adjust the month, then press TRYB.
- Adjust the day, then press TRYB. The day of the week should automatically update.
- Wait for the settings to save.
5.3 Ustawianie alarmu
- Naciśnij TRYB button until the alarm time is displayed (often indicated by an alarm icon or "AL").
- Naciśnij i przytrzymaj TRYB until the alarm hour digits flash.
- Adjust the alarm hour with W GÓRĘ/+ or W DÓŁ/-. Naciskać TRYB.
- Dostosuj minuty alarmu za pomocą W GÓRĘ/+ or W DÓŁ/-. Naciskać TRYB.
- To activate/deactivate the alarm, look for a dedicated alarm ON/OFF button or press W GÓRĘ/+ or W DÓŁ/- while the alarm time is displayed (not flashing). An alarm icon will appear on the display when active.
5.4 Funkcja radia
The clock includes a built-in radio. Specific operation details may vary, but generally:
- Press a dedicated RADIO button or cycle through modes using the TRYB button until the radio frequency is displayed.
- Używać W GÓRĘ/+ or W DÓŁ/- to tune to desired stations.
- Some models may have auto-scan or preset functions. Refer to on-screen prompts if available.
5.5 Wyświetlacz temperatury
The clock automatically displays the ambient temperature. Some models may allow switching between Celsius (°C) and Fahrenheit (°F). Look for a dedicated button or a setting within the MODE cycle to change the temperature unit.
6. Konserwacja
6.1 Czyszczenie
Aby wyczyścić zegar, delikatnie przetrzyj wyświetlacz iasing with a soft, dry, lint-free cloth. Do not use abrasive cleaners, solvents, or spray directly onto the clock.
6.2 Wymiana baterii
If using batteries for backup, replace them when the display dims or functions become erratic. Ensure to use fresh AAA batteries and dispose of old batteries responsibly.
7. Rozwiązywanie Problemów
| Problem | Możliwa przyczyna | Rozwiązanie |
|---|---|---|
| Wyświetlacz jest pusty lub przyciemniony. | No power, low batteries, or power adapter issue. | Check AC power connection. Replace AAA batteries. Ensure power outlet is functional. |
| Zegar nie wskazuje dokładnego czasu. | Incorrect initial setting, power interruption. | Reset the time following Section 5.1. Ensure stable power supply. |
| Alarm nie włącza się. | Alarm not activated, incorrect alarm time, low volume. | Verify alarm is ON (alarm icon displayed). Check alarm time setting. Adjust volume if applicable. |
| Radio not working or poor reception. | Poor signal, antenna not extended (if applicable), incorrect frequency. | Adjust clock position. Extend any external antenna. Rescan for stations. |
8. Specyfikacje
| Funkcja | Szczegół |
|---|---|
| Model | ZXTL-13A |
| Marka | Kumpel |
| Typ wyświetlacza | Cyfrowa dioda LED |
| Funkcje | Time, Date, Day, Temperature, Alarm, Radio |
| Źródło zasilania | Battery Powered (AAA), AC Adapter |
| Tworzywo | Metal |
| Typ montażu | Uchwyt ścienny, biurko/półka |
| Wymiary opakowania | Wymiary 20 x 9 x 8.6 cm |
| Waga | 420 gramów |
9. Gwarancja i wsparcie
For warranty information or technical support, please refer to the documentation included with your purchase or contact Crony customer service directly. Keep your proof of purchase for warranty claims.
Aby uzyskać dalszą pomoc, odwiedź oficjalną stronę producenta webodwiedź witrynę lub skontaktuj się z ich kanałami wsparcia.