
1. Wprowadzenie
The Aerocool LUXPRO550 is a 550W power supply unit designed for desktop computers, offering reliable and efficient power delivery. This unit is 80 Plus 230V EU Bronze certified, ensuring over 88% efficiency. It features high-quality 105°C Japanese capacitors and a 14cm FDB fan for enhanced durability and optimized thermal performance. This manual provides essential information for the safe and correct installation, operation, and maintenance of your LUXPRO550 power supply.

Image 1.1: The Aerocool LUXPRO550 Power Supply Unit, highlighting its high efficiency and 80 Plus Bronze certification.
2. Środki ostrożności
- Przed instalacją lub demontażem zasilacza należy zawsze odłączyć przewód zasilający od gniazdka ściennego.
- Nie otwierać zasilacza casing. Wysoka objętośćtagWewnątrz znajdują się ładunki elektryczne, które mogą spowodować porażenie prądem.
- Zapewnij właściwe uziemienie, aby zapobiec zagrożeniom elektrycznym.
- Zasilacz należy zainstalować w dobrze wentylowanym pomieszczeniu, z dala od źródeł ciepła i wilgoci.
- Należy używać wyłącznie kabli dostarczonych wraz z zasilaczem.
- Ten produkt jest przeznaczony wyłącznie do użytku w systemach komputerowych. Nie należy go używać do żadnych innych celów.
3. Instrukcja instalacji
The LUXPRO550 power supply supports all Intel ATX12V formats and features flat, black cables for optimized internal airflow and ease of installation.
3.1. Przygotowanie do instalacji
- Wyłącz komputer i odłącz przewód zasilający od gniazdka ściennego.
- Otwórz obudowę komputera. Szczegółowe instrukcje znajdziesz w instrukcji obsługi obudowy komputera.
- Jeśli wymieniasz istniejący zasilacz, odłącz wszystkie kable od starego zasilacza i wyjmij go z obudowy.
3.2. Instalowanie zasilacza
- Carefully place the LUXPRO550 into the power supply bay of your computer case.
- Secure the power supply to the case using the provided screws.
- Connect the 20+4 pin ATX motherboard power connector to your motherboard.
- Connect the 4+4 pin CPU power connector to your motherboard.
- Connect SATA power connectors to your storage drives (HDDs, SSDs) and optical drives.
- Connect PCIe 6+2 pin connectors to your graphics card(s) if required.
- Connect any other peripheral connectors (e.g., Molex) as needed for case fans or other components.
- Ensure all connections are secure. Use cable ties to manage cables for better airflow.
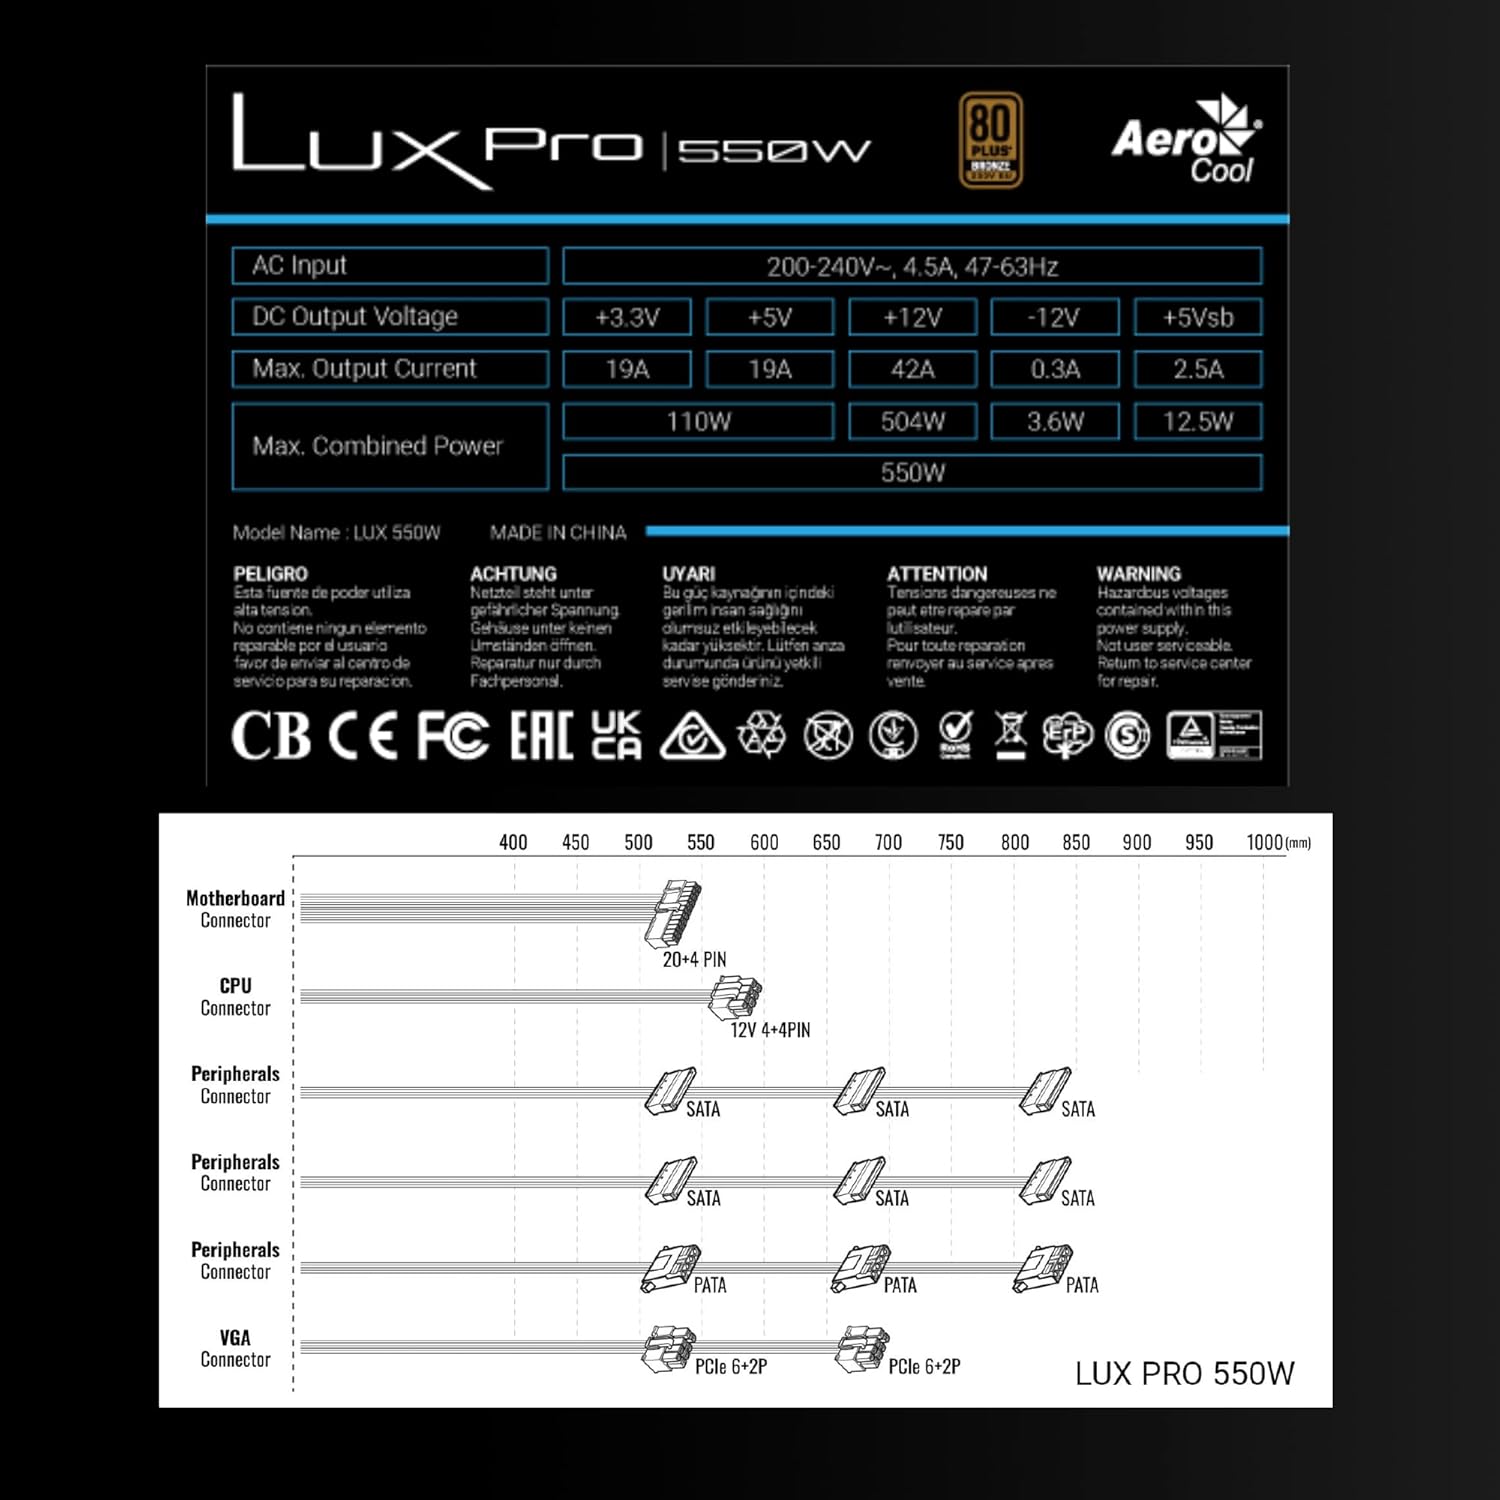
Image 3.1: Connector types and lengths for the LUXPRO550 power supply. This diagram illustrates the available connectors including Motherboard (20+4 PIN), CPU (12V 4+4 PIN), Peripherals (SATA, PATA), and VGA (PCIe 6+2 PIN).
3.3. Ostatnie kroki
- Zamknij obudowę komputera.
- Podłącz przewód zasilający do zasilacza, a następnie do gniazdka ściennego.
- Przełącz wyłącznik zasilania z tyłu zasilacza na pozycję „ON”.
- Włącz komputer.
4. Instrukcja obsługi
The Aerocool LUXPRO550 is designed for continuous and stable operation once correctly installed. Its 80 Plus Bronze certification ensures high energy efficiency, reducing power consumption and heat generation.
4.1. Active PFC Technology
The integrated Active Power Factor Correction (APFC) technology ensures efficient and reliable power distribution, contributing to overall system stability and energy savings.
4.2. Działanie wentylatora
The 14cm FDB (Fluid Dynamic Bearing) fan features optimized thermal speed control. It operates silently, starting at less than 700 RPM, and only increases speed as the load approaches 40% at ambient temperatures of 25°C, ensuring quiet operation under typical loads.

Image 4.1: The 14cm FDB fan of the LUXPRO550, illustrating its optimized thermal speed control for efficient cooling.
5. Konserwacja
The LUXPRO550 is built with high-quality components, including 105°C Japanese capacitors, designed for maximum reliability and a long operational lifespan with minimal maintenance.

Image 5.1: High-quality 105°C Japanese capacitors, contributing to the power supply's reliability and extended lifespan.
5.1. Ogólna opieka
- Keep the power supply and computer case free from dust. Dust accumulation can hinder cooling and reduce efficiency.
- Use compressed air to gently clean the fan and ventilation grilles periodically. Ensure the computer is powered off and unplugged before cleaning.
- Do not obstruct the airflow around the power supply.
Wewnątrz nie ma żadnych części, które mogłyby zostać naprawione przez użytkownika. Nie próbuj otwierać ani naprawiać urządzenia samodzielnie.
6. Rozwiązywanie Problemów
If you encounter issues with your LUXPRO550 power supply, please follow these basic troubleshooting steps:
- Brak zasilania:
- Upewnij się, że przewód zasilający jest prawidłowo podłączony do zasilacza i gniazdka ściennego.
- Sprawdź, czy wyłącznik zasilania z tyłu zasilacza jest w pozycji „ON”.
- Sprawdź, czy gniazdko ścienne działa prawidłowo, podłączając do niego inne urządzenie.
- System się nie uruchamia:
- Double-check all power connections to the motherboard, CPU, graphics card, and storage devices.
- Ensure all components are properly seated in their slots.
- If possible, test the power supply with another known working system or test another power supply with your system to isolate the issue.
- Nietypowe dźwięki:
- A slight hum is normal. If you hear grinding or loud fan noises, ensure the fan is not obstructed by cables or dust.
- Jeśli hałas nadal występuje, skontaktuj się z obsługą klienta.
If these steps do not resolve the issue, please contact Aerocool customer support or your retailer for further assistance. Do not attempt to repair the unit yourself.
7. Specyfikacje
| Funkcja | Specyfikacja |
|---|---|
| Nazwa modelu | LUXPRO550 |
| Marka | AeroCool |
| Cotage | 550 watów |
| Certyfikacja efektywności | 80 Plus Bronze 230V EU (over 88% efficiency) |
| Współczynnik kształtu | ATX |
| Kondensatory | Japanese 105°C |
| Typ wentylatora | 14cm FDB (Fluid Dynamic Bearing) with thermal speed control |
| PFC | Aktywny PFC |
| Wymiary (dł. x szer. x wys.) | Wymiary 16 x 15 x 8.5 cm |
| Waga | 1.4 kilogramów |
| Kompatybilne urządzenia | PC |
7.1. Wyjście DC Objtage Tabela
The following table details the DC output voltages and maximum currents for the LUXPRO550:
| Objętość wyjścia prądu stałegotage | +3.3 V | +5 V | +12 V | -12V | +5Vsb |
|---|---|---|---|---|---|
| Max. Prąd wyjściowy | 19A | 19A | 42A | 0.3A | 2.5A |
| Maks. Połączona moc | 110 W | 504 W | 3.6 W | 12.5 W | |
| Total Combined Power | 550 W | ||||
8. Gwarancja i wsparcie
8.1. Informacje o gwarancji
The Aerocool LUXPRO550 power supply comes with an extended 5-letnia gwarancja, reflecting its high reliability and the quality of its components, such as the 105°C Japanese capacitors.
Proszę zachować dowód zakupu na potrzeby roszczeń gwarancyjnych.
8.2. Obsługa klienta
For technical assistance, warranty claims, or any questions regarding your Aerocool LUXPRO550 power supply, please contact Aerocool customer support through their official weblub u lokalnego sprzedawcy.
Do not attempt to open or repair the power supply unit, as this will void the warranty.