
1. Wprowadzenie
This manual provides detailed instructions for the setup, operation, maintenance, and troubleshooting of your Sharkoon Light² 200 Gaming Mouse. Please read this manual thoroughly before using the device to ensure optimal performance and longevity.
2. Zawartość opakowania
Sprawdź, czy w opakowaniu znajdują się wszystkie elementy:
- Sharkoon Light² 200 Gaming Mouse
- Interchangeable Solid Top Cover (7g)
- Set of Replacement PTFE Glide Feet
- Instrukcja obsługi
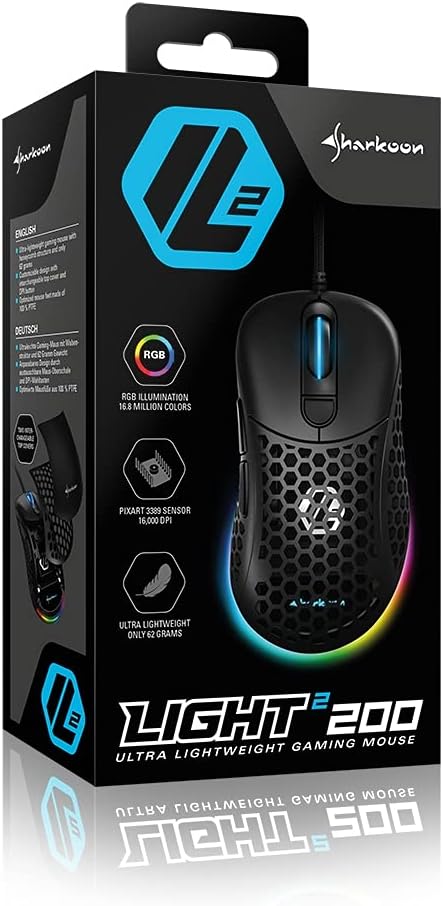
Image: The retail packaging for the Sharkoon Light² 200 Gaming Mouse, showing the mouse and its key features.
3. Konfiguracja
3.1 Podłączanie myszy
- Unpack the Sharkoon Light² 200 Gaming Mouse from its packaging.
- Podłącz wtyczkę USB myszy do wolnego portu USB w komputerze.
- System operacyjny automatycznie wykryje i zainstaluje niezbędne sterowniki.

Image: The Sharkoon Light² 200 Gaming Mouse with its USB cable, ready for connection to a computer.
3.2 Instalacja oprogramowania
For full customization and access to all features, download and install the Sharkoon gaming software from the official Sharkoon website. The software allows for DPI adjustments, button programming, and RGB lighting control.
- Visit the official Sharkoon webstrona.
- Navigate to the support or downloads section for the Light² 200 Gaming Mouse.
- Download the latest version of the gaming software.
- Aby dokończyć instalację, postępuj zgodnie z instrukcjami wyświetlanymi na ekranie.
4. Korzystanie z myszy
4.1 Podstawowe funkcje
The Light² 200 features standard mouse buttons and a scroll wheel:
- Lewy przycisk myszy: Główny przycisk akcji.
- Kliknij prawym przyciskiem myszy: Drugorzędny przycisk akcji, zwykle dla menu kontekstowych.
- Kółko przewijania: For vertical scrolling. Can also be pressed for a middle-click function.
- Przyciski boczne: Two buttons located on the left side, typically for 'forward' and 'back' navigation.
- Przycisk DPI: Located behind the scroll wheel, used to cycle through DPI settings.

Obraz: Bok view of the Sharkoon Light² 200 Gaming Mouse, highlighting the two programmable side buttons and the honeycomb structure.
4.2 Regulacja DPI
The optical PixArt sensor supports up to 16,000 DPI. You can adjust the DPI sensitivity using the dedicated DPI button behind the scroll wheel or through the Sharkoon gaming software. The RGB lighting on the scroll wheel and rear of the mouse indicates the current DPI profile.
4.3 programowalne przyciski
The Light² 200 features six programmable buttons. Use the Sharkoon gaming software to assign custom functions, macros, or key bindings to these buttons for an optimized gaming experience.
4.4 Personalizacja oświetlenia RGB
The mouse features adjustable RGB illumination on the scroll wheel and the back end. The gaming software allows you to customize colors, effects, and brightness to match your preferences or gaming setup.
4.5 Modular Design: Changing the Top Cover
The Light² 200 has a modular design, allowing you to change the top surface. The default honeycomb top cover can be replaced with a closed 7-gram alternative for a different feel or aesthetic.
- Gently lift the rear edge of the honeycomb top cover to detach it. It is held by magnets.
- Align the replacement solid top cover with the mouse body and gently press it down until the magnets secure it in place.

Image: The Sharkoon Light² 200 Gaming Mouse with its honeycomb top cover removed, revealing the internal structure and magnetic attachment points.
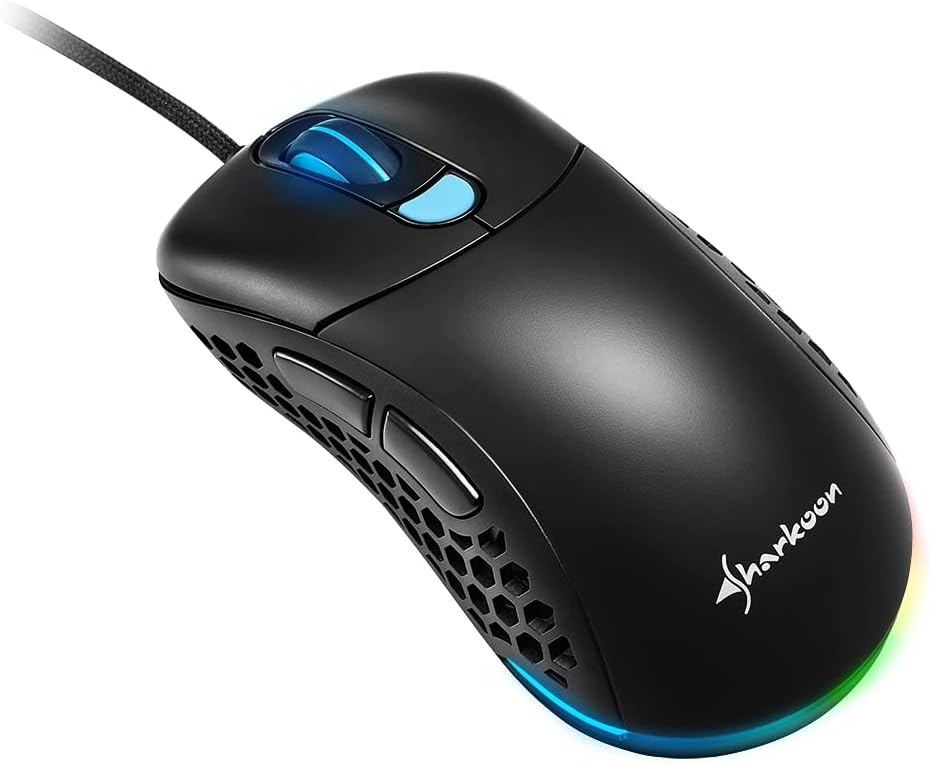
Image: The Sharkoon Light² 200 Gaming Mouse with the alternative solid top cover installed, providing a different aesthetic and feel.
5. Konserwacja
5.1 Czyszczenie myszy
Aby zachować optymalną wydajność, regularnie czyść mysz:
- Odłącz mysz od komputera.
- Do czyszczenia powierzchni myszy należy używać miękkiej, suchej ściereczki.
- W przypadku uporczywych zabrudzeń, delikatnieampPrzetrzyj ściereczkę wodą lub delikatnym środkiem czyszczącym. Unikaj silnych środków chemicznych.
- Use compressed air to clear dust from the honeycomb structure and around buttons.
- Clean the optical sensor area with a cotton swab lightly dampnasączone alkoholem izopropylowym.
5.2 Replacing PTFE Glide Feet
The PTFE glide feet ensure smooth movement. If they become worn, replace them using the included spare set:
- Ostrożnie zdejmij stare nóżki PTFE za pomocą cienkiego, nieściernego narzędzia.
- Clean the surface where the feet were attached to ensure no residue remains.
- Peel the new PTFE feet from their backing and carefully apply them to the corresponding areas on the mouse's underside.
- Dociśnij mocno, aby zapewnić odpowiednią przyczepność.

Image: The underside of the Sharkoon Light² 200 Gaming Mouse, showing the optical sensor, the DPI switch, and the four white PTFE glide feet.
6. Rozwiązywanie Problemów
- Mysz nie odpowiada:
- Ensure the USB cable is securely connected to a working USB port.
- Try connecting the mouse to a different USB port or another computer to rule out port or system issues.
- Zrestartuj swój komputer. - Ustawienia DPI nie ulegają zmianie:
- Ensure the Sharkoon gaming software is installed and running.
- Check if the DPI button is functioning correctly. - Oświetlenie RGB nie działa lub jest nieprawidłowe:
- Verify that the Sharkoon gaming software is installed and that lighting settings are configured correctly.
- Ensure the mouse is properly connected. - Mouse movement is erratic or imprecise:
- Wyczyść czujnik optyczny znajdujący się na spodzie myszy.
- Ensure you are using the mouse on a suitable surface (e.g., a mouse pad).
- Check for any physical obstructions around the sensor. - Przyciski nie reagują:
- Check button assignments in the Sharkoon gaming software.
- Ensure no physical debris is obstructing the button mechanism.
7. Specyfikacje
| Funkcja | Szczegół |
|---|---|
| Nazwa modelu | Światło² 200 |
| Numer modelu przedmiotu | 4044951029013 |
| Wymiary produktu | 4.72 x 2.6 x 1.65 cala (120 x 66 x 42 mm) |
| Waga przedmiotu | 2.19 uncji (62 grama) |
| Technologia wykrywania ruchu | Optical (PixArt Sensor) |
| Maksymalna rozdzielczość | 16,000 DPI |
| Programowalne przyciski | 6 |
| Technologia łączności | USB |
| Funkcja specjalna | RGB LED Lights, Modular Design |
| Producent | Technologie Sharkoona |
8. Gwarancja i wsparcie
8.1 Informacje o gwarancji
Sharkoon products are covered by a manufacturer's warranty against defects in materials and workmanship. The specific warranty period and terms may vary by region. Please retain your proof of purchase for warranty claims.
8.2 Wsparcie techniczne
For technical assistance, driver downloads, or further information, please visit the official Sharkoon webstrona:
- Webstrona: www.sharkoon.com
You may also find FAQs and troubleshooting guides on their support pages.