1. Wprowadzenie i informacje dotyczące bezpieczeństwa
Thank you for choosing the ANENG V8 Digital Multimeter. This device is designed for safe and accurate measurement of AC/DC voltage, AC/DC current, resistance, capacitance, frequency, temperature, diode, continuity, and battery testing. Please read this manual thoroughly before use to ensure proper operation and to prevent potential hazards.
1.1 Środki ostrożności
- Zawsze upewnij się, że multimetr jest w dobrym stanie technicznym przed użyciem. Sprawdź przewody pomiarowe pod kątem uszkodzeń.
- Nie stosować objętościtage or current that exceeds the maximum rated values for the multimeter.
- Zachowaj szczególną ostrożność podczas pracy z voltagnapięcia powyżej 36 V DC lub 25 V AC RMS, ponieważ może to stwarzać ryzyko porażenia prądem.
- Zawsze odłączaj zasilanie obwodu i rozładuj wszystkie ładunki wysokiego napięcia.tagPrzed pomiarem rezystancji, ciągłości, diod lub pojemności wyjmij kondensatory.
- Przed podłączeniem przewodów pomiarowych do obwodu należy upewnić się, że przełącznik obrotowy jest ustawiony we właściwej pozycji dla żądanego pomiaru.
- Nie należy używać multimetru w środowisku zagrożonym wybuchem gazów, oparów lub pyłu.
- Aby zapewnić dokładne odczyty, należy natychmiast wymienić baterie, gdy tylko pojawi się wskaźnik niskiego poziomu naładowania baterii.
2. Koniec produktuview
2.1 Zawartość opakowania
The ANENG V8 Digital Multimeter package typically includes the following items:
- ANENG V8 Digital Multimeter
- Przewody pomiarowe (czerwony i czarny)
- Sonda temperatury
- Etui transportowe
- Instrukcja obsługi

Image: ANENG V8 Digital Multimeter with its standard accessories, including test leads, a temperature probe, and a protective carrying case.
2.2 Sterowanie i wyświetlacz
The multimeter features an 8000-count LCD backlight display for clear readings in various lighting conditions. Key controls include a rotary switch for function selection and buttons for range, data hold, and other features.

Obraz: Szczegółowy view of the multimeter's front panel, highlighting the LCD screen, the central rotary selector, and various control buttons.
3. Konfiguracja
3.1 Instalacja baterii
The ANENG V8 Digital Multimeter is powered by batteries. To install or replace batteries:
- Upewnij się, że multimetr jest wyłączony i odłącz wszystkie przewody pomiarowe.
- Znajdź pokrywę komory baterii z tyłu urządzenia.
- Za pomocą śrubokręta poluzuj śrubę(y) mocującą(e) pokrywę baterii.
- Zdejmij pokrywę.
- Insert new batteries, observing the correct polarity (+ and -) as indicated inside the compartment. The device typically uses AA batteries.
- Załóż pokrywę baterii i zabezpiecz ją śrubą(ami).
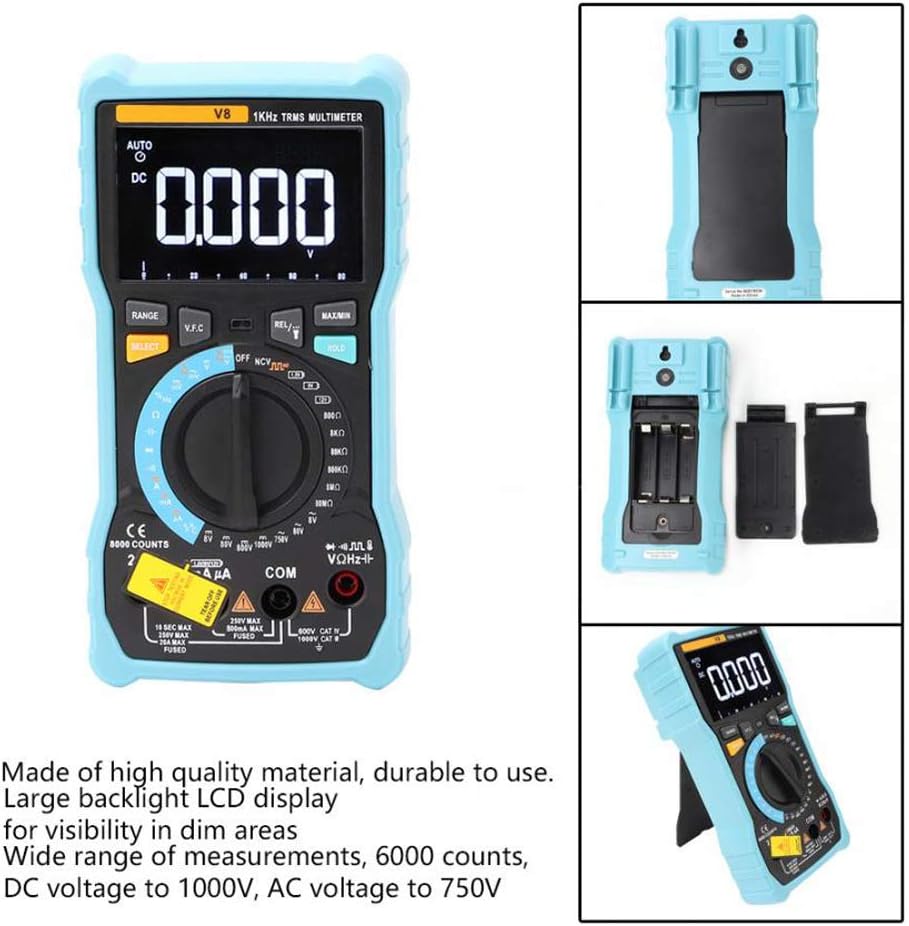
Zdjęcie: Tył view of the multimeter with the battery compartment open, illustrating the correct placement for three AA batteries.
4. Instrukcja obsługi
Before any measurement, ensure the test leads are correctly inserted into the input jacks and the rotary switch is set to the appropriate function.
4.1 Pomiar objętości prądu stałego/przemiennegotage
- Set the rotary switch to the 'V–' (DC Voltage) lub 'V~' (AC Voltage) stanowisko.
- Connect the red test lead to the 'VΩmA' jack and the black test lead to the 'COM' jack.
- Podłącz przewody pomiarowe równolegle do obwodu lub elementu, który chcesz zmierzyć.
- Przeczytaj tomtage wartość na wyświetlaczu.
4.2 Measuring DC/AC Current
- Set the rotary switch to the 'A–' (DC Current) or 'A~' (AC Current) position. For milliampere (mA) lub mikroampere (µA) measurements, select the corresponding range.
- For current up to 800mA, connect the red test lead to the 'VΩmA' jack. For current up to 20A, connect the red test lead to the '20A' jack. Connect the black test lead to the 'COM' jack.
- Disconnect power to the circuit. Open the circuit where you want to measure current. Connect the multimeter in series with the circuit.
- Podłącz zasilanie do obwodu i odczytaj wartość prądu na wyświetlaczu.
4.3 Pomiar rezystancji
- Ustaw przełącznik obrotowy w pozycji „Ω” (rezystancja).
- Connect the red test lead to the 'VΩmA' jack and the black test lead to the 'COM' jack.
- Ensure the circuit is de-energized and all capacitors are discharged. Connect the test leads across the component to be measured.
- Odczytaj wartość rezystancji z wyświetlacza.
4.4 NCV (objętość bezkontaktowa)tage) Wykrywanie
- Ustaw przełącznik obrotowy w pozycji „NCV”.
- Move the top end of the multimeter near the conductor or outlet.
- The multimeter will emit an audible beep and the NCV indicator light will flash if AC voltagwykryto e, co wskazuje na obecność żywej objętościtage bez kontaktu fizycznego.
4.5 Pomiar temperatury
- Ustaw przełącznik obrotowy w pozycji „°C/°F” (temperatura).
- Connect the temperature probe to the 'VΩmA' and 'COM' jacks, observing polarity if applicable.
- Umieść końcówkę sondy temperatury na obiekcie, którego temperaturę chcesz zmierzyć, lub w jego pobliżu.
- Odczytaj wartość temperatury na wyświetlaczu.
4.6 Inne funkcje
- Pojemność: Set the rotary switch to the 'F' position. Connect leads across the discharged capacitor.
- Częstotliwość/Cykl pracy: Set the rotary switch to the 'Hz/%' position. Connect leads to the signal source.
- Test diody: Set the rotary switch to the 'Diode' position. Connect leads across the diode.
- Test ciągłości: Set the rotary switch to the 'Continuity' position. Connect leads across the circuit. An audible beep indicates continuity.
- Test baterii: Set the rotary switch to the 'Battery' position. Connect leads to the battery terminals (1.5V, 9V, or 12V).
- Przechowywanie danych: Naciśnij przycisk „HOLD”, aby zamrozić aktualny odczyt na wyświetlaczu. Naciśnij ponownie, aby zwolnić.
- Podświetlenie/Latarka: Press the backlight button to turn on/off the display backlight or flashlight.
- Automatyczne wyłączanie: Multimetr wyłączy się automatycznie po pewnym okresie bezczynności w celu oszczędzania baterii.
5. Konserwacja
5.1 Czyszczenie
Wyczyść obudowę za pomocą reklamyamp Ściereczką i łagodnym detergentem. Nie używaj środków ściernych ani rozpuszczalników. Utrzymuj zaciski wejściowe w czystości i bez wilgoci.
5.2 Wymiana bezpiecznika
Jeśli funkcja pomiaru prądu nie działa, bezpiecznik może wymagać wymiany. Sprawdź specyfikację, aby uzyskać informacje o prawidłowym typie i parametrach bezpiecznika. Wymianę bezpiecznika powinien wykonywać wyłącznie wykwalifikowany personel.
5.3 Przechowywanie
When not in use for extended periods, remove the batteries to prevent leakage and store the multimeter in a dry, cool place.
6. Rozwiązywanie Problemów
- Brak wyświetlacza: Sprawdź instalację i ładowanie baterii. W razie potrzeby wymień baterie.
- Nieprawidłowe odczyty: Ensure the rotary switch is set to the correct function and range. Check test lead connections. Verify battery charge.
- Pomiar prądu nie działa: Check the fuse. Replace if blown (refer to fuse replacement section).
- NCV nie wykrywa: Ensure the NCV function is selected and the multimeter is close enough to the AC voltagŹródło.
7. Specyfikacje
| Parametr | Wartość |
|---|---|
| Wyświetlacz | 8000-cyfrowy wyświetlacz LCD z podświetleniem |
| Objętość DCtagmi (V) | 8.000V / 80.00V / 800.0V / 1000V |
| Objętość DCtage (mV) | 800mV |
| AC Objętośćtagmi (V) | 8.000 V / 80.00 V / 750 V. |
| AC Objętośćtage (mV) | 800mV |
| Prąd stały (A) | 8.000A / 20.00A |
| Prąd DC (mA) | 8.000mA / 80.00mA / 800.0mA |
| Prąd stały (µA) | 800µA / 8000µA |
| Prąd przemienny (A) | 8.000A / 20.00A |
| Prąd AC (mA) | 8.000mA / 80.00mA / 800.0mA |
| Prąd przemienny (µA) | 800µA / 8000µA |
| Opór | 800.0Ω / 8.000kΩ / 80.00kΩ / 800.0kΩ / 8.000MΩ / 80.00MΩ |
| Pojemność | 9.999nF / 99.99nF / 999.9nF / 9.999µF / 99.99µF / 999.9µF / 9.999mF / 99.99mF |
| Częstotliwość | 9.999 Hz / 99.99 Hz / 999.9 Hz / 9.999 kHz / 99.99 kHz / 999.9 kHz / 9.999 MHz |
| Cykl pracy | 1% ~ 99% |
| Zakres temperatur | -20°C ~ 1000°C (-4°F ~ 1832°F) |
| Test baterii | 1.5 V / 9 V / 12 V. |
| Nośny | Auto / Manual |
| Aktualizuj częstotliwość | 3 razy / sekundę |
| Prawdziwy RMS | Tak |
| Wstrzymanie danych | Tak |
| Podświetlenie/latarka | Tak |
| Alert niskiego poziomu baterii | Tak |
| Automatyczne wyłączanie zasilania | Tak |
| Tworzywo | ABS / PVC |
| Źródło zasilania | Zasilany bateryjnie |
8. Gwarancja i wsparcie
This product is covered by a standard manufacturer's warranty against defects in materials and workmanship. Please refer to the warranty card included with your purchase for specific terms and conditions. For technical support or service inquiries, please contact your retailer or the manufacturer's customer service department.
9. Oficjalne filmy o produktach
W chwili obecnej nie ma możliwości osadzenia oficjalnych filmów produktu od sprzedawcy.