1. Wprowadzenie
Thank you for choosing the Homcloud Wi-Fi LED Strip Controller, Model AS-SL1. This device allows you to control 12-24V RGB + White LED strips via Wi-Fi, offering smart lighting solutions for your home. This manual provides essential information for safe installation, operation, and maintenance of your controller. Please read it thoroughly before use and retain it for future reference.
2. Informacje dotyczące bezpieczeństwa
- Przed przystąpieniem do instalacji lub prac konserwacyjnych należy upewnić się, że zasilanie jest odłączone, aby zapobiec porażeniu prądem.
- This device is designed for indoor use only. Do not expose it to moisture or extreme temperatures.
- Use only with 12-24V DC power supplies and compatible RGB + White LED strips. Exceeding the specified voltage lub wattage (192 Watts max) can damage the device and LED strips.
- Do not attempt to open or modify the controller. This will void the warranty and may cause damage or injury.
- Przechowywać w miejscu niedostępnym dla dzieci.
- Ensure all wiring connections are secure and correctly polarized (positive to positive, negative to negative).
3. Zawartość opakowania
Proszę sprawdzić, czy w paczce znajdują się następujące elementy:
- Homcloud Wi-Fi LED Controller (AS-SL1)
- Instrukcja obsługi (ten dokument)
4. Koniec produktuview
The Homcloud AS-SL1 is a compact Wi-Fi controller designed to manage RGB + White LED strips. It features terminal blocks for secure wiring connections and an integrated Wi-Fi module for smart control via a mobile application or voice commands.
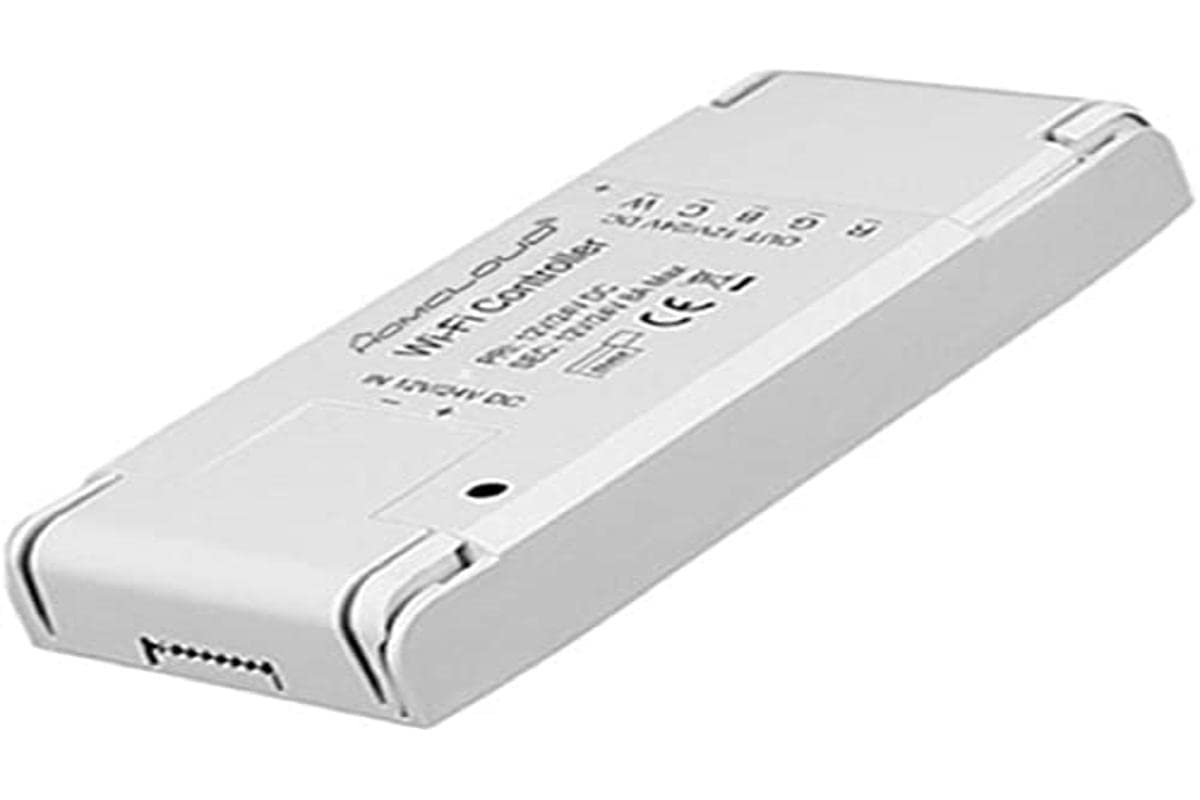
Rysunek 1: Homcloud Wi-Fi LED Strip Controller (AS-SL1). This image shows the compact design of the controller with its input and output terminals.
Główne cechy:
- Wi-Fi Connectivity (2.4GHz)
- Compatible with 12-24V RGB + White LED Strips
- App Control (via Homcloud app or compatible smart home platforms)
- Voice Control (compatible with smart assistants)
- Programmable Schedules and Timers
- Zdalny dostęp
5. Konfiguracja
5.1 Instalacja okablowania
- Przygotuj komponenty: Ensure you have your Homcloud Wi-Fi LED Controller, a compatible 12-24V DC power supply, and an RGB + White LED strip.
- Odłącz zasilanie: Before making any connections, ensure the power supply is unplugged from the mains.
- Connect Power Supply to Controller: Locate the input terminals on the controller (usually marked DC IN, V+, V- or similar). Connect the positive (+) output of your 12-24V DC power supply to the V+ terminal and the negative (-) output to the V- terminal. Ensure connections are secure.
- Connect LED Strip to Controller: Locate the output terminals on the controller (usually marked V+, R, G, B, W or similar). Connect the corresponding wires from your RGB + White LED strip to these terminals.
- LED Strip V+ to Controller V+
- LED Strip R to Controller R
- LED Strip G to Controller G
- LED Strip B to Controller B
- LED Strip W to Controller W
- Sprawdź połączenia: Double-check all wiring for correct polarity and secure connections. Loose connections can cause malfunctions or damage.
Note: A detailed wiring diagram is typically provided in the physical product packaging. Ensure you follow the specific wiring instructions for your LED strip and power supply.
5.2 Parowanie aplikacji
- Pobierz aplikację: Download the "Homcloud" app from your smartphone's app store (iOS or Android).
- Zarejestruj się/Zaloguj: Otwórz aplikację i zarejestruj nowe konto lub zaloguj się, używając istniejącego konta.
- Włącz kontroler: Plug in the power supply to the mains. The LED strip should light up briefly or flash, indicating it's in pairing mode. If not, refer to the app's instructions for resetting the device to pairing mode (often involves cycling power multiple times).
- Dodaj urządzenie: In the Homcloud app, tap the "+" icon (usually in the top right corner) to add a new device. Select "Lighting" or "LED Controller" from the device list.
- Połącz się z Wi-Fi: Follow the on-screen instructions to connect the controller to your 2.4GHz Wi-Fi network. Ensure your phone is also connected to the same 2.4GHz network during pairing.
- Pełne parowanie: Once the device is successfully added, you can rename it and begin controlling your LED strip through the app.
6. Instrukcja obsługi
6.1 Kontrola aplikacji
Once paired, the Homcloud app provides full control over your LED strip:
- Włącz/Wyłącz: Toggle the power button to turn the LED strip on or off.
- Wybór kolorów: Use the color wheel or predefined color palettes to choose any desired color for RGB LEDs.
- Regulacja światła białego: Adjust the brightness and color temperature (if supported by your LED strip) of the dedicated white LEDs.
- Kontrola jasności: Slide the brightness bar to adjust the intensity of the light.
- Tryby scen: Select from various pre-programmed scene modes (e.g., Party, Relax, Reading) or create custom scenes.
- Synchronizacja muzyki: Some apps offer music synchronization features, allowing the lights to react to sound.
- Timery i harmonogramy: Set schedules for the LED strip to turn on/off at specific times or activate certain scenes.
6.2 Sterowanie głosowe
The Homcloud AS-SL1 controller supports voice control through compatible smart assistants (e.g., Amazon Alexa, Google Assistant). To enable voice control:
- Połącz konto: In your smart assistant's app (e.g., Alexa app, Google Home app), search for the "Homcloud" skill or service.
- Autoryzować: Link your Homcloud account with your smart assistant account.
- Odkryj urządzenia: Ask your smart assistant to discover new devices. Your LED strip controller should appear.
- Polecenia głosowe: Możesz teraz używać poleceń głosowych takich jak:
- "Alexa, turn on [LED strip name]"
- "Hey Google, set [LED strip name] to blue"
- "Alexa, dim [LED strip name] to 50%"
7. Konserwacja
- Czyszczenie: Disconnect power before cleaning. Use a soft, dry cloth to wipe the controller. Do not use liquid cleaners or solvents.
- Środowisko: Ensure the controller is kept in a dry, indoor environment, away from direct sunlight, high temperatures, and corrosive substances.
- Znajomości: Okresowo sprawdzaj połączenia przewodów, aby mieć pewność, że są bezpieczne.
8. Rozwiązywanie Problemów
| Problem | Możliwa przyczyna | Rozwiązanie |
|---|---|---|
| Taśma LED nie świeci. | No power; incorrect wiring; faulty LED strip or power supply. | Check power connection. Verify all wiring connections (V+, V-, R, G, B, W). Test LED strip and power supply separately if possible. |
| Controller cannot connect to Wi-Fi. | Incorrect Wi-Fi password; 5GHz Wi-Fi network; controller not in pairing mode; weak Wi-Fi signal. | Ensure correct 2.4GHz Wi-Fi password. Confirm your router supports 2.4GHz. Reset controller to pairing mode (refer to app instructions). Move controller closer to router. |
| Sterowanie aplikacją nie odpowiada. | Poor Wi-Fi connection; app glitch; controller offline. | Check your home Wi-Fi network. Restart the Homcloud app. Power cycle the controller. |
| Sterowanie głosowe nie działa. | Smart assistant not linked to Homcloud account; device not discovered; incorrect voice command. | Ensure Homcloud skill/service is enabled and linked in your smart assistant app. Ask the assistant to discover devices. Use correct voice commands as listed in section 6.2. |
9. Specyfikacje
| Funkcja | Szczegół |
|---|---|
| Numer modelu | AS-SL1 |
| Marka | Homcloud |
| Wejście Voltage | 12-24 V prądu stałego |
| Maksymalna moc wyjściowa | 192 watów |
| Technologia bezprzewodowa | Wi-Fi (2.4 GHz) |
| Metoda kontroli | Kontrola aplikacji, sterowanie głosowe |
| Cechy specjalne | Voice control, remote access, programmable, timer functions |
| Środowisko użytkowania | Tylko do użytku wewnątrz pomieszczeń |
| Wymiary (dł. x szer. x wys.) | 0.01 x 0.01 x 0.01 cm (approx. 0.004 x 0.004 x 0.004 inches) - Note: These dimensions seem unusually small and might be placeholder data. |
| Waga | 10 gramy (ok. 0.35 uncji) |
| UPC | 700443260688 |
10. Gwarancja i wsparcie
Specific warranty information for the Homcloud AS-SL1 controller is not provided in the product details. For warranty claims or technical support, please contact your retailer or visit the official Homcloud website. Please have your model number (AS-SL1) and proof of purchase ready when contacting support.