
1. Koniec produktuview
The Walfront Single Phase Voltage Protector and Energy Meter is a multi-functional device designed to protect electrical circuits from overvoltage, podobjtage, and overcurrent conditions. It features an auto-recovery function, automatically restoring power once fault conditions return to normal. The integrated display provides real-time voltagodczyty prądu, energii i mocy.
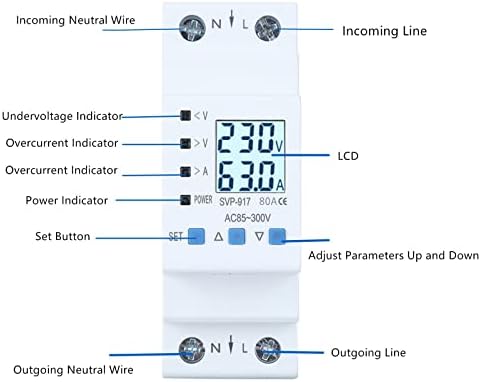
Rycina 1: Przód view of the Walfront Voltage Protector, highlighting the LCD display, undervoltage, przettage, and overcurrent indicators, as well as the 'SET' and adjustment buttons.
Główne cechy:
- Auto-Recovery Function: Automatically restores power after undervoltage or overcurrent faults are resolved.
- Wyczyść wyświetlacz: Wyświetlacz LCD pokazuje aktualną objętośćtage, prąd i moc.
- Wielorakie zabezpieczenia: Zawiera overvoltage, podobjtage i zabezpieczenie nadprądowe.
- Anti-Thunder Protection: Enhances device stability and safety.
- Trwała konstrukcja: Made from high-quality, flame-retardant materials for extended service life.
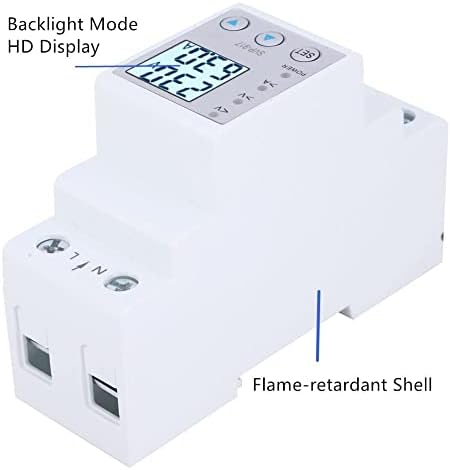
Rysunek 2: Strona view illustrating the flame-retardant shell of the device, contributing to its durability and safety.
2. Konfiguracja i instalacja
This device is designed for DIN rail mounting in an electrical panel. Proper installation by a qualified electrician is recommended to ensure safety and correct functionality.
2.1 Schemat okablowania
Connect the incoming neutral wire to the 'N' terminal and the incoming live wire to the 'L' terminal on the top of the device. Connect the outgoing neutral wire to the 'N' terminal and the outgoing live wire to the 'L' terminal on the bottom of the device. Ensure all connections are secure.
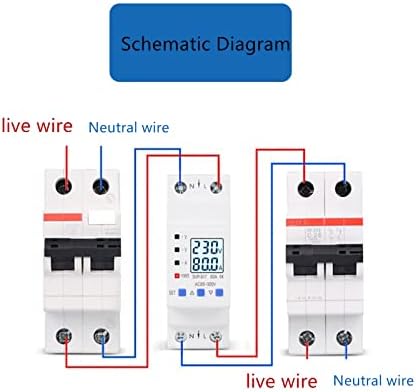
Figure 3: Wiring schematic. The device is installed between an incoming circuit breaker and an outgoing circuit breaker, with live and neutral wires connected to the respective 'L' and 'N' terminals.
2.2 Montaż
The device is designed for standard 35mm DIN rail mounting. Snap the device onto the DIN rail securely within your electrical enclosure.

Figure 4: The device mounted on a DIN rail within an electrical panel, demonstrating a typical installation scenario.
3. Instrukcja obsługi
Upon successful installation and power-up, the LCD will display real-time voltage and current. Use the 'SET' button and the up/down arrow buttons to navigate and adjust settings.
3.1 Wskaźniki wyświetlacza
- <V: Objętość poniżejtage wskaźnik.
- >V: Przepełnienietage wskaźnik.
- >A: Overcurrent indicator.
- MOC: Wskaźnik zasilania.
- LCD: Wyświetla objętośćtage (V), prąd (A) i moc (W).
3.2 Menu Settings and Parameters
Press the 'SET' button to enter the menu. Use the up (▲) and down (▼) arrow buttons to navigate through the settings and adjust values. Press 'SET' again to confirm a selection or value.
- DE (Device Mode): Controls the operational mode of the device.
- DE1: Przepełnienietage, podobjtage, and overcurrent protection with automatic switch off/on.
- DE2: Przepełnienietage, podobjtage, and overcurrent protection with automatic switch off/manual switch on.
- DE3: Przepełnienietage, podobjtage, and overcurrent protection disabled; output load switch remains off.
- DE4: Przepełnienietage, podobjtage, and overcurrent protection disabled; output load switch remains on.
- DE5: Przepełnienietage, podobjtage, and overcurrent protection disabled; output load switch cycles on/off (unit: seconds).
- Bg (Backlight Mode):
- Tryb 1: Backlight always on.
- Tryb 2: Backlight illuminates for 30 seconds after a button is pressed.
- SS (Start-up Delay): Delay time for load switch-on after input power is applied.
- Uo (Overvoltage Protection Value): Ustawia górną głośnośćtage granica.
- UoH (Overvoltage Recovery Value): Ustawia objętośćtage at which the device recovers after an overvoltagWydarzenie.
- UL (Undervoltage Protection Value): Ustawia dolną głośnośćtage granica.
- ULH (Undervoltage Recovery Value): Ustawia objętośćtage at which the device recovers after an undervoltagWydarzenie.
- SU (Voltage Fault Judgment Time): Time duration for judging overvoltage/poniżej objętościtagi usterek.
- Io (Overcurrent Protection Value): Sets the upper current limit.
- Ic (Malignant Load Protection Value): Pure Resistive Load limit.
- SI (Overcurrent Fault Judgment Time): Time duration for judging overcurrent faults.
- SH (Recovery Delay): Delay time setting for load recovery after an output load switch-off protection event.
- Op (Cycle Switch Off Delay): Delay time set for cycle switch off under function mode 5.
- CL (Cycle Switch On Delay): Delay time set for cycle switch on under function mode 5.
- Er1 (Error Records): Displays the last five records of protection reasons.
4. Konserwacja
The Walfront Voltage Protector is designed for minimal maintenance. However, regular checks can ensure optimal performance and longevity.
- Czyszczenie: Utrzymuj urządzenie w czystości i bez kurzu. Do czyszczenia używaj suchej, miękkiej ściereczki. Nie używaj płynnych środków czyszczących.
- Kontrola połączenia: Periodically inspect wiring connections to ensure they remain tight and free from corrosion. Loose connections can lead to overheating or intermittent operation.
- Warunki środowiskowe: Aby zapobiec uszkodzeniom, należy zadbać o to, aby urządzenie działało w określonych dla niego warunkach środowiskowych (temperatura, wilgotność).
5. Rozwiązywanie Problemów
If you encounter issues with your Walfront Voltage Protector, refer to the following common troubleshooting steps:
- Urządzenie nie włącza się:
- Sprawdź zasilanie wejściowe.
- Sprawdź, czy wszystkie połączenia okablowania są prawidłowe i bezpieczne.
- Ensure the main circuit breaker supplying the device is ON.
- Brak mocy wyjściowej:
- Check the display for active protection indicators (<V, >V, >A). If active, resolve the underlying voltage or current issue.
- Review the 'DE' (Device Mode) setting. Ensure it is not set to DE3 (output off) or DE5 (cycling).
- If in DE2 mode, a manual reset might be required after a fault.
- Check 'Er1' for recent protection reasons.
- Nieprawidłowe odczyty:
- Ensure the device is correctly wired and that the load is within its specified limits.
- Verify the device is the correct amperage (e.g., 80A model).
- Ustawienia nie zapisują się:
- Ensure you press the 'SET' button to confirm changes after adjusting a parameter.
6. Specyfikacje
| Specyfikacja | Wartość |
|---|---|
| Marka | Wallfront |
| Model | me791gt8nu-12 |
| Obecna ocena | 80 Amps |
| Typ wyłącznika automatycznego | Standard |
| Typ montażu | Montaż na szynie DIN |
| Liczba biegunów | 1 |
| Tomtage | Prąd zmienny 85-300 V |
6.1 Wymiary

Figure 5: Device dimensions, including front and side viewz pomiarami w centymetrach.
6.2 dostępne modele
The Walfront Voltage Protector is available in different current ratings.

Figure 6: Optional styles available, including 63A and 80A versions of the device.
7. Informacje o gwarancji
Walfront products are manufactured to high-quality standards. For specific warranty details, please refer to the product packaging or contact Walfront customer support. Typically, a limited warranty covers defects in materials and workmanship under normal use.
8. Obsługa klienta
For technical assistance, troubleshooting, or inquiries regarding your Walfront Voltage Protector, please visit the Walfront store on Amazon or contact their customer service directly. Contact information can usually be found on the product packaging or the official Walfront brand page.
Walfront Store Link: Visit the Walfront Store on Amazon