
1. Wprowadzenie i koniecview
The Escort EDM 1111A is a versatile digital multimeter designed for accurate measurement of various electrical parameters. This device is essential for electricians, technicians, and hobbyists for testing circuits, components, and power sources. It features a clear digital display and a rotary dial for selecting different measurement functions.

The Escort EDM 1111A Digital Multimeter with red and black test leads connected, ready for use.
Główne funkcje obejmują:
- Objętość DCtage (DCV) measurement
- AC Objętośćtage (ACV) measurement
- DC Current (DCA) measurement
- AC Current (ACA) measurement
- Pomiar rezystancji (Ω)
- Capacitance (CX) measurement
- Diode and Transistor (hFE) testing
2. Konfiguracja
2.1 Instalacja baterii
The Escort EDM 1111A requires a DC 9V 006P battery for operation. To install or replace the battery:
- Upewnij się, że multimetr jest wyłączony.
- Znajdź komorę baterii z tyłu urządzenia.
- Carefully slide open or unscrew the battery cover.
- Insert a new 9V 006P battery, observing the correct polarity (+/-).
- Załóż ponownie pokrywę baterii.

Tył view of the Escort EDM 1111A Digital Multimeter, showing the battery compartment cover and the product label.
2.2 Podłączanie przewodów pomiarowych
The multimeter comes with two test leads, typically one red (positive) and one black (negative/common). Proper connection is crucial for accurate and safe measurements.
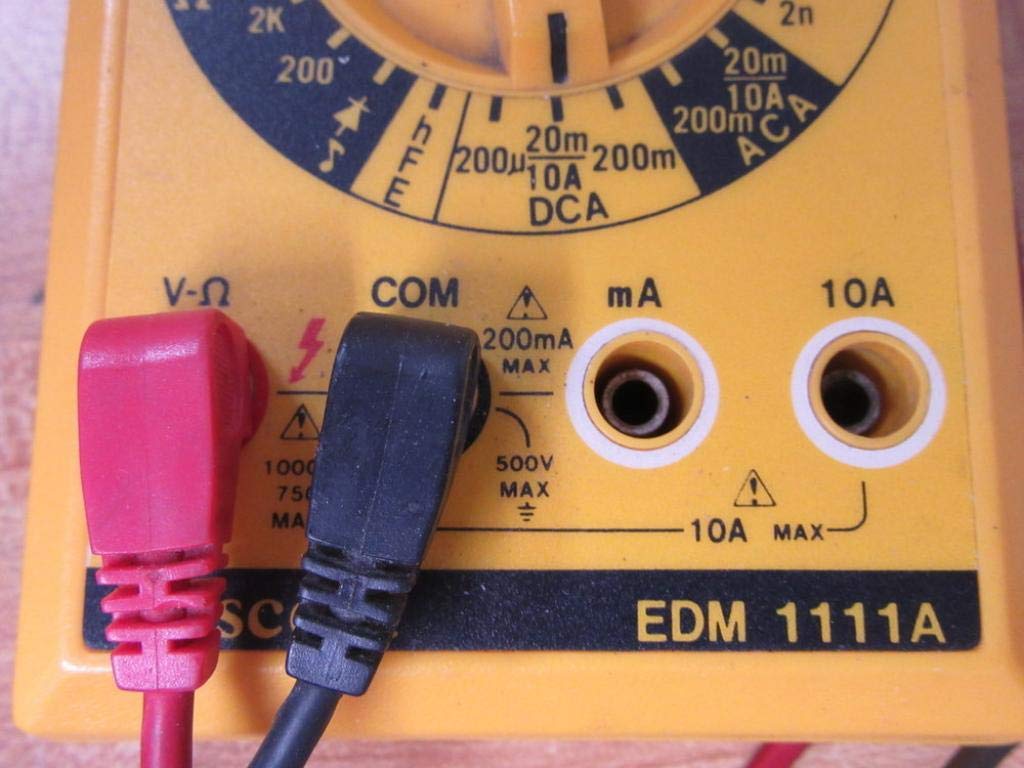
- Dla większości tomówtage, resistance, and low current measurements, connect the black lead to the 'COM' (Common) jack.
- Connect the red lead to the 'V-Ω-mA' jack for voltage, resistance, and milliampobecne pomiary.
- Do pomiarów dużego natężenia prądu (do 10 A) podłącz czerwony przewód do gniazda „10A”. Always ensure the correct jack is used to prevent damage to the meter or circuit.

A closer look at the input jacks (V-Ω, COM, mA, 10A) and the lower portion of the rotary dial, indicating current measurement ranges.

The red and black test probes (leads) used with the Escort EDM 1111A Digital Multimeter, featuring pointed tips for electrical contact.
3. Instrukcja obsługi
Before taking any measurements, ensure the test leads are correctly connected and the rotary dial is set to the appropriate function and range.

Szczegółowy view of the rotary selector dial on the Escort EDM 1111A Digital Multimeter, displaying various measurement functions such as DCV, ACV, Ω, DCA, ACA, and CX.
3.1 Pomiar objętości prądu stałegotage (prąd stały)
- Set the rotary dial to the desired DCV range (e.g., 200m, 2, 20, 200, 1000). Choose a range higher than the expected voltage.
- Connect the red lead to the positive (+) side of the circuit and the black lead to the negative (-) side.
- Przeczytaj tomtage wartość na wyświetlaczu.
3.2 Pomiar objętości prądu przemiennegotage (ACV)
- Set the rotary dial to the desired ACV range (e.g., 200m, 2, 20, 200, 750). Choose a range higher than the expected voltage.
- Podłącz przewody pomiarowe do obwodu prądu przemiennegotage source. Polarity does not matter for AC voltage.
- Przeczytaj tomtage wartość na wyświetlaczu.
3.3 Pomiar rezystancji (Ω)
- Przed pomiarem rezystancji należy upewnić się, że obwód lub element jest odłączony od napięcia.
- Set the rotary dial to the desired Ω range (e.g., 200, 2K, 20K, 200K, 2M, 20M, 200M).
- Podłącz przewody pomiarowe do mierzonego elementu.
- Odczytaj wartość rezystancji z wyświetlacza.
3.4 Measuring DC Current (DCA)
- Upewnij się, że obwód jest odłączony od napięcia.
- Set the rotary dial to the desired DCA range (e.g., 200µ, 2m, 20m, 200m, 10A).
- Ważny: For currents up to 200mA, use the 'V-Ω-mA' jack for the red lead. For currents up to 10A, use the '10A' jack.
- Break the circuit and connect the multimeter in series with the load. The current must flow through the multimeter.
- Ponownie włącz obwód i odczytaj wartość prądu.
3.5 Measuring AC Current (ACA)
- Upewnij się, że obwód jest odłączony od napięcia.
- Set the rotary dial to the desired ACA range (e.g., 200µ, 2m, 20m, 200m, 10A).
- Ważny: For currents up to 200mA, use the 'V-Ω-mA' jack for the red lead. For currents up to 10A, use the '10A' jack.
- Przerwij obwód i podłącz multimetr szeregowo do obciążenia.
- Ponownie włącz obwód i odczytaj wartość prądu.
3.6 Measuring Capacitance (CX)
- Przed rozpoczęciem testu należy upewnić się, że kondensator jest całkowicie rozładowany.
- Set the rotary dial to the CX range (e.g., 2n, 20n, 200n, 2µ, 20µ).
- Podłącz przewody pomiarowe do zacisków kondensatora.
- Odczytaj wartość pojemności na wyświetlaczu.
3.7 Diode and Transistor (hFE) Testing
Refer to the specific markings on the dial for diode and transistor testing functions. Typically, diode test mode allows checking the forward voltage drop of a diode, and hFE mode is used for measuring the DC current gain of transistors.
4. Konserwacja
4.1 Wymiana baterii
Replace the 9V 006P battery when the low battery indicator appears on the display or if the multimeter fails to power on. Follow the instructions in Section 2.1.
4.2 Czyszczenie
Do czyszczenia multimetru należy używać miękkiej,amp ściereczką. Nie używaj środków czyszczących ani rozpuszczalników o działaniu ściernym, ponieważ mogą one uszkodzićasing or display. Ensure the device is turned off and disconnected from any circuits before cleaning.
4.3 Przechowywanie
When not in use for extended periods, store the multimeter in a cool, dry place, away from direct sunlight and extreme temperatures. Consider removing the battery to prevent leakage, which could damage the internal components.
5. Rozwiązywanie Problemów
| Problem | Możliwa przyczyna | Rozwiązanie |
|---|---|---|
| Brak wyświetlacza lub wyświetlacz jest przyciemniony | Niski lub rozładowany akumulator | Replace the 9V 006P battery. |
| Błędne odczyty | Incorrect range selected Poor lead connection Uszkodzone przewody pomiarowe Incorrect input jack used | Wybierz odpowiedni zakres. Ensure leads are firmly connected. Inspect and replace damaged leads. Verify leads are in the correct V-Ω-mA or 10A jack. |
| Wyświetlany jest komunikat „OL” (Przeciążenie) | Measurement exceeds selected range | Przełącz na wyższy zakres. |
| Brak sygnału dźwiękowego ciągłości | Continuity function not selected Otwarty obwód | Ensure dial is on continuity/diode test. Check the circuit for breaks. |
6. Specyfikacje
| Parametr | Wartość |
|---|---|
| Model | EDM 1111A |
| Wymiary produktu (dł. x szer. x wys.) | 8 x 4 x 2 cala |
| Waga przedmiotu | 1.84 funtów |
| Źródło zasilania | DC 9V 006P Battery |
| Typ pomiaru | Multimetr |
| Producent | Eskorta |
| Data pierwszej dostępności | 21 listopada 2019 r. |
| Objętość DCtage Zakresy | 200mV, 2V, 20V, 200V, 1000V |
| AC Objętośćtage Zakresy | 200mV, 2V, 20V, 200V, 750V |
| Zakresy prądu stałego | 200µA, 2mA, 20mA, 200mA, 10A |
| Zakresy prądu przemiennego | 200µA, 2mA, 20mA, 200mA, 10A |
| Zakresy oporu | 200Ω, 2KΩ, 20KΩ, 200KΩ, 2MΩ, 20MΩ, 200MΩ |
| Capacitance Ranges | 2nF, 20nF, 200nF, 2µF, 20µF |
7. Informacje o gwarancji
For specific warranty details regarding your Escort EDM 1111A Digital Multimeter, please refer to the documentation provided at the time of purchase or contact the manufacturer directly. Warranty terms typically cover defects in materials and workmanship under normal use.
8. Obsługa klienta
If you encounter any issues or have questions not covered in this manual, please contact Escort customer support. Have your product model number (EDM 1111A) and serial number (if applicable, found on the back label) ready when contacting support for faster assistance.
The product label on the back of the Escort EDM 1111A, indicating 'DIGITAL MULTIMETER DC 9V 006P BATTERY', serial number, and 'MADE IN TAIWAN R.O.C.'.