
1. Wprowadzenie
The EPEVER Tracer 3215BN is a 30A Maximum Power Point Tracking (MPPT) solar charge controller designed for 12V/24V battery systems. It efficiently converts solar energy to charge various battery types, including Sealed, Gel, and Flooded lead-acid batteries. This controller features an integrated LCD display for system monitoring and configuration, along with advanced protection functions to ensure system reliability.
2. Funkcje produktu
- Zaawansowana technologia MPPT: Ensures maximum power point tracking with an efficiency of no less than 99.5%, optimizing solar energy harvesting.
- Wysoka wydajność konwersji: Achieves a maximum conversion efficiency of 98%.
- Szybka prędkość śledzenia: Ultra-fast tracking and accurate recognition of multiple power points.
- Solidna konstrukcja: Features a common negative design and die-cast aluminum construction for effective heat dissipation.
- Kompleksowa ochrona: Includes all-round electronic fault self-test and enhanced electronic protection functions to prevent system damage.
- Interfejs komunikacyjny: Equipped with an RS-485 communication bus interface and Modbus communication protocol for expanded applications and monitoring via PC or external display units like MT52.
- Software Upgrade Support: Allows for future software enhancements.
- Przyjazne dla użytkownika wskaźniki: LED indicators provide clear system status.
- Flexible Load Control: Offers multiple load control modes including manual control, light ON/OFF, light On+Timer, and time control.
- Kompatybilność baterii: Supports Sealed, Gel, Flooded, and User-defined battery types.
- Kompensacja temperatury: Includes a battery temperature compensation function.
- Statystyki dotyczące energii: Provides real-time energy statistics.
3. Konfiguracja i instalacja
Proper installation is crucial for the safe and efficient operation of your EPEVER Tracer 3215BN controller. Follow these steps carefully.
3.1 Identyfikacja komponentów

This image illustrates the various components and ports of the Tracer 3215BN controller, including the Heat Sink, RTS Port, Charging LED indicator, Solar Terminal, Battery LED indicator, Button, RS-485 Port, Battery Terminal, and Load Terminal.
3.2 Schemat okablowania
Connect the components in the specified order to prevent damage to the controller and other system components.

This diagram shows the connection sequence: Solar Panel (PV) to the controller, controller to Battery, and controller to Load (e.g., lights, fan, TV, computer via inverter). Ensure correct polarity for all connections.
- Podłącz akumulator: First, connect the battery to the controller's battery terminals. Ensure correct polarity (+ to + and - to -). The controller requires battery power to operate.
- Podłącz panele słoneczne: Next, connect the solar panels to the controller's PV terminals. Verify correct polarity.
- Podłącz obciążenie: Finally, connect your DC loads to the controller's load terminals. If using AC loads, connect them through an inverter, which is then connected to the battery.
Ważna uwaga dotycząca bezpieczeństwa: Always disconnect power from solar panels and battery before making or breaking any connections to the controller. Ensure all connections are tight to prevent loose contacts and overheating.
3.3 Porty komunikacyjne

This image highlights the RTS (Remote Temperature Sensor) Port and the RS-485 Port, used for external temperature sensing and communication respectively.
- RTS Port: Connect the optional Remote Temperature Sensor (RTS) here for accurate battery temperature compensation.
- Port RS-485: Use this port for connecting to a PC, MT52 remote meter, or other monitoring devices via Modbus protocol.
4. Instrukcja obsługi
Once installed, the controller will automatically begin charging the battery from the solar panels. The LCD display provides real-time information about the system status.
4.1 Wyświetlacz LCD i przyciski
The integrated LCD display shows various parameters such as battery voltage, charging current, load status, and error codes. Use the buttons adjacent to the display to navigate through menus and adjust settings.
4.2 Tryby sterowania obciążeniem
The controller offers several load control modes:
- Sterowanie ręczne: Turn the load ON or OFF manually.
- Światło WŁ./WYŁ.: Load turns ON at dusk and OFF at dawn.
- Light On+Timer: Load turns ON at dusk and stays ON for a set duration.
- Kontrola czasu: Load operates during specific programmed times.
4.3 Remote Monitoring and Settings
The Tracer 3215BN supports remote monitoring and parameter adjustment through various accessories.
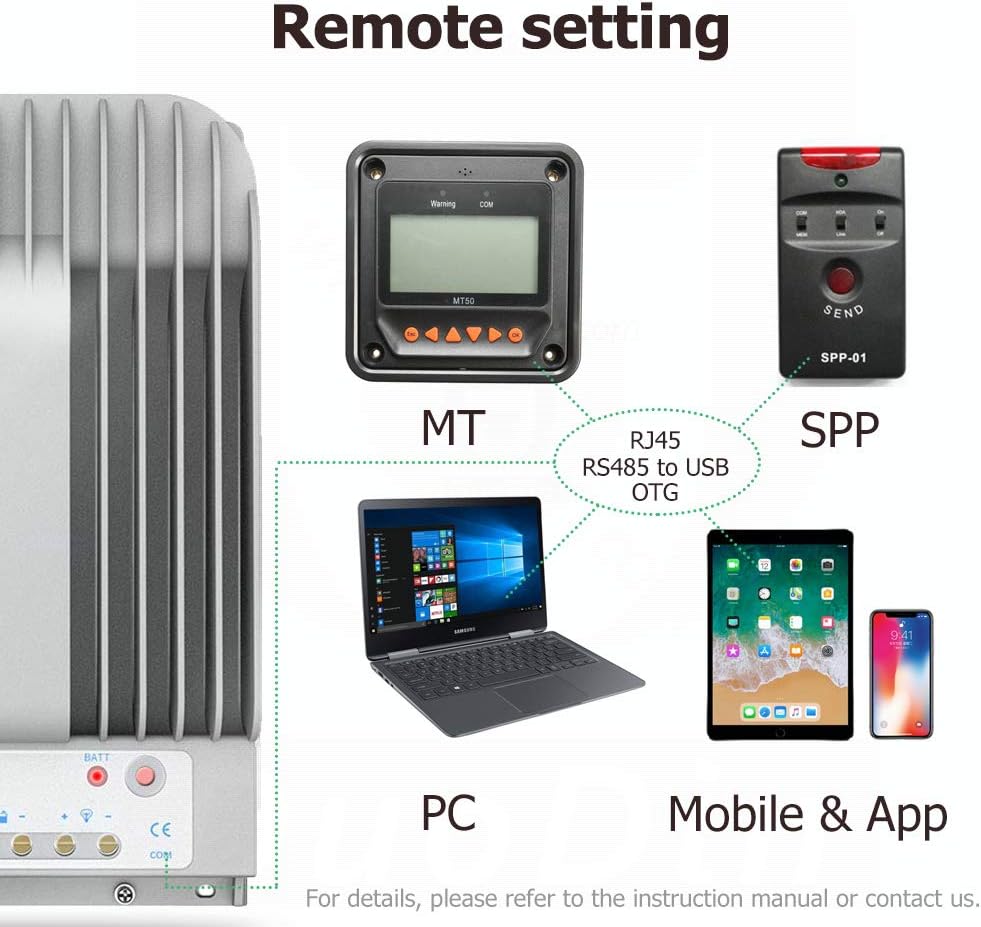
This image illustrates how the controller can be connected to an MT (remote meter), SPP (wireless module), PC, or mobile application for remote monitoring and configuration.
- MT Remote Meter: Connect an EPEVER MT series remote meter (e.g., MT52) to view real-time data and modify parameters from a distance.
- Oprogramowanie komputerowe: Use EPEVER PC software by connecting the controller via an RS-485 to USB adapter for detailed monitoring, data logging, and advanced settings.
- Aplikacja mobilna: Connect a compatible wireless module (e.g., Bluetooth or WiFi) to use the EPEVER mobile application for convenient monitoring and control via smartphone or tablet.
5. Konserwacja
Regularna konserwacja zapewnia długowieczność i optymalną wydajność regulatora ładowania słonecznego.
- Sprawdź połączenia: Okresowo sprawdzaj wszystkie połączenia przewodów pod kątem szczelności i korozji. Luźne połączenia mogą powodowaćtagkrople wody i przegrzanie.
- Wyczyść kontroler: Utrzymuj kontroler w czystości, bez kurzu i zanieczyszczeń. Upewnij się, że żeberka radiatora nie są zasłonięte, aby zapewnić prawidłowe odprowadzanie ciepła.
- Sprawdź stan baterii: Monitoruj pojemność bateriitage and health regularly. Ensure the battery type setting in the controller matches your installed battery.
- Warunki środowiskowe: Ensure the controller is installed in a dry, well-ventilated area, away from direct sunlight and extreme temperatures.
6. Rozwiązywanie Problemów
This section addresses common issues you might encounter with your Tracer 3215BN controller.
6.1 Kontroler się nie włącza
- Sprawdź połączenie akumulatora: The controller requires a minimum battery voltage to power on. Ensure the battery is properly connected and has sufficient charge. If the battery is completely discharged, the controller may not power on until an external 12V source or sufficient solar input is provided to raise the battery voltage.
- Sprawdź biegunowość: Confirm that the battery connections are made with correct polarity.
- Inspect Fuses/Breakers: Check any inline fuses or circuit breakers between the battery and the controller.
6.2 No Charging Indication
- Check Solar Panel Connection: Ensure solar panels are correctly connected to the PV terminals with proper polarity.
- Verify Solar Input Voltage: Zmierz objętość obwodu otwartegotage of your solar panels to ensure it is within the controller's acceptable range (Max 150V).
- Sunlight Conditions: Ensure there is adequate sunlight reaching the solar panels.
6.3 Load Not Working
- Check Load Connection: Verify that the load is correctly connected to the load terminals.
- Tryb kontroli obciążenia: Ensure the load control mode is set appropriately (e.g., manual ON, or correct timer settings).
- Pojemność bateriitage: Jeśli pojemność akumulatoratage is too low, the controller may disconnect the load to protect the battery.
- Zabezpieczenie przed przeciążeniem: Check if the load current exceeds the controller's rated load current, triggering overload protection.
7. Specyfikacje
Key technical specifications for the EPEVER Tracer 3215BN MPPT Solar Charge Controller:
| Parametr | Wartość |
|---|---|
| Model | Tracer3215BN |
| System Nominalna objtage | 12V / 24V Auto Work |
| Prąd znamionowy ładowania | 30A |
| Znamionowy prąd obciążenia | 30A |
| Maks. Obwód otwarty PV Objętośćtage | 150 V (przy minimalnej temperaturze środowiska pracy) 138 V (przy temperaturze otoczenia 25°C) |
| Maksymalna moc wejściowa PV | 390 W (12 V) / 780 W (24 V) |
| MPP Objętośćtage Zakres | Pojemność bateriitage +2V ~ 108V |
| Typ baterii | Sealed, Gel, Flooded, User |
| Efektywność konwersji | ≤98% |
| Wydajność śledzenia | ≥99.5% |
| Komunikacja | RS-485 (RJ45 interface) |
| Zakres temperatur pracy | -35°C do +55°C |
| Zakres temperatur przechowywania | -35°C do +80°C |
| Wymiary (dł. x szer. x wys.) | 281mm x 160mm x 60mm |

This table provides a comparison of key specifications between the Tracer-AN and Tracer-BN series, highlighting the superior heat dissipation and voltage ranges of the BN series.

This image details the physical dimensions of the Tracer 3215BN controller.
8. Informacje o gwarancji
Warranty terms and conditions for EPEVER products can vary. It is recommended to confirm the specific warranty period and coverage directly with your seller (SolaMr) or the manufacturer (EPEVER) at the time of purchase. Keep your proof of purchase for any warranty claims.
9. Wsparcie
For technical assistance, troubleshooting beyond this manual, or inquiries regarding product functionality, please contact the following:
- Wsparcie sprzedawcy: Contact SolaMr for assistance related to your purchase.
- Wsparcie producenta: Visit the official EPEVER website for product documentation, FAQs, and contact information for direct manufacturer support.