
ProfiCare PC-BSR 3042
Instrukcja obsługi robota odkurzającego ProfiCare PC-BSR 3042
Model: PC-BSR 3042
1. Wprowadzenie
Thank you for choosing the ProfiCare PC-BSR 3042 Robot Vacuum Cleaner. This manual provides essential information for the safe and efficient operation, maintenance, and troubleshooting of your new appliance. Please read these instructions thoroughly before first use and keep them for future reference.
The ProfiCare PC-BSR 3042 is designed to independently clean various hard floor surfaces and short-pile carpets, effectively removing dirt, dust, crumbs, and pet hair. Its extra-flat design allows for cleaning under furniture, and its quiet operation ensures minimal disturbance.
2. Instrukcje bezpieczeństwa
Aby zapobiec obrażeniom ciała lub uszkodzeniu urządzenia, należy zawsze przestrzegać następujących środków ostrożności:
- Przed przystąpieniem do obsługi urządzenia przeczytaj uważnie wszystkie instrukcje.
- To urządzenie jest przeznaczone wyłącznie do użytku domowego w pomieszczeniach.
- Do not allow children to play with the appliance. Supervise children and individuals with reduced physical, sensory, or mental capabilities when the appliance is in use.
- Do not immerse the appliance, power adapter, or remote control in water or other liquids.
- Use only the original power adapter supplied with the appliance.
- Nie używaj urządzenia do zbierania materiałów łatwopalnych, gorącego popiołu ani ostrych przedmiotów.
- Ensure the dustbin and filter are correctly installed before operation.
- Trzymaj włosy, luźne ubrania, palce i inne części ciała z dala od otworów i ruchomych części.
- The appliance features automatic stair detection. However, always exercise caution near stairs or elevated surfaces.
- If the appliance is damaged, do not operate it. Contact customer support for assistance.
3. Zawartość opakowania
Sprawdź, czy wszystkie przedmioty są obecne i w dobrym stanie:
- ProfiCare PC-BSR 3042 Robot Vacuum Cleaner
- Zasilacz
- Zdalne sterowanie
- Szczotki boczne (2 fabrycznie zainstalowane, 2 dodatkowe)
- Filtr HEPA (wstępnie zainstalowany)
- Szczotka do czyszczenia filtra
- Instrukcja obsługi
4. Koniec produktuview
Zapoznaj się z elementami robota odkurzającego.
Rysunek 4.1: Szczyt view of the robot vacuum cleaner, showing the main power button, HEPA filter indicator, and remote sensor area.

Rysunek 4.2: The multi-function remote control for operating the robot vacuum cleaner.
Elementy jednostki głównej:
- Przycisk zasilania: Located on the top surface for manual start/stop.
- Dustbin Compartment: Houses the removable dustbin and HEPA filter.
- Szczotki boczne: Two rotating brushes for sweeping debris into the vacuum's path.
- Port ładowania: Do podłączenia zasilacza.
- Czujniki podczerwieni: For obstacle detection and stair avoidance.
- Koła napędowe: Rubberized and spring-mounted for smooth movement across various surfaces.
Funkcje pilota zdalnego sterowania:
- Zacznij przerwę: Initiates or pauses cleaning.
- Strzałki kierunkowe: Manually guides the robot.
- FOCUS (Spot Cleaning): Poleca robotowi intensywne czyszczenie określonego obszaru.
- RANDOM (Random Cleaning): Robot cleans in a random pattern.
- AUTO (Systematic Cleaning): Robot cleans in a systematic pattern.
- REAGOWAĆ: Locates the robot.
5. Konfiguracja
5.1. Ładowanie akumulatora
- Connect the power adapter to the charging port on the side of the robot vacuum cleaner.
- Podłącz zasilacz do gniazdka ściennego.
- Allow the robot to charge for approximately 5 hours before its first use. The charging indicator light will show the charging status.
5.2. Montaż szczotek bocznych
The robot comes with two side brushes pre-installed. If replacement is needed:
- Odwróć robota odkurzającego do góry nogami.
- Align the new side brush with the brush post and press down until it clicks into place. Ensure the brushes are securely attached.
5.3. Preparing the Cleaning Area
- Remove any large obstacles, loose cables, or delicate items from the floor.
- Upewnij się, że drzwi do obszarów, które chcesz posprzątać, są otwarte, a drzwi do obszarów, których chcesz unikać, są zamknięte.
6. Obsługa robota odkurzającego
6.1. Rozpoczęcie cyklu czyszczenia
You can start the robot in two ways:
- Rozpoczęcie ręczne: Press the power button on the top of the robot.
- Zdalne sterowanie startem: Press the "Start/Pause" button on the remote control.
The robot will begin cleaning in its default mode (Systematic or Random, depending on the last setting).
6.2. Wybór trybów czyszczenia
Use the remote control to select a specific cleaning program:
- AUTO (Systematic Cleaning): The robot cleans in a structured, back-and-forth pattern to cover the entire area efficiently.
- RANDOM (Random Cleaning): Robot porusza się losowo, zmieniając kierunek po napotkaniu przeszkód.
- FOCUS (Spot Cleaning): The robot cleans a concentrated area in a spiral pattern, ideal for heavily soiled spots.
6.3. Wstrzymywanie i wznawianie
Press the "Start/Pause" button on the robot or remote control to pause the cleaning cycle. Press it again to resume.
6.4. Stopping the Robot
To stop the robot completely, press and hold the power button on the robot until it turns off, or press the "Start/Pause" button on the remote and then the power button on the robot.
6.5. Funkcja timera
The remote control includes a timer function to schedule cleaning times. Refer to the remote control section in this manual for detailed instructions on setting the timer.
6.6. Stair Detection
The robot is equipped with infrared sensors that automatically detect stairs and prevent it from falling. Ensure these sensors are kept clean for optimal performance.
7. Konserwacja
Regularna konserwacja zapewnia optymalną wydajność i wydłuża żywotność robota odkurzającego.
7.1. Opróżnianie i czyszczenie pojemnika na śmieci

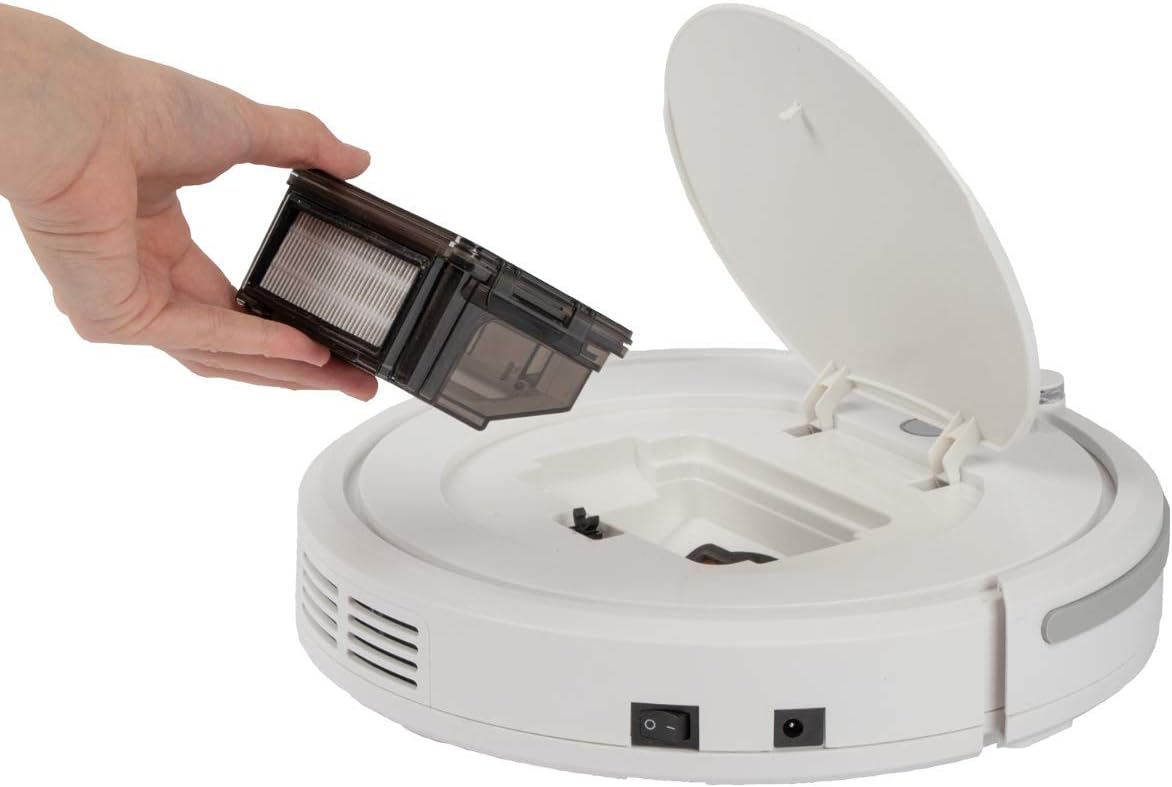
Rysunek 7.1: Removing the dustbin for emptying and cleaning.
- Turn off the robot vacuum cleaner.
- Otwórz górną pokrywę robota.
- Grasp the handle of the dustbin and lift it out.
- Open the dustbin and empty its contents into a waste bin.
- W razie konieczności opłucz kosz na śmieci wodą i upewnij się, że jest całkowicie suchy przed ponownym montażem.
7.2. Czyszczenie filtra HEPA
The HEPA filter is located inside the dustbin. Clean it regularly to maintain suction power.
- Wyjmij pojemnik na śmieci w sposób opisany powyżej.
- Ostrożnie wyjmij filtr HEPA ze kosza na śmieci.
- Use the provided cleaning brush to remove dust and debris from the filter. Do not wash the HEPA filter with water unless specified by the manufacturer.
- Reinsert the clean HEPA filter into the dustbin and then place the dustbin back into the robot.
7.3. Czyszczenie szczotek bocznych
Periodically check and clean the side brushes for tangled hair or debris.
- Turn off the robot and flip it over.
- Aby wyjąć szczotki boczne, delikatnie pociągnij je do góry.
- Remove any hair or debris wrapped around the brushes or brush posts.
- Reattach the brushes by pressing them down onto their posts until they click.
7.4. Cleaning Sensors and Wheels
Wipe the infrared sensors (located around the bumper and underneath the robot) and the drive wheels with a clean, dry cloth to ensure proper navigation and movement.
8. Rozwiązywanie Problemów
If you encounter issues with your robot vacuum cleaner, refer to the following table for common problems and solutions.
| Problem | Możliwa przyczyna | Rozwiązanie |
|---|---|---|
| Robot nie włącza się. | Bateria jest słaba lub rozładowana. | Charge the robot for 5 hours. |
| Robot zatrzymuje się niespodziewanie. | Battery is low; Obstacle detected; Wheels/brushes jammed. | Charge the robot; Remove obstacles; Clean wheels and brushes. |
| Słaba skuteczność czyszczenia. | Dustbin full; Filter clogged; Side brushes worn or dirty. | Opróżnij kosz na śmieci; Wyczyść/wymień filtr; Wyczyść/wymień szczotki boczne. |
| Robot nie ładuje się. | Power adapter not connected; Faulty adapter/port. | Ensure secure connection; Try a different outlet; Contact support. |
| Robot spada ze schodów. | Stair sensors are dirty or blocked. | Clean the stair sensors thoroughly. |
9. Specyfikacje
Technical details for the ProfiCare PC-BSR 3042 Robot Vacuum Cleaner:

Rysunek 9.1: Dimensions of the robot vacuum cleaner.
| Funkcja | Szczegół |
|---|---|
| Numer modelu | 330420 |
| Typ baterii | Ni-MH |
| Pojemność bateriitage | 14.4 V |
| Pojemność baterii | 1500 mAh |
| Czas pracy baterii | Do 90 minut |
| Czas ładowania akumulatora | Około 5 godzin |
| Poziom hałasu | Około. 61dB |
| Wymiary (średnica x wysokość) | Wymiary 290mm x 75mm |
| Waga | 1.9 kilogramów |
| Typ filtra | Filtr HEPA |
| Programy czyszczenia | 3 (Random, Systematic, Spot) |
| Cechy specjalne | Automatic stair detection, Mechanical furniture barrier, Remote control, Timer function |
| Zalecenia dotyczące powierzchni | Hard floors, short-pile carpets |
10. Gwarancja i wsparcie
10.1. Gwarancja producenta
This product is covered by a manufacturer's warranty. Please refer to the warranty card included in your package or contact ProfiCare customer service for specific terms and conditions. Spare parts availability is typically 2 years from the date of purchase.
10.2. Obsługa klienta
For technical assistance, troubleshooting beyond this manual, or warranty claims, please contact your retailer or the ProfiCare customer support team. Contact information can usually be found on the product packaging or the official ProfiCare webstrona.
Ask a question about this manual
Ask about setup, troubleshooting, compatibility, parts, safety, or missing instructions. Manuals+ will review the question and use this page’s manual context to help answer it.