
1. Wprowadzenie
This manual provides detailed instructions for the proper setup, operation, and maintenance of your PROEL Eikon WM700DMA Dual-Channel PLL UHF Wireless Handheld Microphone System. Please read this manual thoroughly before using the system to ensure optimal performance and to prevent damage.
The Eikon WM700DMA is a professional dual-channel wireless microphone system designed for various applications, including karaoke, singing, and public address systems. It operates within the 518-550 MHz frequency range, offering reliable wireless connectivity.
2. Ważne informacje dotyczące bezpieczeństwa
- Aby uniknąć pożaru lub porażenia prądem, nie wystawiaj urządzenia na działanie deszczu i wilgoci.
- Nie otwierać casing. Wszelkie prace serwisowe powierzaj wykwalifikowanemu personelowi.
- Ensure proper ventilation around the receiver unit.
- Należy używać wyłącznie zasilacza dołączonego do systemu.
- Trzymaj system z dala od źródeł ciepła i bezpośredniego światła słonecznego.
- Baterie należy utylizować zgodnie z lokalnymi przepisami.
3. Zawartość opakowania
Sprawdź, czy w przesyłce znajdują się wszystkie elementy wymienione poniżej:
- WM700DMA Dual-Channel Wireless Receiver
- 2 x bezprzewodowe mikrofony ręczne
- Zasilacz
- Audio Cable (e.g., 1/4" to 1/4" or XLR to 1/4") - (Note: Specific cable type not detailed in product info, common for such systems)
- Etui transportowe
- Instrukcja obsługi (ten dokument)
4. Koniec produktuview
4.1. WM700DMA Receiver Front Panel

Obraz 4.1: Przód view of the WM700DMA receiver. It features two volume control knobs (VOL A, VOL B), SET buttons, up/down navigation buttons, IR sync windows, a central LCD display, and a POWER button.
- VOL A / VOL B: Adjusts the output volume for Channel A and Channel B respectively.
- Przycisk SET: Used to enter menu settings or confirm selections.
- Przyciski w górę/w dół: Navigates through menu options or adjusts parameters.
- Okno podczerwieni: Infrared sensor for syncing frequencies with the handheld microphones.
- Wyświetlacz LCD: Shows channel frequency, signal strength, and other operational information.
- Przycisk zasilania: Turns the receiver ON or OFF.
4.2. WM700DMA Receiver Rear Panel

Obraz 4.2: Tył view of the WM700DMA receiver. It includes a power input, two balanced XLR outputs (Balanced B, Balanced A), and an auxiliary 1/4" output (AUX).
- POWER INPUT (USB): Connects the supplied power adapter.
- BALANCED B / BALANCED A (XLR): Balanced audio outputs for Channel B and Channel A. Connect these to a mixer or PA system.
- AUX (1/4" Jack): Unbalanced auxiliary audio output, combining both channels.
4.3. Handheld Wireless Microphone

Obraz 4.3: Eikon handheld wireless microphone. It features a display, power/mute button, and an IR sensor for synchronization.
- Kratka mikrofonu: Protects the cardioid dynamic capsule.
- Wyświetlacz LCD: Shows battery status and current channel/frequency.
- Przycisk zasilania/wyciszania: Turns the microphone ON/OFF and mutes/unmutes the audio.
- Czujnik podczerwieni: Receives frequency synchronization signals from the receiver.
- Komora baterii: Located at the bottom, holds the required batteries (typically AA, not specified in product data, but common).
5. Instrukcje konfiguracji
- Pozycja odbiornika: Place the WM700DMA receiver in a central location, away from large metal objects or other wireless devices that might cause interference.
Ensure the antennas are extended and positioned for optimal reception.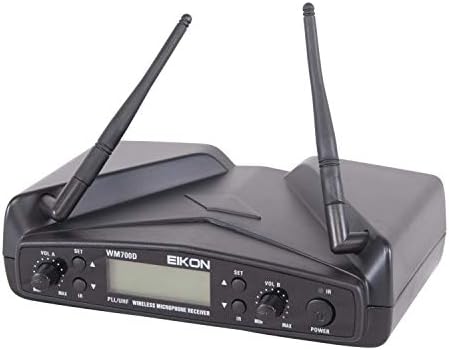
Obraz 5.1: WM700DMA receiver with antennas extended for improved signal reception.
- Podłącz zasilanie: Connect the supplied power adapter to the POWER INPUT (USB) on the rear of the receiver and plug it into a suitable power outlet.
- Podłącz wyjście audio:
- For individual channel output, connect XLR cables from BALANCED A and BALANCED B to your mixer or PA system's input channels.
- For a mixed output of both channels, connect a 1/4" cable from the AUX output to your mixer or PA system's input.
- Instalacja baterii mikrofonu: Open the battery compartment of each handheld microphone and insert the required batteries (e.g., 2x AA batteries per microphone, check markings on the device). Ensure correct polarity.
- Włączanie: Turn on the receiver by pressing the POWER button. Turn on each handheld microphone by pressing and holding its Power/Mute button.
- Synchronizacja częstotliwości (synchronizacja IR):
- On the receiver, select the desired channel (A or B) and frequency using the SET and Up/Down buttons.
- Hold the microphone's IR sensor close to the receiver's IR window.
- Press the SET button on the receiver. The display on both the receiver and microphone should indicate successful synchronization. Repeat for the second microphone on the other channel.
- Pierwsza próba dźwięku: Speak into each microphone and adjust the VOL A and VOL B knobs on the receiver, as well as the input gain on your mixer/PA system, to achieve a clear audio level without distortion.
6. Instrukcja obsługi
6.1. Działanie odbiornika
- Regulacja głośności: Use the VOL A and VOL B knobs to adjust the individual output levels of each microphone channel.
- Wybór kanału/częstotliwości: Press the SET button to enter the frequency selection mode. Use the Up/Down buttons to change the frequency. Press SET again to confirm.
- Synchronizacja w podczerwieni: If a microphone loses connection or needs to be paired with a different channel, follow the synchronization steps outlined in Section 5.
6.2. Obsługa mikrofonu
- Włączanie/wyłączanie zasilania: Press and hold the Power/Mute button to turn the microphone ON or OFF.
- Funkcja wyciszenia: Briefly press the Power/Mute button to mute or unmute the microphone. The display will indicate the mute status.
- Wskaźnik baterii: The microphone's LCD display shows the current battery level. Replace batteries when the indicator is low to avoid interruptions.
- Optymalne wykorzystanie: Hold the microphone approximately 2-6 inches (5-15 cm) from your mouth for best sound quality. Avoid covering the grille with your hand.
7. Konserwacja
- Czyszczenie: Do czyszczenia odbiornika i mikrofonów używaj miękkiej, suchej ściereczki. Nie używaj płynnych środków czyszczących ani rozpuszczalników.
- Składowanie: When not in use for extended periods, remove batteries from the microphones and store the system in its carrying case in a cool, dry place.
- Wymiana baterii: Replace microphone batteries promptly when the low battery indicator appears. Use high-quality alkaline batteries for best performance.
- Pielęgnacja anteny: Handle receiver antennas carefully to avoid bending or breaking.
8. Rozwiązywanie Problemów
| Problem | Możliwa przyczyna | Rozwiązanie |
|---|---|---|
| Brak dźwięku z mikrofonu. |
|
|
| Zakłócenia lub zakłócenia statyczne. |
|
|
| Microphone not syncing. |
|
|
9. Specyfikacje
| Funkcja | Szczegół |
|---|---|
| Marka | PROEL |
| Numer modelu | EIKONWM700DM |
| Zakres częstotliwości | 518–550 MHz |
| Technologia łączności | UHF, USB |
| Typ złącza | USB (for power), XLR, 1/4" Jack |
| Liczba kanałów | 2 |
| Typ mikrofonu | Handheld, Cardioid Dynamic Capsule |
| Wzór biegunowy | Jednokierunkowy |
| Stosunek sygnału do szumu | 80 dB (System), 105 dB (Microphone Audio Sensitivity) |
| Odpowiedź częstotliwościowa | 15 kHz (górna granica, typowa dla dźwięku) |
| Zalecane zastosowania | Karaoke, śpiew |
| Kompatybilne urządzenia | PA System, Personal Computer (via audio output) |
| Waga przedmiotu | 2000 Grams (System) |
| Wymiary przedmiotu | 14.5 x 10.2 x 7.9 cal (odbiornik) |
| Zawarte komponenty | Etui transportowe |
10. Gwarancja i wsparcie
PROEL products are designed and manufactured to the highest quality standards. For information regarding warranty coverage, technical support, or service, please refer to the warranty card included with your product or visit the official PROEL webstrona.
Proszę zachować dowód zakupu na wypadek ewentualnych roszczeń gwarancyjnych.


