
1. Wprowadzenie
Thank you for choosing the Xigmatek Aurora 360 RGB Liquid Cooler. This All-in-One (AIO) liquid cooling system is designed to provide efficient heat dissipation for your CPU while offering vibrant RGB lighting effects. This manual will guide you through the installation, operation, and maintenance of your new cooler to ensure optimal performance and longevity.

Image 1.1: The Xigmatek Aurora 360 RGB Liquid Cooler, showcasing the radiator, pump, and three RGB fans.
2. Informacje dotyczące bezpieczeństwa
Please read and understand all safety instructions before installing or operating this product. Failure to do so may result in damage to the product, other components, or personal injury.
- Przed instalacją lub konserwacją należy zawsze odłączyć komputer od zasilania.
- Aby uniknąć uszkodzeń, należy obchodzić się z elementami ostrożnie.
- Do not open the pump or radiator; the liquid coolant is sealed and not user-serviceable.
- Keep the product away from direct sunlight, high temperatures, and high humidity.
- Zapewnij właściwe uziemienie, aby zapobiec zagrożeniom elektrycznym.
3. Zawartość opakowania
Verify that all components are present and in good condition before proceeding with installation. If any items are missing or damaged, please contact your retailer or Xigmatek support.
- 1x Xigmatek Aurora 360 RGB Radiator with Integrated Pump/Cold Plate
- 3x 120mm RGB Fans
- Mounting Hardware for Intel Sockets (LGA 115X/1200/1700/2011/2066)
- Mounting Hardware for AMD Sockets (AM4/AM5/TR4)
- Pasta termoprzewodząca (gotowa do użycia lub w tubce)
- RGB Controller and Cables
- Fan Splitter Cables
- Instrukcja obsługi

Image 3.1: Retail packaging for the Xigmatek Aurora 360 RGB Liquid Cooler, indicating included components.
4. Specyfikacje
Key technical specifications for the Xigmatek Aurora 360 RGB Liquid Cooler:
| Funkcja | Specyfikacja |
|---|---|
| Numer modelu | EN42814 |
| Metoda chłodzenia | Płyn (wszystko w jednym) |
| Radiator Dimensions (L x W x H) | Wymiary 39.8 x 12 x 2.7 cm |
| Rozmiar wentylatora | 3x 120mm |
| Poziom hałasu | 25.3 decybeli |
| Tomtage | 12 V (prąd stały) |
| Moc | 3.8 watów |
| Typ złącza zasilania | 6-pin |
| Kompatybilne gniazda | Intel LGA 115X/1200/1700/2011/2066, AMD AM4/AM5/TR4 (check specific bracket compatibility) |
5. Konfiguracja i instalacja
Follow these steps carefully to install your Xigmatek Aurora 360 RGB Liquid Cooler. The process may vary slightly depending on your specific CPU socket and PC case.
5.1 Przygotuj chłodnicę i wentylatory
- Attach the three 120mm RGB fans to the radiator using the provided long screws. Ensure the fan airflow direction is appropriate for your case (typically pushing air through the radiator and out of the case, or pulling air in).
- Connect the fan power cables to the included fan splitter cable, and then connect the splitter to a CPU_FAN or SYS_FAN header on your motherboard.
- Connect the fan RGB cables to the included RGB controller or directly to a compatible 3-pin 5V Addressable RGB header on your motherboard.

Image 5.1: The 360mm radiator component of the liquid cooler.
5.2 Install the Radiator in Your PC Case
- Identify a suitable mounting location for the 360mm radiator in your PC case (e.g., top, front).
- Secure the radiator assembly to the case using the appropriate screws. Ensure the tubing has enough slack and is not kinked.
5.3 Prepare the CPU Socket
- For Intel sockets, install the correct backplate behind the motherboard. For AMD sockets, use the existing stock backplate if applicable, or install the provided AMD backplate.
- Attach the appropriate mounting standoffs to the motherboard around the CPU socket.
5.4 Install the Pump/Cold Plate
- Ensure the CPU surface is clean and free of dust or old thermal paste.
- If thermal paste is not pre-applied to the cold plate, apply a small pea-sized amount to the center of your CPU's integrated heat spreader (IHS).
- Align the pump/cold plate assembly with the standoffs and gently place it onto the CPU.
- Secure the pump/cold plate with the provided thumb screws or nuts, tightening them in a diagonal pattern until snug. Do not overtighten.
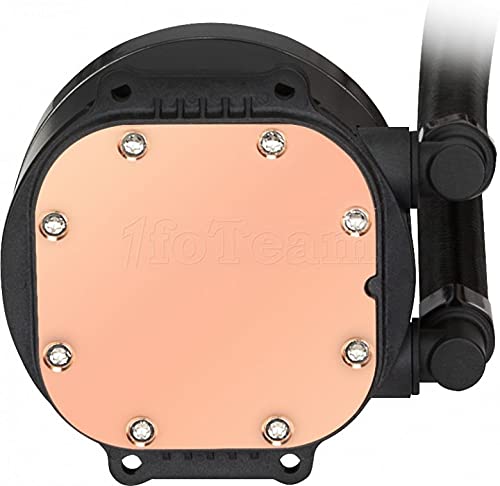
Image 5.2: The copper cold plate of the liquid cooler, which makes contact with the CPU.
5.5 Connect Power and RGB Cables
- Connect the pump's 3-pin or 4-pin power cable to the CPU_OPT or AIO_PUMP header on your motherboard. Ensure it receives full power (often set to 100% in BIOS).
- Connect the pump's RGB cable to the RGB controller or a compatible 3-pin 5V Addressable RGB header on your motherboard.
- Organize all cables for a clean build and improved airflow.
6. Instrukcja obsługi
Once installed, the Xigmatek Aurora 360 RGB Liquid Cooler operates automatically based on your motherboard's fan and pump control settings. The RGB lighting can be customized.
6.1 Sterowanie wentylatorem i pompą
- The pump speed is typically constant for optimal cooling. Ensure the motherboard header it's connected to is set to deliver full power (12V).
- Fan speeds can be controlled via your motherboard's BIOS/UEFI settings or through motherboard software (e.g., ASUS AI Suite, MSI Dragon Center, Gigabyte SIV). Adjust fan curves to balance cooling performance and noise levels.
6.2 Sterowanie oświetleniem RGB
- If connected to the included RGB controller, use the physical buttons on the controller to cycle through various lighting modes, colors, and effects.
- If connected to your motherboard's 3-pin 5V Addressable RGB header, use your motherboard's RGB software (e.g., ASUS Aura Sync, MSI Mystic Light Sync, Gigabyte RGB Fusion, ASRock Polychrome Sync) to synchronize and customize the lighting effects across your system.

Image 6.1: Close-up of the pump unit, showing the illuminated Xigmatek logo and RGB ring.
7. Konserwacja
Regularna konserwacja pomaga zapewnić długowieczność i optymalną wydajność chłodnicy cieczy.
- Czyszczenie kurzu: Periodically clean the radiator fins and fan blades with compressed air to remove dust buildup. Dust can significantly impede cooling performance.
- Inspekcja rur: Occasionally inspect the tubing for any signs of wear, kinks, or leaks. While rare, early detection can prevent potential damage.
- Cold Plate Check: If you notice a significant drop in cooling performance over time, consider reapplying thermal paste to the CPU. This typically involves removing the pump, cleaning both surfaces, and applying new thermal paste.
8. Rozwiązywanie Problemów
If you encounter issues with your Xigmatek Aurora 360 RGB Liquid Cooler, refer to the following common problems and solutions.
| Problem | Możliwa przyczyna | Rozwiązanie |
|---|---|---|
| Wysokie temperatury procesora | Poor thermal paste application, pump not running, fans not spinning, dust buildup. | Reapply thermal paste, check pump power connection, ensure fans are spinning and connected correctly, clean radiator fins. |
| Hałas pompy | Air bubbles in the loop, pump running at incorrect speed. | Orient radiator higher than the pump if possible, gently tilt case to dislodge air bubbles, ensure pump is receiving full power. |
| Światła RGB nie działają | Incorrect RGB connection, software conflict, faulty controller. | Check RGB cable connections to controller/motherboard, ensure correct 3-pin 5V ARGB header is used, try different RGB software or controller. |
| Wentylatory nie kręcą się | Loose power connection, incorrect motherboard header, faulty fan. | Verify fan power connections, ensure fan headers are enabled in BIOS, test fans individually if possible. |
If the issue persists after attempting these solutions, please contact Xigmatek customer support.
9. Gwarancja i wsparcie
Xigmatek products are manufactured to high standards and undergo rigorous quality control. This product is covered by a limited warranty against defects in materials and workmanship. The specific warranty period may vary by region and retailer. Please retain your proof of purchase for warranty claims.
For technical support, warranty inquiries, or further assistance, please visit the official Xigmatek webodwiedź witrynę lub skontaktuj się z lokalnym sprzedawcą.
- Urzędnik Webstrona: www.xigmatek.com (Sprawdź różnice regionalne)
- Obsługa klienta: Zapoznaj się z sekcją pomocy na oficjalnej stronie webwitryna do informacji kontaktowych.