
1. Wprowadzenie
Dziękujemy za zakupasing the Nobsound Mini EL34 Tube Integrated Amplifier. This Class A, single-ended Hi-Fi amplifier is designed to deliver warm and rich audio performance. This manual provides essential information for the safe and optimal use of your amplifier, w tym konfiguracja, obsługa, konserwacja i rozwiązywanie problemów.
2. Instrukcje bezpieczeństwa
- Zasilanie: Zapewnij amplifier is connected to a 100V AC power supply. Using an incorrect voltage may damage the unit and void the warranty.
- Wentylacja: Do not block the ventilation holes on the amplifier. Ensure adequate airflow around the unit to prevent overheating.
- Wilgoć: Zachowaj ampPrzechowywać z dala od wody, wilgoci i środowisk o wysokiej wilgotności.
- Źródła ciepła: Unikaj umieszczania ampnie należy umieszczać w pobliżu źródeł ciepła, takich jak grzejniki, kratki wentylacyjne, piece i inne urządzenia wytwarzające ciepło.
- Obsługa rur: Vacuum tubes can become very hot during operation. Avoid touching them directly. Allow sufficient time for tubes to cool before handling or replacing.
- Serwisowanie: Nie próbuj samodzielnie naprawiać tego produktu. Wszelkie czynności serwisowe należy powierzyć wykwalifikowanemu personelowi serwisowemu.
- Czyszczenie: Przed czyszczeniem odłącz przewód zasilający. Użyj miękkiej, suchej ściereczki. Nie używaj środków czyszczących w płynie ani w aerozolu.
3. Zawartość opakowania
Sprawdź, czy w opakowaniu znajdują się wszystkie elementy:
- Nobsound Mini EL34 Tube Integrated Amplżejszy (x1)
- Przewód zasilający (x1)
- Vacuum Tubes: 5Z2P (x1), EL34 (x2), 6N1 (x1)

Description: This image displays the Nobsound Mini EL34 Tube Integrated Amplifier along with its accessories. The amplifier unit is shown with its dimensions (260W x 230D x 175H mm). Also included are the power cord and the four vacuum tubes (one 5Z2P, two EL34, and one 6N1) that come with the ampliyfikator.
4. Koniec produktuview
4.1 Panel przedni
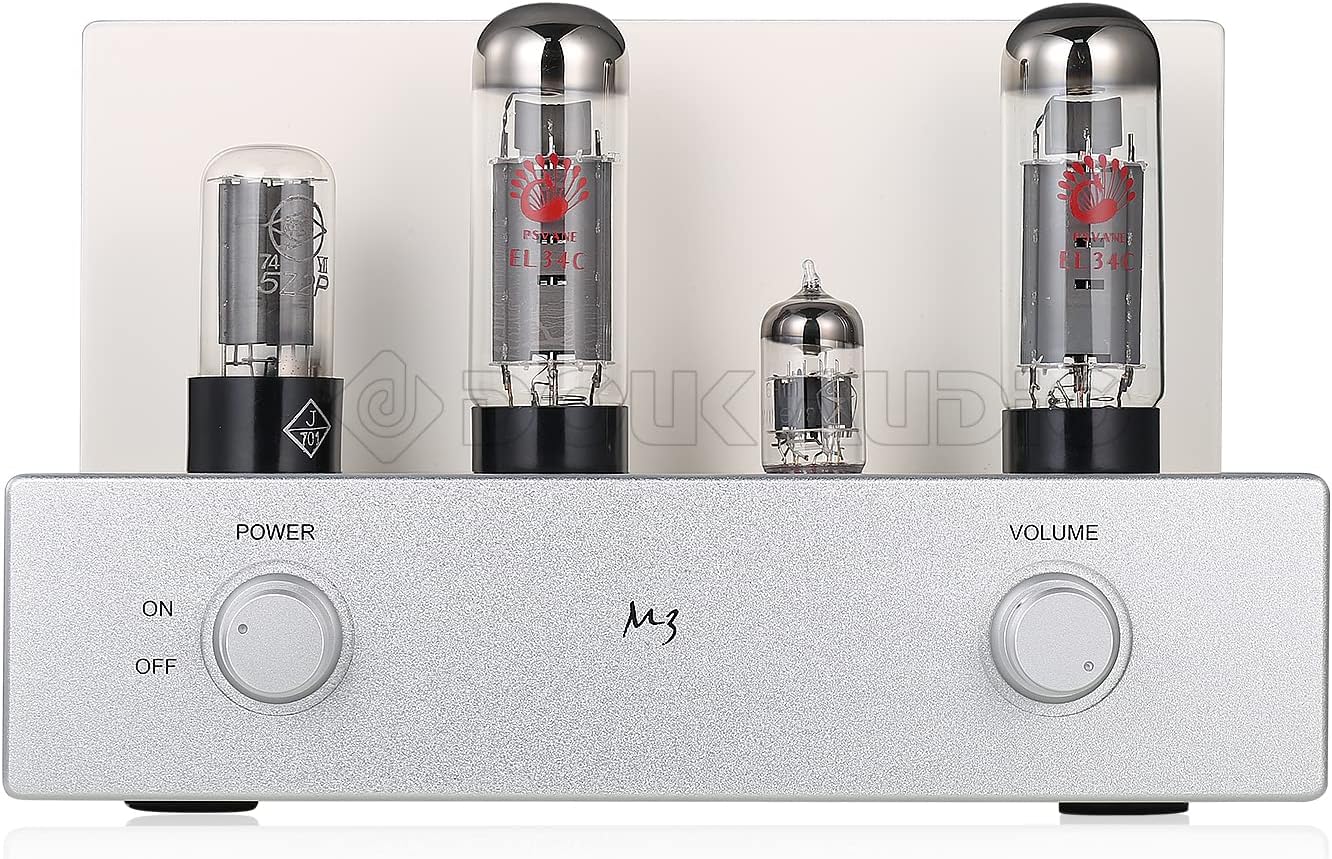
Description: This image shows the front panel of the Nobsound Mini EL34 Tube Integrated Amplifier. On the left, there is a rotary power switch with 'ON' and 'OFF' positions. On the right, a rotary volume control knob is visible. The vacuum tubes are prominently displayed on top of the unit.
- Przycisk zasilania: Obraca ampWŁ. lub WYŁ.
- Regulacja głośności: Reguluje ogólną głośność wyjściową.
4.2 Panel tylny

Description: This image displays the rear panel of the Nobsound Mini EL34 Tube Integrated Amplifier. From left to right, it features two sets of RCA audio inputs labeled 'PC' and 'CD', with a selector switch to choose between them. To the right are the speaker output terminals, supporting both 4Ω and 8Ω impedance connections via banana plugs or bare wire. On the far right is the AC power input socket.
- PC Input (RCA L/R): Audio input for connecting devices like computers.
- CD Input (RCA L/R): Audio input for connecting devices like CD players.
- Przełącznik wyboru wejścia: Toggles between PC and CD audio inputs.
- Zaciski wyjściowe głośnikowe: Connect your passive speakers. Supports 4Ω and 8Ω impedance.
- Pobór mocy: Tutaj podłącz dostarczony przewód zasilający.
5. Konfiguracja
5.1 Tube Installation (if not pre-installed)
If the vacuum tubes are not pre-installed, follow these steps:
- Carefully remove the tubes from their packaging.
- Identify the correct sockets for each tube type (5Z2P, EL34, 6N1). Refer to the markings on the amppodwozie lifier.
- Align the pins of each tube with the corresponding holes in the socket. Gently push the tube straight down until it is firmly seated. Do not force it.

Description: This image provides a close-up view of the four vacuum tubes used in the Nobsound Mini EL34 Tube Integrated Amplifier. From left to right, they are one 5Z2P rectifier tube, two EL34 power tubes, and one 6N1 pre-amplifier tube.
5.2 Podłączanie głośników
- Zapewnij amplifier is turned OFF and unplugged from the power outlet.
- Connect your passive speakers to the speaker output terminals on the rear panel.
- Match the speaker impedance (4Ω or 8Ω) to the corresponding terminals on the ampliyfikator.
- Podłącz dodatni (+) zacisk głośnika do dodatniego (+) zacisku ampgłośnika i zacisku ujemnego (-) głośnika do zacisku ujemnego (-) głośnika amplifier. Ensure secure connections.
5.3 Podłączanie źródeł dźwięku
- Connect your audio source (e.g., CD player, PC, streamer) to either the 'CD' or 'PC' RCA input jacks on the rear panel using appropriate RCA cables.
- Ensure left (L) and right (R) channels are correctly connected.
5.4 Połączenie zasilania
- After all audio and speaker connections are made, connect the supplied power cord to the power input socket on the rear panel.
- Podłącz drugi koniec przewodu zasilającego do gniazdka sieciowego 100 V prądu zmiennego.
6. Instrukcja obsługi
- Włączanie: Turn the Power Switch on the front panel to the 'ON' position. The tubes will begin to glow, indicating the amplifier is warming up. Allow a few moments for the tubes to stabilize before playing audio.
- Wybierz wejście: Use the Input Selector Switch on the rear panel to choose between the 'PC' or 'CD' audio input, corresponding to your connected source.
- Dostosuj głośność: Start with the Volume Control knob at its minimum setting. Begin playing audio from your source, then slowly turn the Volume Control clockwise to achieve your desired listening level.
- Wyłączone: Aby wyłączyć amplifier, turn the Power Switch to the 'OFF' position.
7. Konserwacja
- Czyszczenie: Regularnie wycieraj amplifier's exterior with a soft, dry cloth to remove dust. Do not use abrasive cleaners or solvents.
- Wymiana rurki: Vacuum tubes have a finite lifespan. If you notice a degradation in sound quality or a tube fails, it may need replacement. Ensure the amplifier is OFF and unplugged, and the tubes have cooled completely before attempting replacement. Gently pull the old tube straight out and insert the new tube, aligning the pins carefully.
- Wentylacja: Ensure the ventilation holes remain unobstructed to prevent overheating.
8. Rozwiązywanie Problemów
| Problem | Możliwa przyczyna | Rozwiązanie |
|---|---|---|
| Brak dźwięku |
|
|
| Zniekształcony dźwięk |
|
|
| Brzęczenie lub buczenie |
|
|
9. Specyfikacje
- Typ: Zintegrowana rura próżniowa Ampżywsze
- Model: Single-ended Class A
- Kanały: 2.0
- Czułość wejściowa: 550mV
- Moc wyjściowa: 2 × 8W (Ultralinear connection)
- Stosunek sygnału do szumu: 85dB
- Impedancja wejściowa: 100 kΩ
- Impedancja wyjściowa: 4Ω, 8Ω
- Zasilanie: 100 V prądu zmiennego
- Pobór mocy: 76 W
- Pasmo przenoszenia: 30Hz ~ 38KHz
- Rury próżniowe: 5Z2P (x1), EL34 (x2), 6N1 (x1)
- Wejście audio: Stereo L/R RCA (CD / AUX, PC)
- Wyjście audio: Gniazda głośnikowe typu banan
- Wymiary (szer.×głęb.×wys.): 260 mm × 230 mm × 175 mm
- Waga: 7.5kg
10. Gwarancja i wsparcie
Nobsound products are designed for reliability and performance. For warranty information or technical support, please refer to the documentation provided with your purchase or contact your retailer. Keep your purchase receipt as proof of purchase.
For further assistance, you may visit the official Nobsound webstronie lub skontaktuj się z działem obsługi klienta.