1. Wprowadzenie
The DNT Grabstar AV is a standalone video digitizer designed to convert analog video signals from sources like VCRs, camcorders, and DVD players into digital MP4 files. This device allows you to preserve your old video memories by saving them directly to an SD card, USB flash drive, or external USB hard drive without requiring a computer. It features a built-in 3.5-inch color display for monitoring and playback, and supports both Composite (RCA) and S-Video inputs for optimal quality.
Ważny: Always ensure your device is running the latest firmware. You can check your current firmware version in the device menu. The recommended firmware version is v210317dnt (dated 17.03.2021).
2. Zawartość opakowania
Sprawdź, czy w przesyłce znajdują się wszystkie elementy wymienione poniżej:
- 1 x DNT Grabstar AV Video Digitizer
- 1 x USB Power Adapter (5V DC/1A)
- 1 x kabel ładujący USB (micro USB)
- 1 x AV Cable (3 x RCA male to 3 x RCA male)
- 1 x Instrukcja obsługi

Image: DNT Grabstar AV device with its power adapter, USB cable, and RCA cable.
3. Urządzenie ponadview
Familiarize yourself with the various components and controls of your DNT Grabstar AV.

Obraz: Przód view of the DNT Grabstar AV, displaying the 3.5-inch screen and control panel with Menu, Back, OK, directional buttons, Mode, and Rec/Stop buttons.
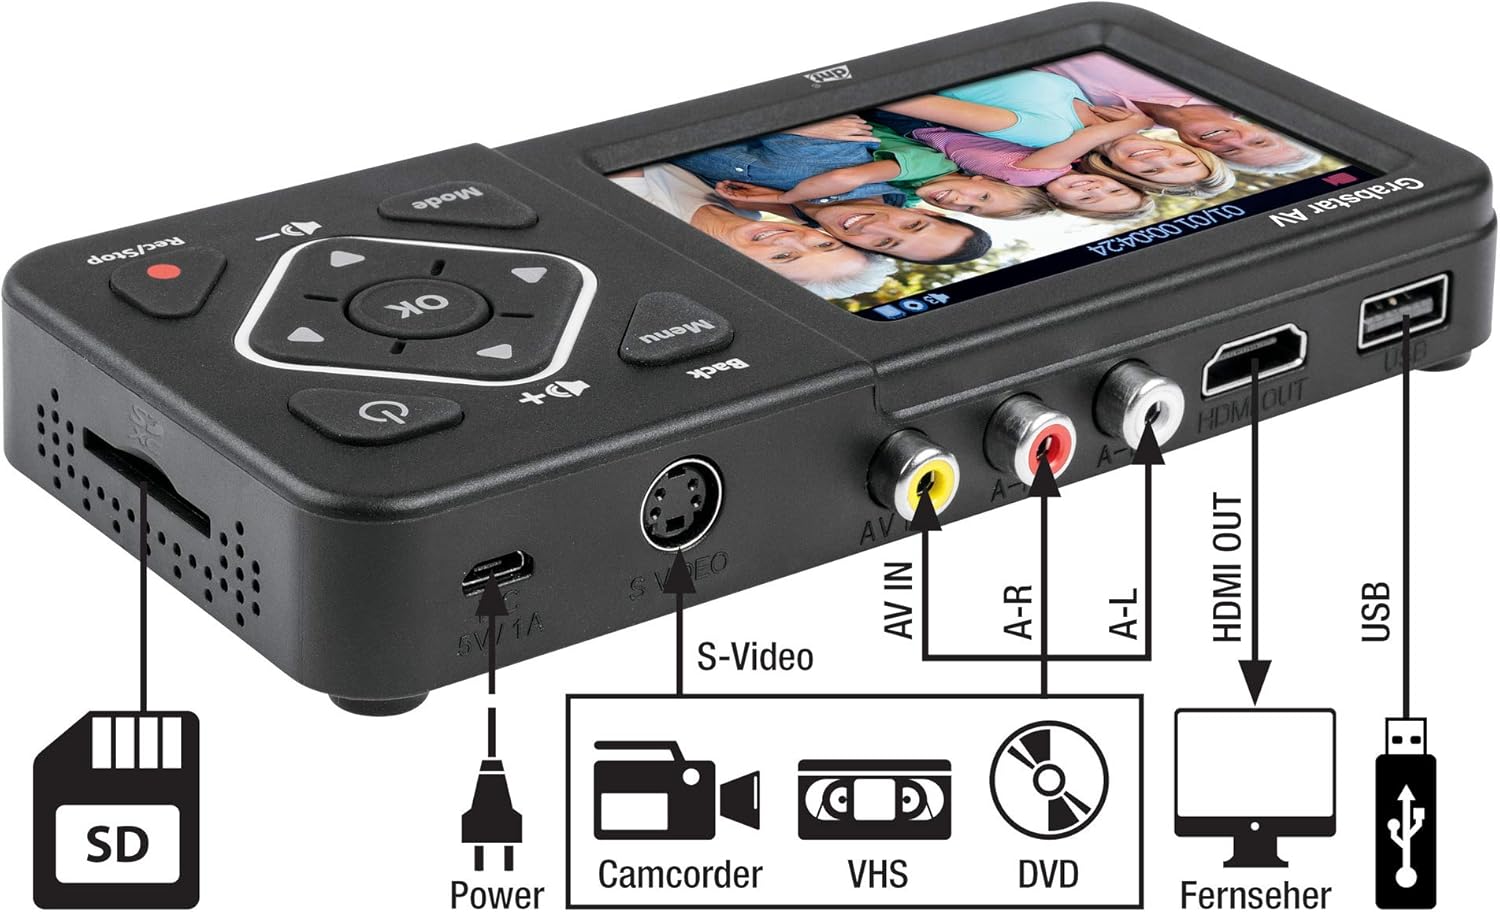
Obraz: kątowy view of the DNT Grabstar AV, highlighting the S-Video input, AV IN (RCA) ports, HDMI OUT, USB port, Micro USB power input, and SD card slot.
Sterowanie i porty:
- Kolorowy wyświetlacz o przekątnej 3.5 cala: For live monitoring and playback of recordings.
- Przycisk menu: Dostęp do ustawień i opcji urządzenia.
- Przycisk Wstecz: Powrót do poprzedniego menu lub ekranu.
- Przyciski kierunkowe (góra, dół, lewo, prawo): Poruszaj się po menu i dostosuj ustawienia.
- Przycisk OK: Potwierdza wybór.
- Przycisk trybu: Switches between recording and playback modes.
- Rec/Stop Button: Initiates and terminates video recording.
- Przyciski głośności (+/-): Reguluje głośność wbudowanego głośnika.
- Przycisk zasilania: Włącza lub wyłącza urządzenie.
- DC 5V/1A (Micro USB): Port wejściowy zasilania.
- S-Video Input: For connecting video sources with S-Video output.
- AV IN (RCA): Composite video (yellow) and stereo audio (red/white) input ports.
- WYJŚCIE HDMI: Connects to a TV or monitor for external display.
- Port USB: For connecting USB flash drives or external USB hard drives.
- Gniazdo karty SD: For inserting SD/SDHC memory cards.
4. Konfiguracja
Follow these steps to prepare your DNT Grabstar AV for use:
- Podłączenie zasilania: Connect the supplied USB power adapter to the Micro USB port (DC 5V/1A) on the device and plug it into a power outlet.
- Insert Storage Media: Insert an SD/SDHC memory card (Class 10 or higher, up to 128 GB) into the SD card slot, or connect a USB flash drive (up to 128 GB) or an external USB hard drive (up to 4 TB) to the USB port. Ensure the storage media is formatted to FAT32, NTFS, or exFAT.
- Connect Analog Video Source:
- Composite (RCA): Use the supplied AV cable to connect the yellow video output from your source device (VCR, camcorder, DVD player) to the yellow AV IN port on the Grabstar AV. Connect the red and white audio outputs from your source to the corresponding red (A-R) and white (A-L) AV IN audio ports.
- S-wideo: If your source device has an S-Video output, connect an S-Video cable to the S-Video port on the Grabstar AV. For audio, you must still connect the red and white audio RCA cables from your source to the Grabstar AV's A-R and A-L ports. S-Video only transmits video.
- (Optional) Connect to TV: Do view the input signal or recorded videos on a larger screen, connect an HDMI cable from the HDMI OUT port on the Grabstar AV to an HDMI input on your television or monitor.
5. Instrukcja obsługi
5.1 Włączanie/wyłączanie
Press and hold the Power button (⑁) on the device for a few seconds to turn it on or off.
5.2 Nagrywanie wideo
- Wybierz wejście: Ensure your analog video source is connected and powered on. The Grabstar AV will automatically detect the input signal (Composite or S-Video). The live video feed should appear on the 3.5-inch display.
- Start Source Playback: Begin playing the video on your source device (e.g., press Play on your VCR).
- Rozpocznij nagrywanie: Naciśnij Nagraj/Zatrzymaj (●) button on the Grabstar AV. A red recording indicator will appear on the screen, and the recording duration will be displayed.
- Monitor Recording: Observe the recording on the device's screen or an external TV connected via HDMI.
- Zatrzymaj nagrywanie: Naciśnij Nagraj/Zatrzymaj (●) button again to stop the recording. The device will save the video file to your inserted storage media.
Funkcja automatycznego nagrywania: The device supports automatic recording durations of 60, 90, 120, or 150 minutes. This can be configured in the device's menu settings.
Uwaga dotycząca File Rozmiar: Wskutek file system limitations (especially FAT32), individual recorded files are limited to a maximum size of 4 GB. If a recording exceeds this limit, the device will automatically split it into multiple 4 GB files.
Rozdzielczość nagrywania: The Grabstar AV supports recording resolutions of 720x576p, 720x480p, and 640x480p. For analog sources, higher recording resolutions do not necessarily improve the visual quality, as the native resolution of analog material is inherently low. Selecting a higher resolution than the source material may not yield better results and can sometimes lead to less optimal digitization.
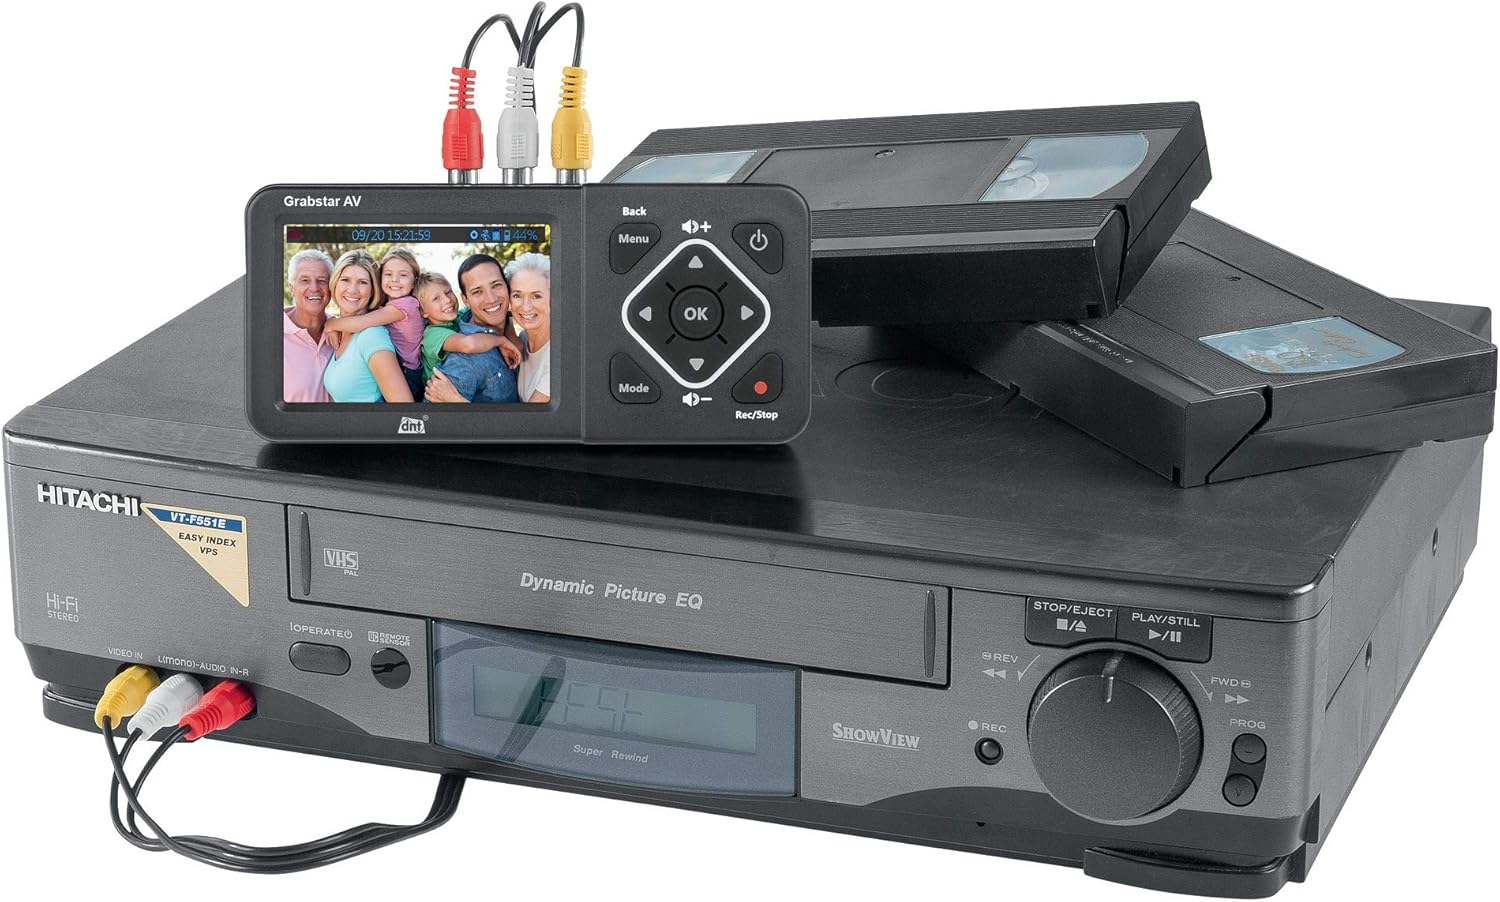
Image: The DNT Grabstar AV connected to a VHS player, demonstrating the process of digitizing old video tapes.
5.3 Odtwarzanie
To play back recorded videos:
- Naciśnij Tryb przycisk, aby przejść do trybu odtwarzania.
- Use the directional buttons to navigate through your recorded files.
- Naciśnij OK przycisk, aby rozpocząć odtwarzanie wybranego file.
- If connected to a TV via HDMI, the video will be displayed on the external screen.
5.4 File Kierownictwo
You can access and manage your recorded MP4 files directly on the inserted SD card or USB storage device. Connect the storage media to a computer to transfer, edit, or back up your digitized videos.
6. Konserwacja
6.1 Czyszczenie
Przetrzyj urządzenie miękką, suchą ściereczką. Nie używaj płynnych środków czyszczących ani materiałów ściernych, ponieważ mogą one uszkodzić ekran lubasing.
6.2 aktualizacji oprogramowania sprzętowego
Periodically check the DNT website for available firmware updates. Updates can improve performance, add features, or resolve issues. Firmware updates are typically performed via USB or SD card. Refer to the DNT support resources for detailed instructions on how to update your device's firmware.
7. Rozwiązywanie Problemów
If you encounter issues with your DNT Grabstar AV, refer to the following common problems and solutions:
- Brak sygnału:
- Ensure your source device (VCR, camcorder) is powered on and playing video.
- Verify that all video cables (Composite or S-Video) are securely connected to both the source device and the Grabstar AV.
- Check the input selection on the Grabstar AV if there is an option to manually switch.
- Sprawdź kable pod kątem uszkodzeń.
- No Audio During Recording or Playback:
- Ensure the red (A-R) and white (A-L) audio RCA cables are correctly connected from your source device to the Grabstar AV. Even when using S-Video for video, audio must be connected via RCA cables.
- Check the volume level on the Grabstar AV using the volume buttons.
- Verify the audio output settings on your source device.
- Recording Not Starting or Stopping Unexpectedly:
- Ensure a compatible storage device (SD card, USB drive) is inserted and has sufficient free space.
- Check the formatting of your storage media (FAT32, NTFS, exFAT).
- Confirm that a stable video signal is present before pressing the record button. The device will only record if it detects an active input signal.
- For external hard drives, ensure they have their own power supply if required.
- Słaba jakość wideo:
- The quality of the digitized video is highly dependent on the quality of the original analog source material and playback device.
- Ensure video tapes or other media are clean and in good condition.
- Use S-Video connection if available on your source device for potentially better video quality compared to Composite (RCA).
- Storage Media Not Recognized:
- Ensure the SD card or USB drive is inserted correctly.
- Verify the storage media is formatted to a supported file system (FAT32, NTFS, exFAT).
- Try a different SD card or USB drive to rule out media issues.
8. Specyfikacje
| Funkcja | Specyfikacja |
|---|---|
| Typ produktu | Analogowy digitalizator wideo |
| Wyświetlacz | 3.5-inch (8.9 cm) Color Screen |
| Standard wideo | PAL, NTSC |
| Obsługiwane rozdzielczości wejściowe | 720x576i/50Hz (625 lines), 720x480i/60Hz (525 lines) |
| Rozdzielczości nagrywania | 720x576p, 720x480p, 640x480p |
| Format nagrywania | MP4 (H.264) |
| Recording Size | Up to 150 MB/minute |
| Wejścia | 1 x FBAS/RCA (3 x RC), 1 x S-Video |
| Wyjścia | 1 wyjście HDMI |
| Porty magazynowe | 1 x USB, 1 x SD/SDHC slot |
| Obsługiwane typy pamięci masowej | SD/SDHC memory card (up to 128 GB), USB flash drive (up to 128 GB), USB hard drive (up to 4 TB) |
| Utrzymany File Systemy | FAT32/NTFS/exFAT (max. 4 GB/file) |
| Zasilacz | 5V DC/1A (via USB power adapter) |
| Wbudowany głośnik | Yes, 1 W RMS |
| Wymiary (szer. x wys. x gł.) | Wymiary: 160 x 75 x 25 mm |
| Waga | 156 g (ok. 5.5 uncji) |
9. Gwarancja i wsparcie
The DNT Grabstar AV comes with a standard manufacturer's warranty. Please refer to the warranty information provided with your purchase for specific terms and conditions. For technical support, firmware updates, or further assistance, please visit the official DNT webstronie lub skontaktuj się z działem obsługi klienta.


