1. Wprowadzenie
This manual provides essential information for the safe and effective use of your Lepro HeadLamp Model 320015-2. Please read these instructions thoroughly before operation and retain for future reference.
Zawartość pudełka:
- 2 x Lepro HeadLamps
2. Główne cechy
- Bardzo jasna dioda LED: Equipped with a powerful XPG2 LED, providing up to 1300 lux illumination and a beam distance of up to 400 feet (120 meters).
- Wiele trybów oświetlenia: Features 6 distinct lighting modes including spot light (high/low), flood light (high/low), and red light (stay on/flash) for various needs.
- Regulowany pałąk: Removable, washable, and elastic headband ensures a comfortable fit for adults and children, and can be worn over hard hats or helmets.
- 45° Tilt Function: Ergonomic design allows for a 45-degree adjustable angle, reducing neck strain and ensuring light is directed where needed.
- Trwałe i odporne na warunki atmosferyczne: IPX4 water-resistant rating protects against splashing water from any angle. Impact-resistant construction withstands drops, rain, cold, and heat.
- Lekka konstrukcja: Weighs only 1.94 ounces (without batteries), making it ideal for extended wear during activities like running and hiking.

Obraz: Ponadview of Lepro HeadLamps highlighting Cree XP-G2 LEDs, IPX4 resistance, protective coating, 6 lighting modes, and adjustable head.
3. Konfiguracja
3.1 Instalacja baterii
The Lepro HeadLamp requires 3 AAA batteries (not included). Follow these steps to install the batteries:
- Znajdź komorę baterii z tyłu reflektora.amp jednostka.
- Ostrożnie otwórz pokrywę komory baterii.
- Włóż 3 baterie AAA, zwracając uwagę na prawidłową biegunowość (+/-), zgodnie ze wskazaniami wewnątrz komory.
- Zamknij pokrywę komory baterii, aż zatrzaśnie się na swoim miejscu.
Video: Demonstrates the process of installing 3 AAA batteries into the Lepro HeadLamp.
3.2 Regulacja opaski na głowę
The elastic headband is adjustable to fit various head sizes, from children to adults, and can accommodate hard hats or helmets.
- Umieść głowicęamp na głowie.
- Use the adjustable buckles on the sides of the headband to tighten or loosen it until a comfortable and secure fit is achieved.

Image: Illustrates the versatility of the adjustable headband, fitting various users including adults, children, and over a hard hat.
4. Instrukcja obsługi
Your Lepro HeadLamp features two buttons on the top for controlling the lighting modes.

Obraz: Zbliżenie view głowyamp's top, indicating the 'General Switch' for ON/OFF and output selection, and the 'Functional Switch' for red/green/strobe modes.
4.1 Tryby włączania/wyłączania i światła białego
Użyj Przełącznik ogólny (typically the larger button) to control the white light modes:
- Naciśnij raz, aby Spot Light - Low.
- Naciśnij ponownie, aby Spot Light - High.
- Naciśnij trzeci raz, aby Flood Light - Low.
- Naciśnij czwarty raz, aby Flood Light - High.
- Press a fifth time to turn the headlamp WYŁĄCZONY.
4.2 Tryby światła czerwonego
Użyj Functional Switch (typically the smaller button) to access the red light modes:
- Naciśnij raz, aby Red Light - Stay On.
- Naciśnij ponownie, aby Red Light - Flash (emergency signal).
- Press a third time to turn the red light OFF.
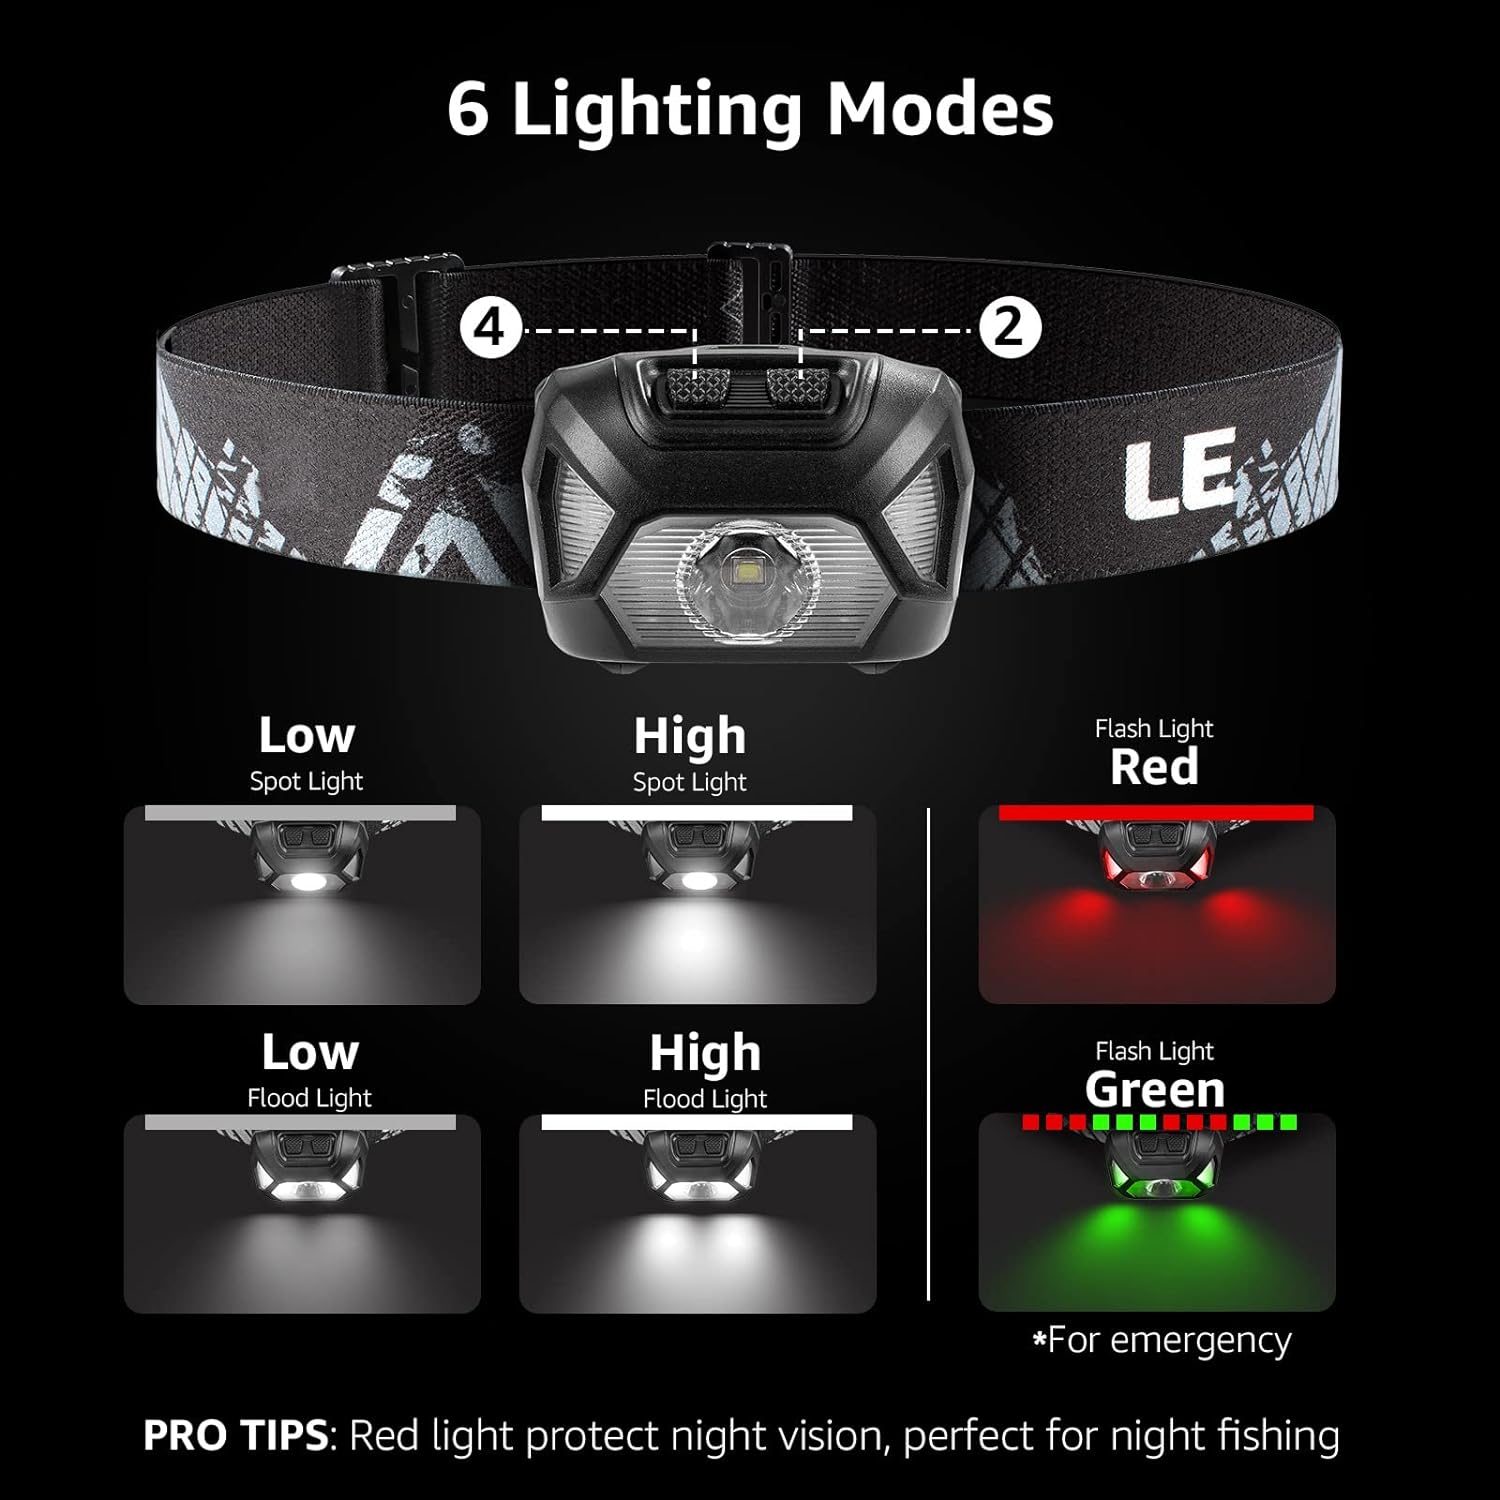
Image: Visual representation of the six available lighting modes: Spot Light (Low/High), Flood Light (Low/High), and Red Light (Stay On/Flash).
4.3 Funkcja pochylania
Naczelnyamp unit can be tilted up to 45 degrees to adjust the beam direction without needing to reposition your head. Simply grasp the headlamp unit and gently pivot it to the desired angle.

Obraz: Szczegółowy view głowyamp's adjustable headband, 45-degree tilt mechanism, and shockproof rubber coating.
Video: Demonstrates the various lighting modes and the 45-degree tilt function of the Lepro HeadLamp.
5. Konserwacja
5.1 Czyszczenie
Aby wyczyścić głowicęamp, przetrzyj miękką,amp Ściereczką. Nie używaj środków czyszczących ani rozpuszczalników o działaniu ściernym. Pałąk jest zdejmowany i nadaje się do prania.
5.2 Przechowywanie
When not in use for extended periods, remove the batteries to prevent leakage and store the headlamp w chłodnym i suchym miejscu.
5.3 Wodoodporność
Naczelnyamp is IPX4 water-resistant, meaning it is protected against splashing water from any direction. It is not designed for submersion in water.
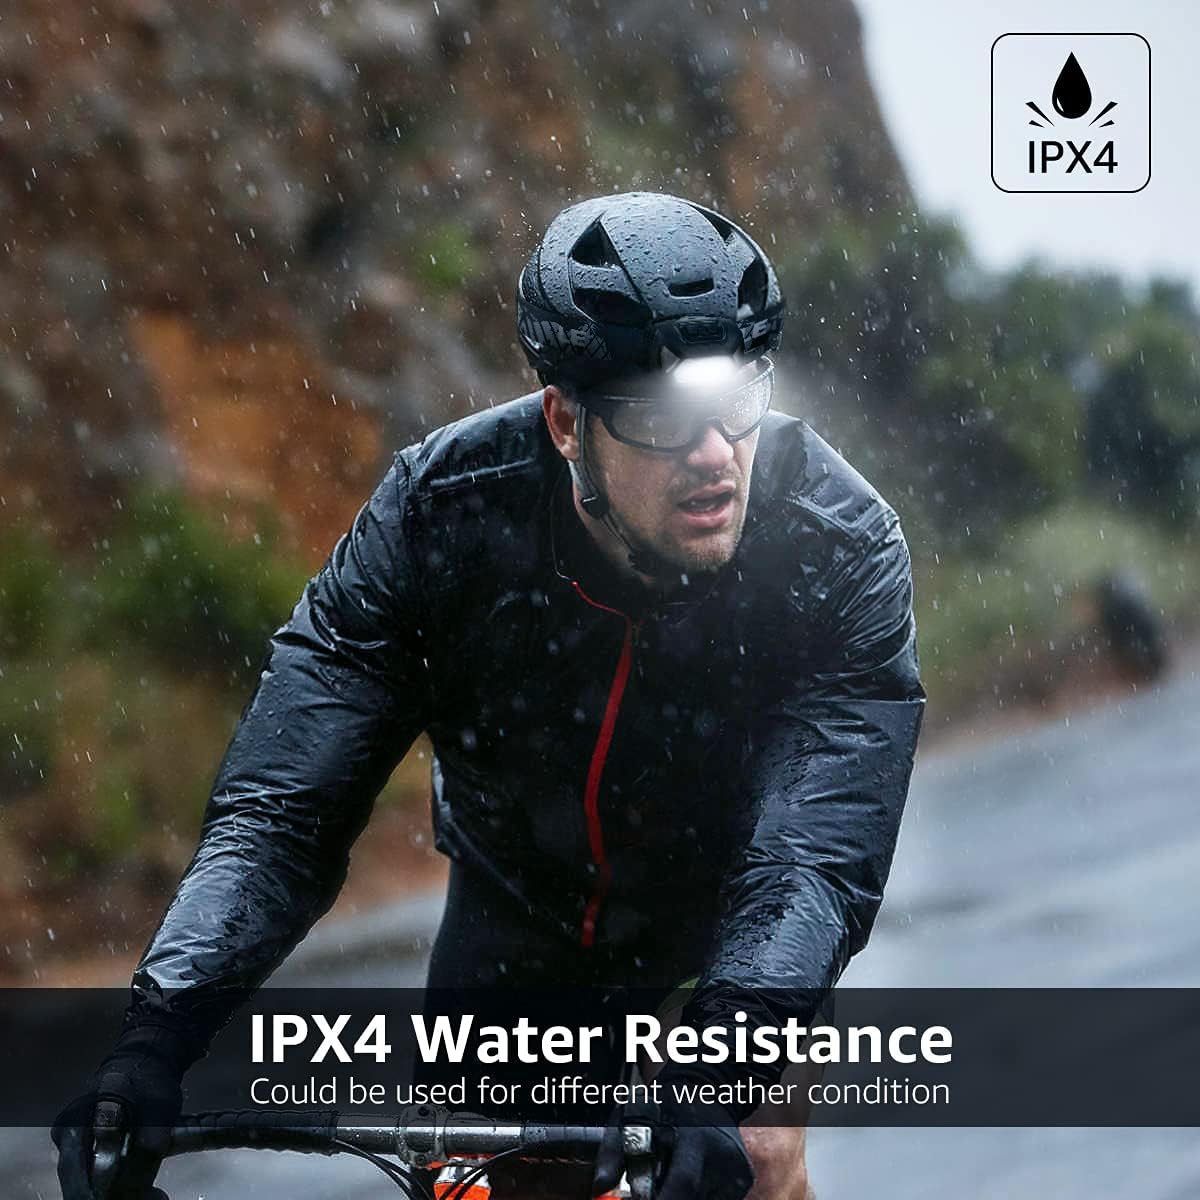
Image: A person cycling in the rain demonstrates the IPX4 water resistance of the Lepro HeadLamp, suitable for various weather conditions.
6. Rozwiązywanie Problemów
6.1 Światło się nie włącza
- Upewnij się, że baterie zostały włożone prawidłowo, z zachowaniem właściwej polaryzacji.
- Wymień stare baterie na nowe.
- Sprawdź, czy nie ma widocznych uszkodzeń komory baterii lub styków.
6.2 Moc światła przyciemnionego
- Batteries may be low. Replace with fresh batteries.
- Upewnij się, że soczewka jest czysta i wolna od brudu i przeszkód.
7. Specyfikacje
| Funkcja | Specyfikacja |
|---|---|
| Numer modelu | 320015-2 |
| Marka | Trąd |
| Typ źródła światła | LED (XPG2) |
| Jasność | Up to 1300 lux (200 Lumens White Brightness) |
| Odległość wiązki | Up to 400 FT / 120m (Spot Light) |
| Tryby oświetlenia | 6 (Spot High/Low, Flood High/Low, Red Stay On/Flash) |
| Źródło zasilania | Zasilany bateryjnie (wymagane 3 baterie AAA, nie dołączone) |
| Battery Life (Low Setting) | Do 22 godzin |
| Poziom wodoodporności | IPX4 (odporność na wodę) |
| Cechy specjalne | 45° Tilt, Impact Resistant |
| Tworzywo | ABS Poliwęglan |
| Waga przedmiotu | 1.94 uncji (bez baterii) |
| Wymiary produktu | 2.48" gł. x 1.77" szer. x 1.38" wys. |
8. Gwarancja i wsparcie
8.1 Informacje o gwarancji
This product comes with a manufacturer and seller combination warranty. For specific details regarding warranty coverage and duration, please refer to the documentation included with your purchase or contact Lepro customer service.
8.2 Obsługa klienta
For any questions, technical assistance, or support needs, please visit the official Lepro weblub skontaktuj się z działem obsługi klienta. Dane kontaktowe zazwyczaj znajdują się na opakowaniu produktu lub oficjalnej stronie marki. webstrona.