
1. Wprowadzenie
The AstralPool NA6888 is a sophisticated regulator, controller, and display unit designed for integration with AstralPool heat pump systems. This device provides essential control and monitoring functionalities for your heat pump, ensuring efficient and reliable operation. Please note that this unit is not compatible with remote control systems.
This manual provides detailed instructions for the proper installation, operation, and maintenance of your NA6888 unit. Please read this manual thoroughly before installation and use to ensure safe and optimal performance.
2. Informacje dotyczące bezpieczeństwa
Aby zapobiec obrażeniom ciała lub uszkodzeniu urządzenia, należy zawsze przestrzegać następujących wytycznych bezpieczeństwa:
- Bezpieczeństwo elektryczne: This unit operates on 220V AC. All electrical connections must be performed by a qualified electrician in accordance with local electrical codes and regulations. Ensure the power supply is disconnected before any installation or maintenance work.
- Ochrona środowiska: The NA6888 unit has an IP65 protection rating, meaning it is protected against dust ingress and low-pressure water jets from any direction. However, avoid direct high-pressure water jets or submersion.
- Prawidłowe użycie: Use the device only for its intended purpose as a regulator, controller, and display for AstralPool heat pumps. Do not attempt to modify the unit.
- Obsługiwanie: Aby uniknąć uszkodzeń fizycznych, należy obchodzić się z urządzeniem ostrożnie.
3. Funkcje produktu
The NA6888 unit offers a range of features for comprehensive heat pump management:
- Zintegrowane sterowanie: Combines regulation, control, and display functions in a single compact unit.
- Wejścia czujników: Supports dedicated inputs for a Temperature Sensor (T1) and a Defrost Sensor (T2).
- Wejścia alarmowe: Features three external alarm signal inputs (S1, S2, S3) for enhanced system monitoring.
- Kontrola wyjścia: Provides control outputs for key heat pump components including Water Pump, Fan, Valve, and Compressor.
- Trwała konstrukcja: IP65 rated enclosure for protection against dust and water splashes.

Rycina 3.1: Przód view of the NA6888 controller display, showing the digital readout and control buttons.
4. Zawartość opakowania
Po otwarciu opakowania należy sprawdzić, czy znajdują się w nim wszystkie poniższe elementy:
- 1x NA6888 Regulator-Controller-Display Unit
- 1x Wiring Harness/Cables
- 2x klipsy montażowe

Figure 4.1: Included wiring harness.

Figure 4.2: Mounting clips.
5. Konfiguracja i instalacja
Installation of the NA6888 unit requires careful attention to electrical connections. It is strongly recommended that installation be performed by a qualified and licensed professional.
5.1. Montaż urządzenia
- Identify a suitable location for the controller, ensuring it is protected from direct sunlight, extreme temperatures, and excessive vibration.
- Cut an appropriate opening in the mounting panel or enclosure, matching the dimensions of the NA6888 unit.
- Insert the NA6888 unit into the opening from the front.
- Secure the unit in place using the provided mounting clips on the sides, ensuring a snug fit.
5.2. Połączenia okablowania
Refer to the wiring diagram printed on the back of the NA6888 unit for precise connection points. Ensure all connections are secure and correctly polarized.
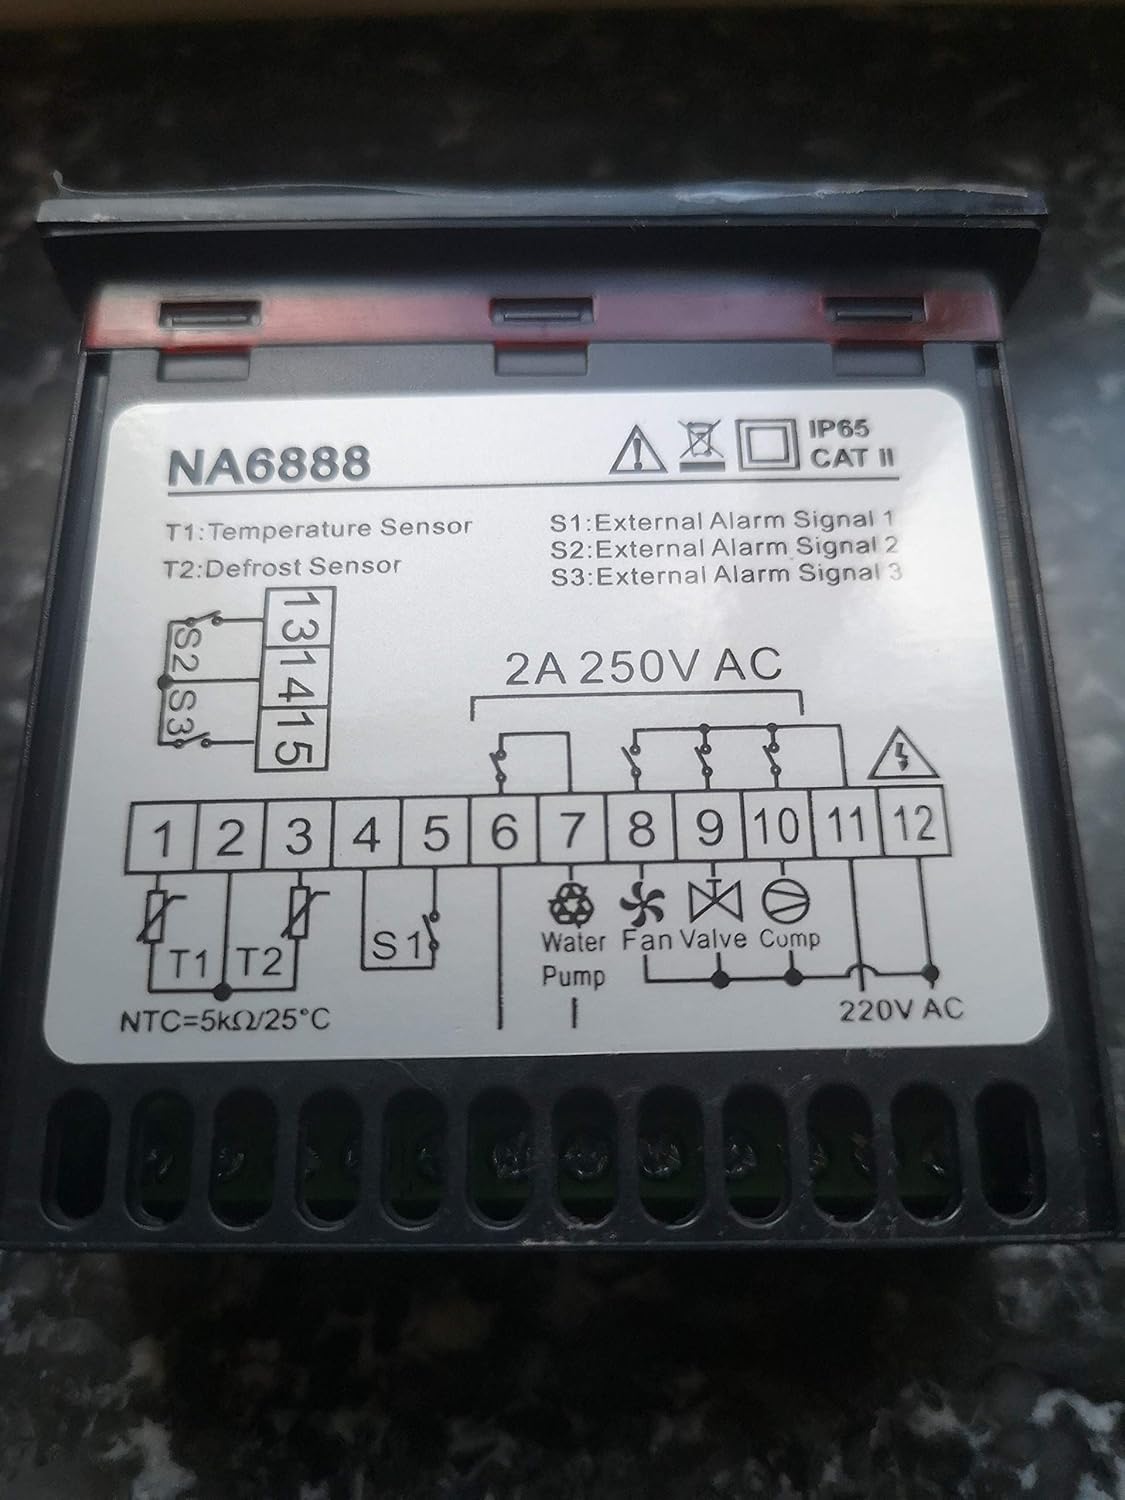
Figure 5.1: NA6888 Wiring Diagram.
Opisy terminali:
| Terminal | Opis | Notatki |
|---|---|---|
| T1 | Czujnik temperatury | Connect the main temperature sensor (NTC=5kΩ/25°C). |
| T2 | Czujnik odszraniania | Connect the defrost sensor. |
| S1, S2, S3 | External Alarm Signals | Inputs for external alarm triggers. |
| 1, 2 | Moc wejściowa | Connect to 220V AC power supply. |
| 6, 7 | Water Pump Output | Control output for the water pump. |
| 8, 9 | Wyjście wentylatora | Control output for the fan. |
| 10, 11 | Wyjście zaworu | Control output for the valve. |
| 11, 12 | Wyjście sprężarki | Control output for the compressor. Note shared terminal 11 with Valve. |
After all connections are made, double-check the wiring against the diagram to prevent damage to the unit or connected components.
6. Instrukcja obsługi
Once installed and powered on, the NA6888 display will illuminate, showing current system parameters. The unit features several buttons for navigation and setting adjustments:
- W górę (^) Przycisk: Used to increase values or navigate up through menu options.
- W dół (v) Przycisk: Used to decrease values or navigate down through menu options.
- Przycisk SET: Used to enter a menu, confirm a selection, or save a setting.
- Przycisk M (Menu): Used to access the main menu or exit a sub-menu.
6.1. Podstawowa obsługa
- Włączanie: Ensure the unit is correctly wired and power is supplied. The display will show the current temperature or system status.
- ViewParametry wejściowe: Use the Up/Down buttons to cycle through various displayed parameters (e.g., temperature readings from T1/T2, set points, operational status).
- Zmiana ustawień:
- Naciśnij USTAWIĆ button to enter the setting mode for the currently displayed parameter, or press the M przycisk, aby uzyskać dostęp do menu głównego.
- Use the Up/Down buttons to adjust the value.
- Naciskać USTAWIĆ again to confirm and save the new value.
- Naciskać M to exit the menu or setting mode.
For detailed programming and advanced settings, refer to the specific programming guide for your AstralPool heat pump model, as the NA6888 acts as the interface for these settings.
7. Konserwacja
The NA6888 unit is designed for low maintenance. Regular checks can help ensure its longevity and proper function:
- Czyszczenie: Okresowo czyść wyświetlacz iasing z miękkim, damp Ściereczką. Nie używaj środków czyszczących o działaniu ściernym ani rozpuszczalników. Upewnij się, że do urządzenia nie dostanie się żaden płyn.
- Kontrola połączenia: Annually, or if issues arise, have a qualified technician check all electrical connections for tightness and signs of corrosion.
- Warunki środowiskowe: Ensure the unit remains within its specified operating environment (temperature, humidity) and that its IP65 rating is not compromised by physical damage.
8. Rozwiązywanie Problemów
If you encounter issues with your NA6888 unit, consider the following common troubleshooting steps. For complex problems, always consult a qualified technician.
| Problem | Możliwa przyczyna | Rozwiązanie |
|---|---|---|
| Wyświetlacz jest pusty | No power supply; Loose connection; Unit failure. | Check power source (220V AC). Verify wiring connections. If power is present and connections are secure, the unit may require replacement. |
| Nieprawidłowy odczyt temperatury | Faulty sensor (T1 or T2); Loose sensor connection. | Check sensor wiring. Test sensor resistance (NTC=5kΩ/25°C). Replace sensor if faulty. |
| Outputs (Pump, Fan, etc.) not activating | Incorrect settings; Wiring issue; Component failure. | Verify controller settings. Check wiring to the respective component. Test the component itself. |
| External alarm not registering | Incorrect wiring to S1/S2/S3; Faulty external alarm device. | Check wiring to alarm inputs. Test the external alarm device. |
If troubleshooting steps do not resolve the issue, contact AstralPool customer support or a certified service technician. Information regarding spare parts availability is not provided.
9. Specyfikacje
| Parametr | Wartość |
|---|---|
| Numer modelu | NA6888 |
| Marka | AstralPool |
| Zasilacz | 220 V AC, maks. 2 A |
| Wejście czujnika temperatury | T1 (NTC=5kΩ/25°C) |
| Defrost Sensor Input | T2 |
| Zewnętrzne wejścia alarmowe | S1, S2, S3 |
| Wyjścia sterujące | Water Pump, Fan, Valve, Compressor |
| Stopień ochrony | IP65 |
| Kategoria instalacji | CAT II |
| ASIN | B07XGCN44T |
| Pierwsza dostępna data | 21 czerwca 2021 |
10. Gwarancja i wsparcie
Specific warranty terms for the NA6888 unit are typically provided at the point of purchase or can be obtained directly from AstralPool. Please retain your proof of purchase for warranty claims.
For technical support, service, or inquiries regarding spare parts, please contact AstralPool customer service or your authorized dealer. Contact information can usually be found on the AstralPool official webstronie lub w dokumentacji zakupu.