
1. Wprowadzenie
The Protmex PT625A is a handheld digital anemometer designed for measuring air velocity and airflow. This device is suitable for various applications, including environmental monitoring, HVAC system analysis, outdoor sports, and industrial use. It provides accurate and fast readings with multiple measurement units and data handling capabilities.
2. Koniec produktuview
2.1 Składniki
- Air Velocity Flow Sensor: The fan blade assembly at the top of the device.
- Wyświetlacz: LCD screen for showing measurement readings and indicators.
- Przyciski sterujące: Power, Function, Unit, Max/Min/Avg, Data Hold, Record.
- Komora baterii: Znajduje się z tyłu i służy do montażu baterii.
- Port micro USB: For data connection (on some models, not explicitly stated for PT625A but mentioned in video).
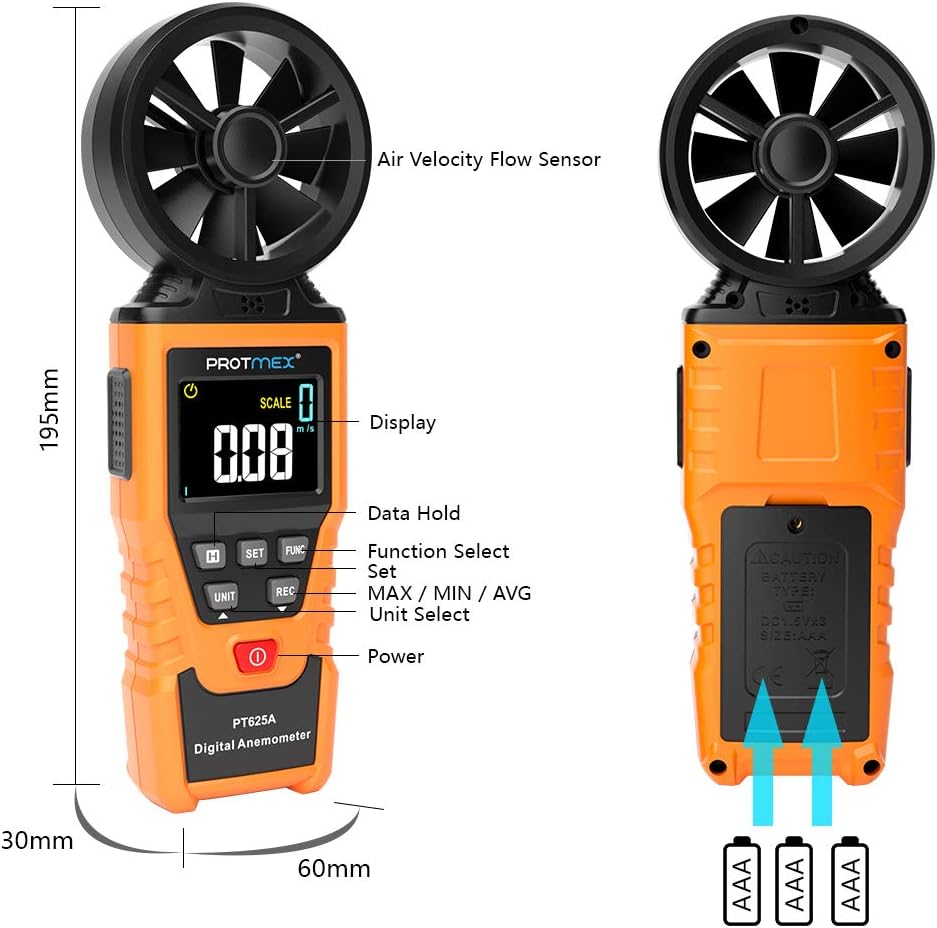
Rycina 1: Przód view of the Protmex PT625A Anemometer with key components labeled, including the air velocity flow sensor, display, and control buttons.
2.2 Funkcje
- High accuracy for wind speed measurement (0.4~40 m/s).
- Multiple units for wind speed: m/s, km/h, ft/s, knots, mil/h, fp/m.
- Air volume measurement in CFM, CMM, CMS.
- 8-blade aviation wing fan for sensitive and accurate readings.
- MAX/MIN/AVG data display.
- Funkcja zatrzymania danych.
- Automatyczne wyłączanie zasilania.
- Wskaźnik niskiego poziomu naładowania baterii.
- Air duct area setting for airflow calculation.
3. Konfiguracja
3.1 Instalacja baterii
- Znajdź komorę baterii z tyłu urządzenia.
- Za pomocą śrubokręta otwórz pokrywę komory baterii.
- Włóż dostarczoną baterię 9 V, zwracając uwagę na prawidłową biegunowość (+/-).
- Załóż pokrywę komory baterii i zabezpiecz ją śrubą.

Rysunek 2: Tył view of the anemometer, indicating the battery compartment where a 9V battery is inserted. A screwdriver is required to open the compartment.
4. Instrukcja obsługi
4.1 Włączanie/wyłączanie zasilania
Naciśnij Moc przycisk ( ) to turn the device on or off. The device features an auto power-off function to conserve battery life.
4.2 Measuring Air Velocity
- Turn on the anemometer.
- Point the air velocity flow sensor (fan) directly into the airflow you wish to measure. Ensure the airflow passes through the fan blades.
- The current air velocity reading will be displayed on the LCD screen.
- Naciśnij JEDNOSTKA button to cycle through different measurement units (m/s, km/h, ft/s, knots, mil/h, fp/m).

Figure 3: The anemometer being used to measure wind speed in an outdoor environment, demonstrating how to position the sensor into the airflow.
4.3 Airflow Measurement (CFM/CMM/CMS)
- Turn on the anemometer.
- Naciśnij FUNC button to enter airflow measurement mode.
- Użyj USTAWIĆ button to input the cross-sectional area of the air duct or channel. This is crucial for accurate airflow calculation.
- Once the area is set, point the sensor into the airflow. The device will display the airflow volume in CFM, CMM, or CMS.
- Naciśnij JEDNOSTKA button to select the desired airflow unit.

Figure 4: Illustration of the anemometer displaying airflow measurement after setting the air duct area. The screen shows both area input and calculated flow.
4.4 Data Hold, Max/Min/Avg, and Record Functions
- Przechowywanie danych: Naciśnij TRZYMAĆ Naciśnij przycisk, aby zamrozić aktualny odczyt na wyświetlaczu. Naciśnij ponownie, aby zwolnić.
- MAKS./MIN./ŚRED.: Naciśnij MAX/MIN/ŚREDNIE button to cycle through maximum, minimum, and average readings during a measurement session.
- Nagrywać: Naciśnij REK button to initiate data recording. (Note: Specific details on data storage and retrieval may be in the full manual or software).
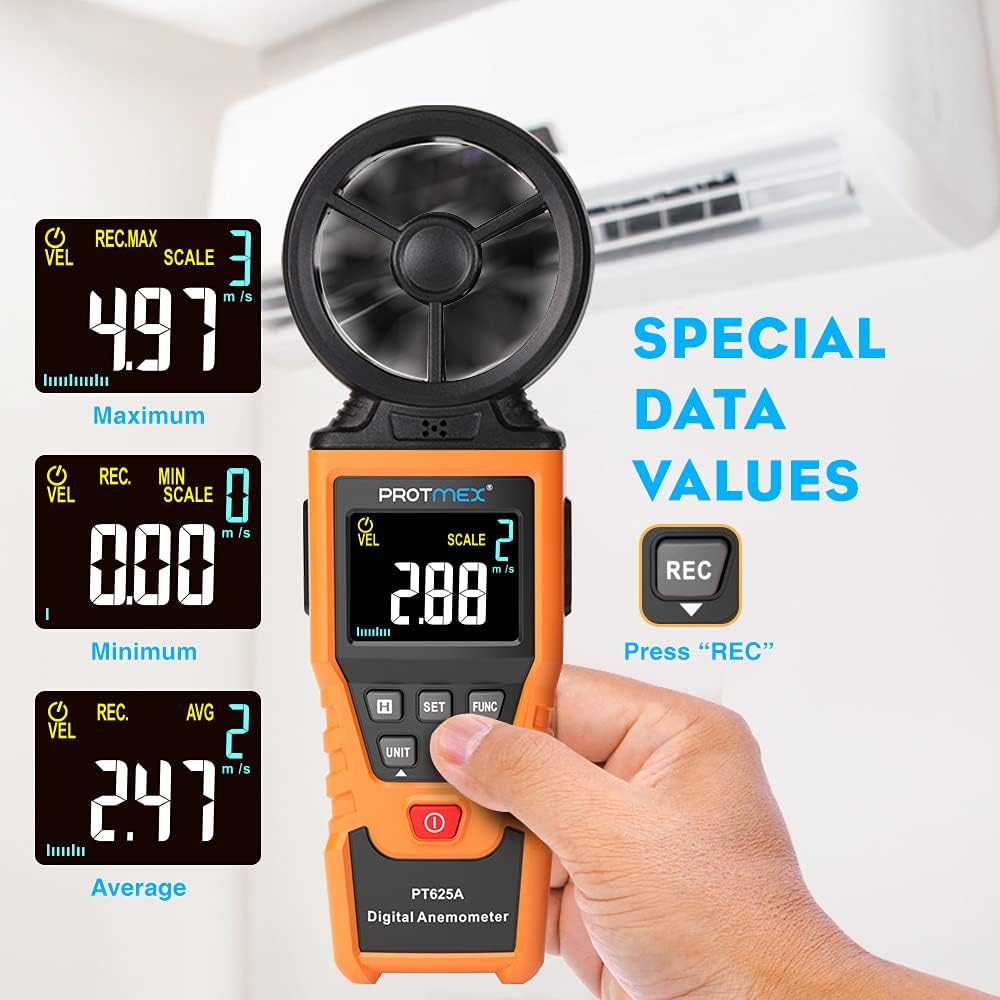
Figure 5: The anemometer's display showing maximum, minimum, and average wind velocity readings, accessible via the dedicated buttons.
5. Konserwacja
- Utrzymuj urządzenie w czystości i suchości. Przecieraj miękką, miękką szmatką.amp ściereczka. Nie należy używać środków czyszczących o właściwościach ściernych ani rozpuszczalników.
- Ensure the fan blades are free from dust and debris to maintain measurement accuracy.
- Jeśli nie używasz urządzenia przez dłuższy czas, wyjmij baterię, aby zapobiec wyciekowi.
- Store the anemometer in its protective case in a cool, dry place.
6. Rozwiązywanie Problemów
- Brak wyświetlacza/urządzenie się nie włącza:
- Sprawdź, czy bateria została zainstalowana prawidłowo, z zachowaniem właściwej polaryzacji.
- Wymień baterię, jeśli jest słaba lub wyczerpana.
- Niedokładne odczyty:
- Ensure the fan blades are clean and spinning freely.
- Verify that the sensor is pointed directly into the airflow.
- Check if the correct measurement unit is selected.
- For airflow measurements, confirm the air duct area setting is accurate.
- Przyciski nie odpowiadają:
- Wyłącz urządzenie i włącz je ponownie.
- Wymień baterię.
7. Specyfikacje
| Parametr | Wartość |
|---|---|
| Zakres prędkości wiatru | 0.4~40 m/s |
| Jednostki prędkości wiatru | m/s, km/h, ft/s, knots, mil/h, fp/m |
| Air Volume Units | CFM, CMM, CMS |
| Sampling czas | Approx. 0.5s/time |
| Maksymalna wartość wyświetlania | 9999 |
| Zasilacz | Bateria 9V |
| Wymiary (dł. x szer. x wys.) | 8.85 x 4.52 x 1.77 cala |
| Waga przedmiotu | 10 uncji |
| Tworzywo | Guma |

Figure 6: A detailed screen introduction showing various symbols and their descriptions, including MAX, MIN, AVG, VEL, FLOW, AREA, and different units of measurement.
8. Gwarancja i wsparcie
Protmex products are designed for quality and reliability. For any issues or support, please refer to the contact information provided with your purchase or visit the official Protmex website. The product is CE (LVE, EMC), RoHS approved.
Protmex offers 24/7 online friendly support. Your satisfaction is our priority.


