
NVX XC4N1
NVX XC4N1 Uniwersalny 4 w 1 tylnyview Instrukcja obsługi kamery cofania
Model: XC4N1
Wstęp
This manual provides detailed instructions for the installation, operation, and maintenance of your NVX XC4N1 Universal 4-in-1 Rearview Backup Camera. Please read this manual thoroughly before installation and use to ensure proper function and safety.

Image: The NVX XC4N1 camera shown with its various mounting configurations, highlighting its versatility.
Informacje dotyczące bezpieczeństwa
- Przed przystąpieniem do prac elektrycznych należy zawsze odłączyć akumulator pojazdu.
- Upewnij się, że wszystkie przewody są odpowiednio zaizolowane i zabezpieczone, aby zapobiec zwarciom i uszkodzeniom.
- Nie utrudniaj kierowcy view lub zakłócać działanie elementów sterujących pojazdu podczas instalacji.
- This camera is an aid for reversing and parking; it does not replace the driver's responsibility to check surroundings.
- Jeśli nie jesteś pewien któregokolwiek etapu instalacji, skonsultuj się ze specjalistą.
Zawartość opakowania
Przed rozpoczęciem instalacji sprawdź, czy wszystkie komponenty są obecne:
- NVX XC4N1 Backup Camera Unit
- Kwadratowy uchwyt
- Mocowanie kątowe
- Kołnierz płaski
- Gumowe mocowanie
- License Plate Bar Mount
- Kabel zasilający
- Kabel wideo RCA
- Mounting Hardware (screws, adhesive pad)
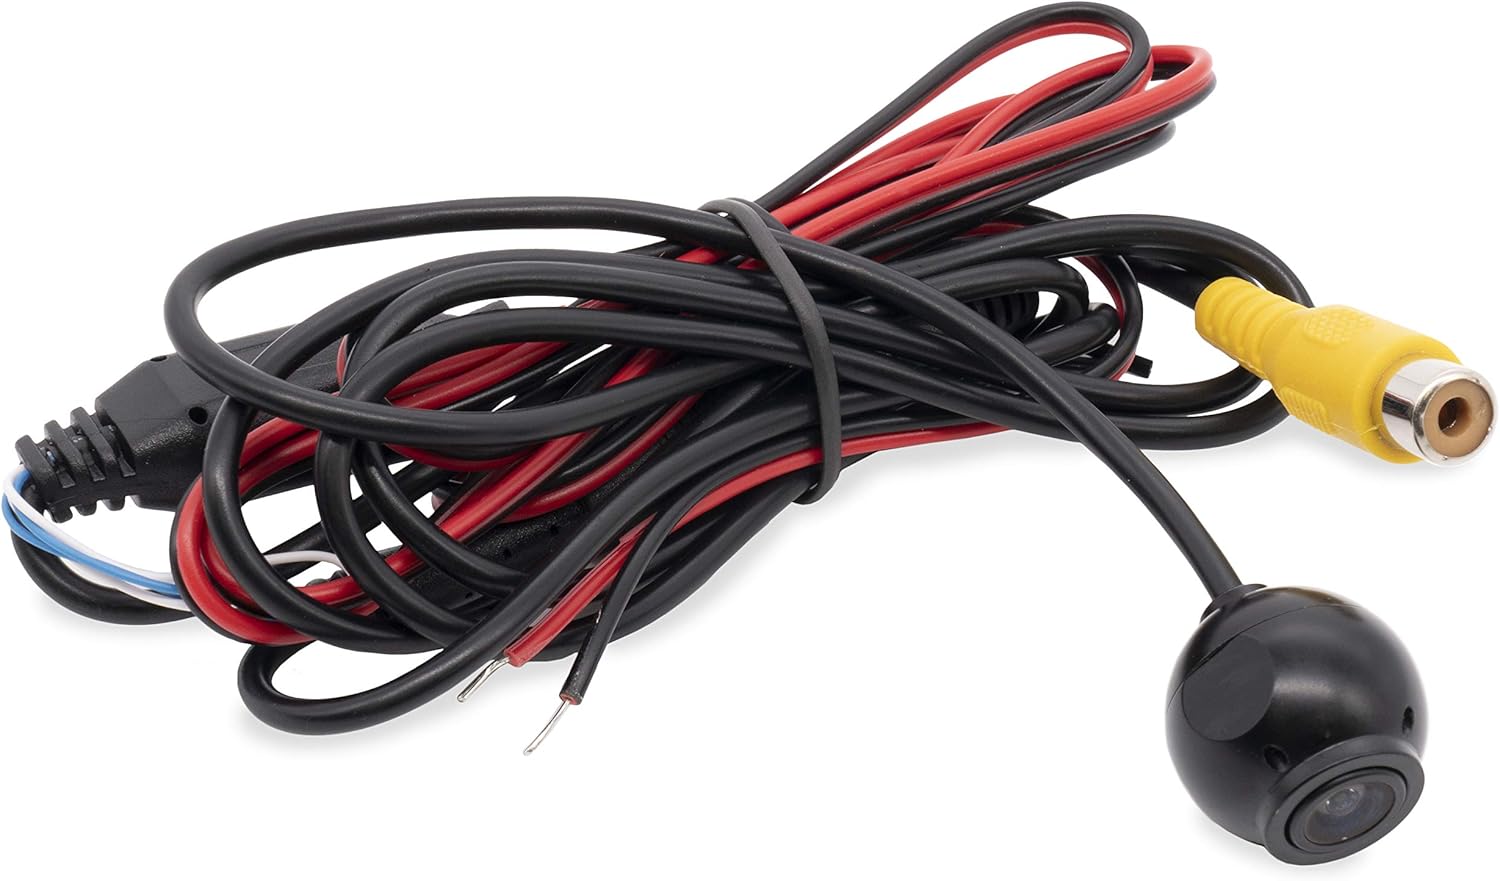
Image: The main camera unit with its attached power and RCA video cables.

Image: A collection of mounting brackets and screws included with the camera for different installation types.

Image: Supplementary mounting accessories, including a flush mount housing and adhesive pad.
Konfiguracja i instalacja
The NVX XC4N1 offers four primary mounting options to suit various vehicle types and preferences.

Image: Visual representation of the four mounting styles: Flush, Square, Rubber (angled), and Bar (angled for license plate).
Opcje montażu:
- Równo mocowanie: For a discreet, integrated look. Requires drilling a hole for the camera body.
- Mocowanie kwadratowe: A surface-mount option, typically used on flat areas.
- Rubber Mount (Angled): Provides an angled view, often used for specific bumper or panel contours.
- License Plate Bar Mount (Angled): Designed to attach to the vehicle's license plate frame for easy installation.
Ogólne kroki instalacji:
- Wybierz miejsce montażu: Select the optimal mounting location based on visibility and vehicle aesthetics.
- Install Camera Mount: Secure the chosen mount using the provided screws or adhesive. Ensure the camera is oriented correctly.
- Trasa kabli: Carefully route the power and video cables from the camera to the vehicle's interior, avoiding moving parts, sharp edges, and heat sources.
- Podłącz zasilanie:
- Connect the red wire of the power cable to a 12V reverse light power source (positive). This ensures the camera activates when the vehicle is in reverse.
- Connect the black wire of the power cable to a vehicle ground (negative).
- Połącz wideo:
- Connect the yellow RCA video cable from the camera to the video input of your display monitor or head unit.
- If your monitor requires a trigger wire for reverse activation, connect the small red wire integrated into the RCA cable to the reverse trigger input of your monitor.
- System testowy: Reconnect the vehicle battery. Engage reverse gear (with the parking brake on and foot on the brake pedal) to verify the camera image appears on your display.
- Zakończ instalację: Secure all cables and components, ensuring no loose wires or potential hazards.
Instrukcja obsługi
The NVX XC4N1 camera automatically activates when the vehicle is shifted into reverse, displaying the rear view na podłączonym monitorze.
Główne cechy:
- Ultra-Wide 170-Degree View: Provides an expansive field of view za pojazdem, minimalizując martwe pola.

Image: A visual representation of the camera's 170-degree wide viewing angle, showing an extended area behind a vehicle.
- Linie parkingowe: Integrated color parking lines assist in judging distance and alignment. These lines are fixed and cannot be adjusted.

Image: A screenshot of the camera's output, showing green, yellow, and red parking guide lines overlaid on the rear view.
- Ultra-Low Lux Night Vision: The camera operates effectively in low-light conditions with a minimum illumination of 0.08 Lux, enhancing visibility at night.

Image: A split image comparing the night vision performance of a competitor's camera (left, darker) versus the NVX XC4N1 (right, brighter) in low light conditions.
- Penetrating Fog Function: Designed to improve visibility in foggy conditions.
Konserwacja
The NVX XC4N1 camera is designed for durability and minimal maintenance.
- Wodoodporna konstrukcja: The camera is IP68 certified, meaning it is fully dustproof and can withstand submersion in water. This protects it from rain, car washes, and other environmental elements.

Image: The camera lens partially submerged in water, illustrating its IP68 waterproof capability.
- Czyszczenie: Okresowo czyść obiektyw aparatu miękką,amp cloth to ensure a clear image. Avoid abrasive cleaners or materials that could scratch the lens.
- Kontrola kabla: Occasionally check the cables for any signs of wear, damage, or loose connections.
Rozwiązywanie problemów
If you encounter issues with your NVX XC4N1 camera, refer to the following common problems and solutions:
| Problem | Możliwa przyczyna | Rozwiązanie |
|---|---|---|
| No image on display when in reverse. |
|
|
| Obraz jest rozmazany lub zniekształcony. |
|
|
| Parking lines are not visible. |
|
|
Specyfikacje
| Funkcja | Szczegół |
|---|---|
| Model | XC4N1 |
| Marka | NVX |
| Rezolucja | 720 x 480 pikseli |
| Viewing kąt | 170 stopni (rzeczywisty kąt View) |
| Technologia czujnika optycznego | CMOS |
| Rozmiar czujnika optycznego | 1/3 cala |
| Minimalne oświetlenie | 0.08 luks |
| Stopień wodoodporności | IP68 |
| Tomtage | 12 wolty |
| Typ złącza | RCA |
| Typ instalacji | Bracket Mount (4-in-1 Universal) |
| Waga przedmiotu | 1.5 funta |
Gwarancja i wsparcie
For warranty information or technical support, please refer to the documentation included with your purchase or visit the official NVX website. Contacting customer support with your product model (XC4N1) and purchase details will help expedite assistance.
Visit the NVX Store on Amazon Aby uzyskać więcej informacji i produktów.
Ask a question about this manual
Ask about setup, troubleshooting, compatibility, parts, safety, or missing instructions. Manuals+ will review the question and use this page’s manual context to help answer it.