Amazon Basics BM1349-UL-B
Amazon Basics Programmable Bread Maker Instruction Manual
Model: BM1349-UL-B
Wstęp

Figure 1: Amazon Basics Programmable Bread Maker. This image shows the black bread maker from an angled front view, highlighting its compact design, control panel with LCD display, and program settings listed on the top surface.
Dziękujemy za zakupasing the Amazon Basics Programmable Bread Maker. This appliance is designed to simplify the process of making fresh bread, doughs, and jams at home. Please read this instruction manual thoroughly before first use to ensure safe operation and optimal performance. Keep this manual for future reference.
Ważne instrukcje bezpieczeństwa
- Przed użyciem urządzenia należy przeczytać całą instrukcję.
- Nie dotykaj gorących powierzchni. Używaj uchwytów lub gałek.
- Aby uniknąć porażenia prądem elektrycznym, nie zanurzaj przewodu, wtyczek ani urządzeń w wodzie lub innym płynie.
- Należy zachować ścisły nadzór, jeżeli z urządzenia korzystają dzieci lub w ich pobliżu.
- Odłącz od gniazdka, gdy nie jest używany i przed czyszczeniem. Pozostaw do ostygnięcia przed założeniem lub zdjęciem części.
- Nie używaj żadnego urządzenia, jeśli przewód lub wtyczka są uszkodzone, ani po awarii urządzenia lub po jego uszkodzeniu w jakikolwiek sposób.
- Stosowanie akcesoriów niezalecanych przez producenta urządzenia może spowodować obrażenia.
- Nie stosować na zewnątrz.
- Nie pozwól, aby przewód zwisał z krawędzi stołu lub blatu i dotykał gorących powierzchni.
- Nie umieszczać na gorącym palniku gazowym lub elektrycznym ani w jego pobliżu, a także w nagrzanym piekarniku.
- Należy zachować szczególną ostrożność podczas przenoszenia urządzenia zawierającego gorący olej lub inne gorące płyny.
- Aby odłączyć urządzenie, ustaw dowolny element sterujący w pozycji „wyłączone”, a następnie wyjmij wtyczkę z gniazdka ściennego.
- Nie używaj urządzenia niezgodnie z jego przeznaczeniem.
Składniki produktu
Familiarize yourself with the parts of your bread maker before operation.

Rysunek 2: Dołączone akcesoria. This image displays the bread pan with handle, a clear plastic measuring cup, a black kneading blade, a white double-sided measuring spoon (teaspoon/tablespoon), and a metal hook for removing the kneading blade.
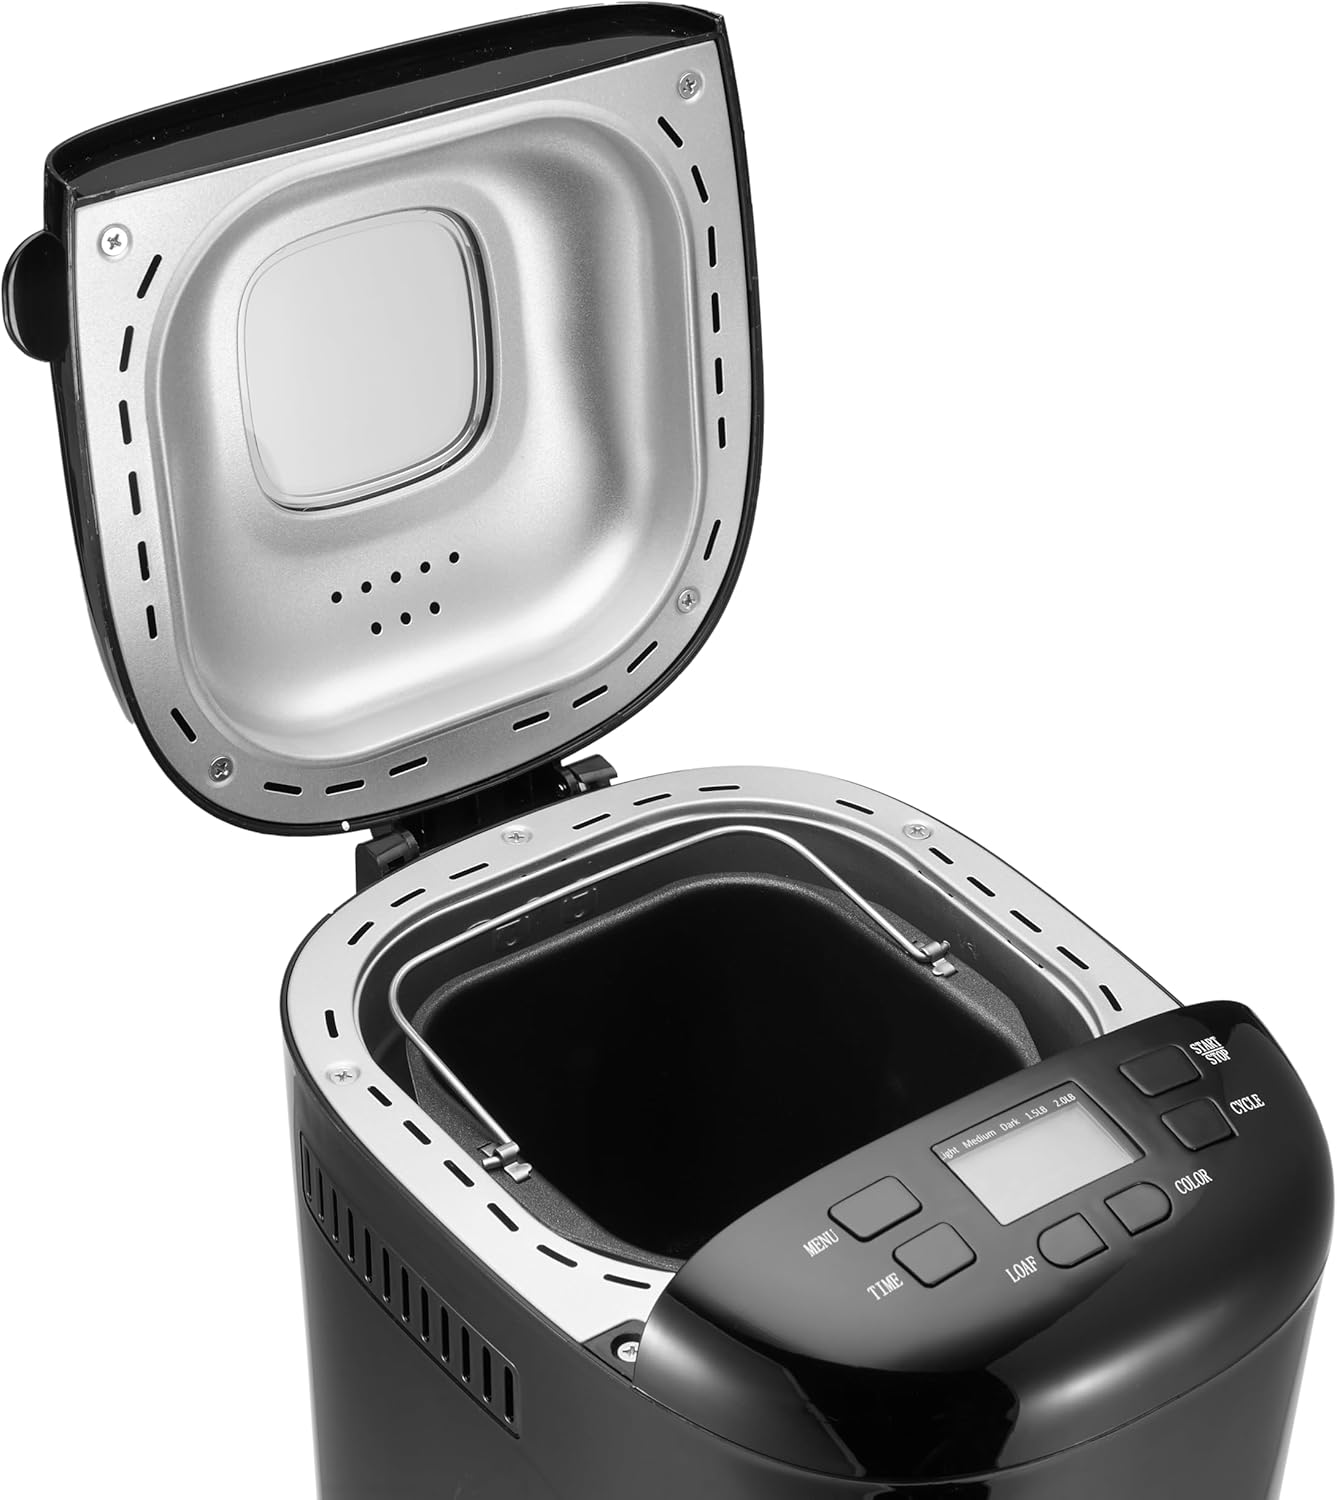
Figure 3: Bread Maker Interior. This image shows the bread maker with its lid open, revealing the heating element and the space where the bread pan is inserted. The control panel with its LCD display and buttons is visible at the front.
- Jednostka główna: Główna obudowa maszyny do wypieku chleba.
- Panel sterowania: Features an LCD display and buttons for program selection, time, loaf size, and crust color.
- Pokrywa: Przykrywa komorę pieczenia, często viewokno.
- Forma do pieczenia chleba: Non-stick baking pan where ingredients are placed and bread is baked.
- Mieszadło: Mocowana do wałka wewnątrz formy do pieczenia chleba w celu mieszania i wyrabiania ciasta.
- Miarka: For liquid and dry ingredients.
- Łyżka miarowa: For smaller measurements (teaspoon/tablespoon).
- Hak: Used to remove the kneading blade from the baked loaf.
Konfiguracja i pierwsze użycie
- Rozpakowywanie: Ostrożnie wyjmij wypiekacz do chleba i wszystkie akcesoria z opakowania. Zachowaj opakowanie do późniejszego przechowywania lub transportu.
- Czyszczenie: Before first use, wash the bread pan and kneading blade with warm, soapy water. Rinse thoroughly and dry completely. Wipe the exterior of the bread maker with a damp płótno. Nie zanurzaj jednostki głównej w wodzie.
- Początkowe wypalenie: It is recommended to run the bread maker empty for approximately 10 minutes on a "Bake" cycle (if available, or a short custom bake cycle) to burn off any manufacturing oils. Some smoke or odor may be present; this is normal. Ensure adequate ventilation. After this, allow the unit to cool completely and clean the interior again.
- Umieszczenie: Ustaw urządzenie do pieczenia chleba na stabilnej, płaskiej i odpornej na ciepło powierzchni, z dala od bezpośredniego światła słonecznego i źródeł ciepła. Zapewnij odpowiednią wentylację wokół urządzenia.
- Podłączenie zasilania: Podłącz przewód zasilający do uziemionego gniazdka elektrycznego. Wyświetlacz zaświeci się, wskazując, że urządzenie jest gotowe do użycia.
Instrukcja obsługi
This section guides you through the process of making bread with your appliance.
Panel sterowania nadview
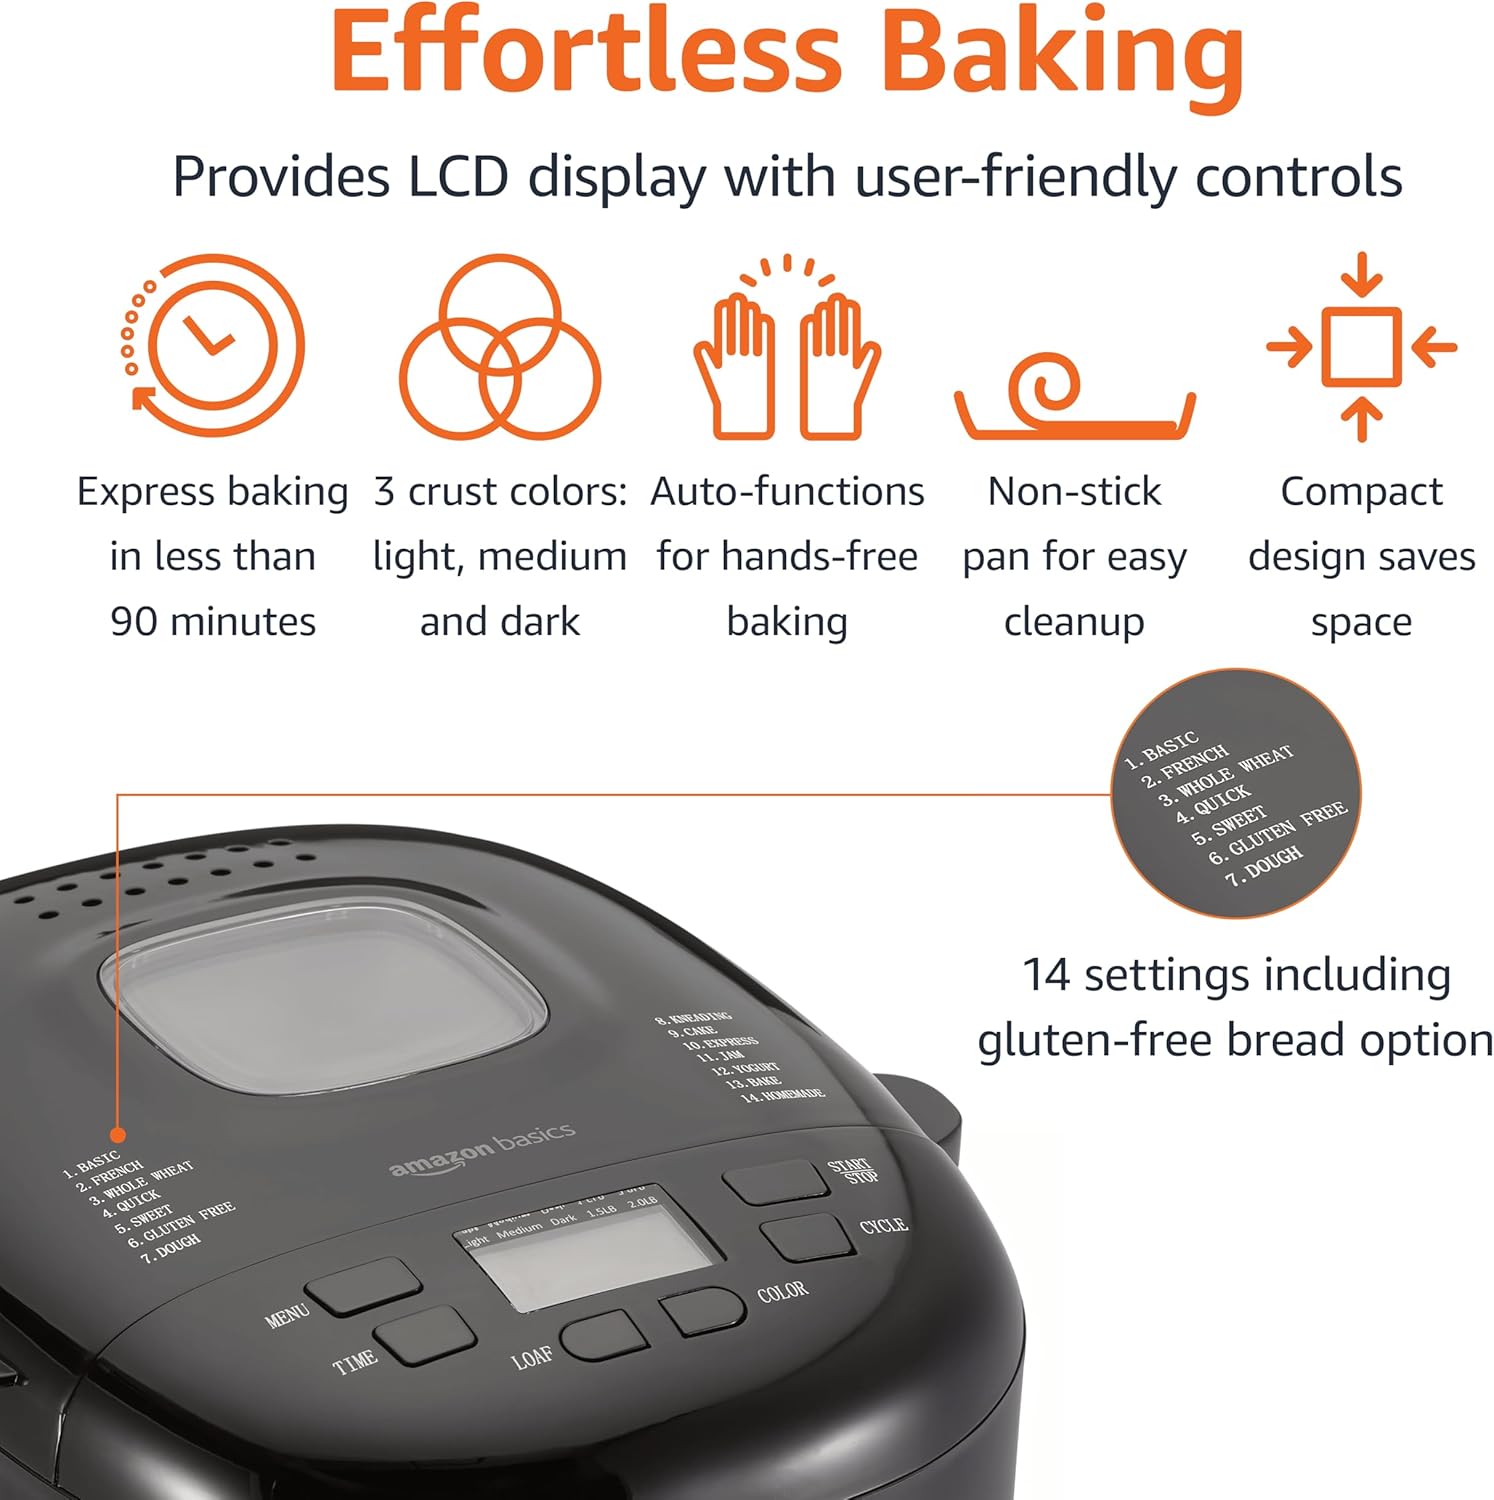
Rysunek 4: Panel sterowania. This image highlights the bread maker's control panel, featuring an LCD screen that displays program information. Buttons for 'MENU', 'TIME', 'LOAF', 'COLOR', and 'CYCLE' are clearly visible, along with a list of 14 program settings.
- Przycisk MENU: Selects one of the 14 available programs (e.g., Basic, French, Whole Wheat, Sweet, Gluten Free, Dough, Jam).
- TIME Buttons (+/-): Dostosowuje opóźnienie pieczenia.
- Przycisk LOAF: Selects the loaf size (e.g., 1.5 lb or 2 lb).
- Przycisk KOLOR: Selects the crust darkness (Light, Medium, Dark).
- CYCLE (Start/Stop) Button: Uruchamia lub zatrzymuje wybrany program.
- Wyświetlacz LCD: Shows the selected program, time remaining, loaf size, and crust color.
Podstawowe kroki wypieku chleba
- Włóż ostrze do wyrabiania ciasta: Umieść ostrze wyrabiające ciasto na wałku wewnątrz formy do pieczenia chleba.
- Dodaj składniki: Dodaj składniki do formy na chleb w kolejności określonej w przepisie (zazwyczaj najpierw płyny, potem składniki suche, a na końcu drożdże, oddzielnie od płynów/soli). Upewnij się, że odmierzyłeś je dokładnie.
- Umieść formę do pieczenia chleba: Insert the bread pan into the bread maker, ensuring it is securely locked in place. Close the lid.
- Wybierz program: Naciśnij MENU button to choose the desired program (e.g., "Basic" for white bread).
- Wybierz rozmiar bochenka: Naciśnij BOCHENEK button to select the appropriate loaf size (1.5 lb or 2 lb).
- Wybierz kolor skórki: Naciśnij KOLOR button to choose your preferred crust darkness (Light, Medium, or Dark).
- Uruchom program: Naciśnij CYKL button to start the program. The machine will begin mixing.
- Monitorowanie: During the kneading cycles, you may check the dough consistency by opening the lid briefly. If the dough is too dry, add a small amount of liquid; if too wet, add a small amount of flour.
- Ukończenie: Once the program is complete, the bread maker will usually beep and switch to a "Keep Warm" cycle. Press the CYKL przycisk, aby zatrzymać maszynę.
- Usuń chleb: Using oven mitts, carefully remove the hot bread pan from the machine. Invert the pan onto a wire rack to release the bread. If the kneading blade remains in the loaf, use the provided hook to carefully remove it.
- Chłodzenie: Allow the bread to cool on a wire rack for at least 20-30 minutes before slicing. This allows the internal structure to set.
Funkcja timera opóźnienia
The delay timer allows you to program the bread maker to finish baking at a later time, up to 13 hours. This is useful for having fresh bread ready in the morning.
- After selecting your program, loaf size, and crust color, press the CZAS buttons to set the desired delay time. The displayed time includes the baking cycle duration.
- Naciśnij CYKL button. The timer will count down, and the machine will start automatically when the delay time expires.
- Ostrożność: Do not use the delay timer with recipes containing highly perishable ingredients like milk, eggs, or fresh fruit, as they may spoil before baking begins.
Wskazówki dotyczące przepisów
The Amazon Basics Bread Maker offers 14 settings for various types of baked goods. For best results, always use recipes specifically designed for bread makers and ensure accurate measurement of ingredients.
- Programy chlebowe: Basic, French, Whole Wheat, Sweet, Gluten-Free, ExpressBake.
- Programy do ciasta: For pizza dough, pasta dough, or rolls.
- Programy specjalistyczne: Jam, Cake, Yogurt.
Refer to the recipe book that came with your bread maker or reliable bread machine recipe sources for ingredient quantities and specific instructions for each program.
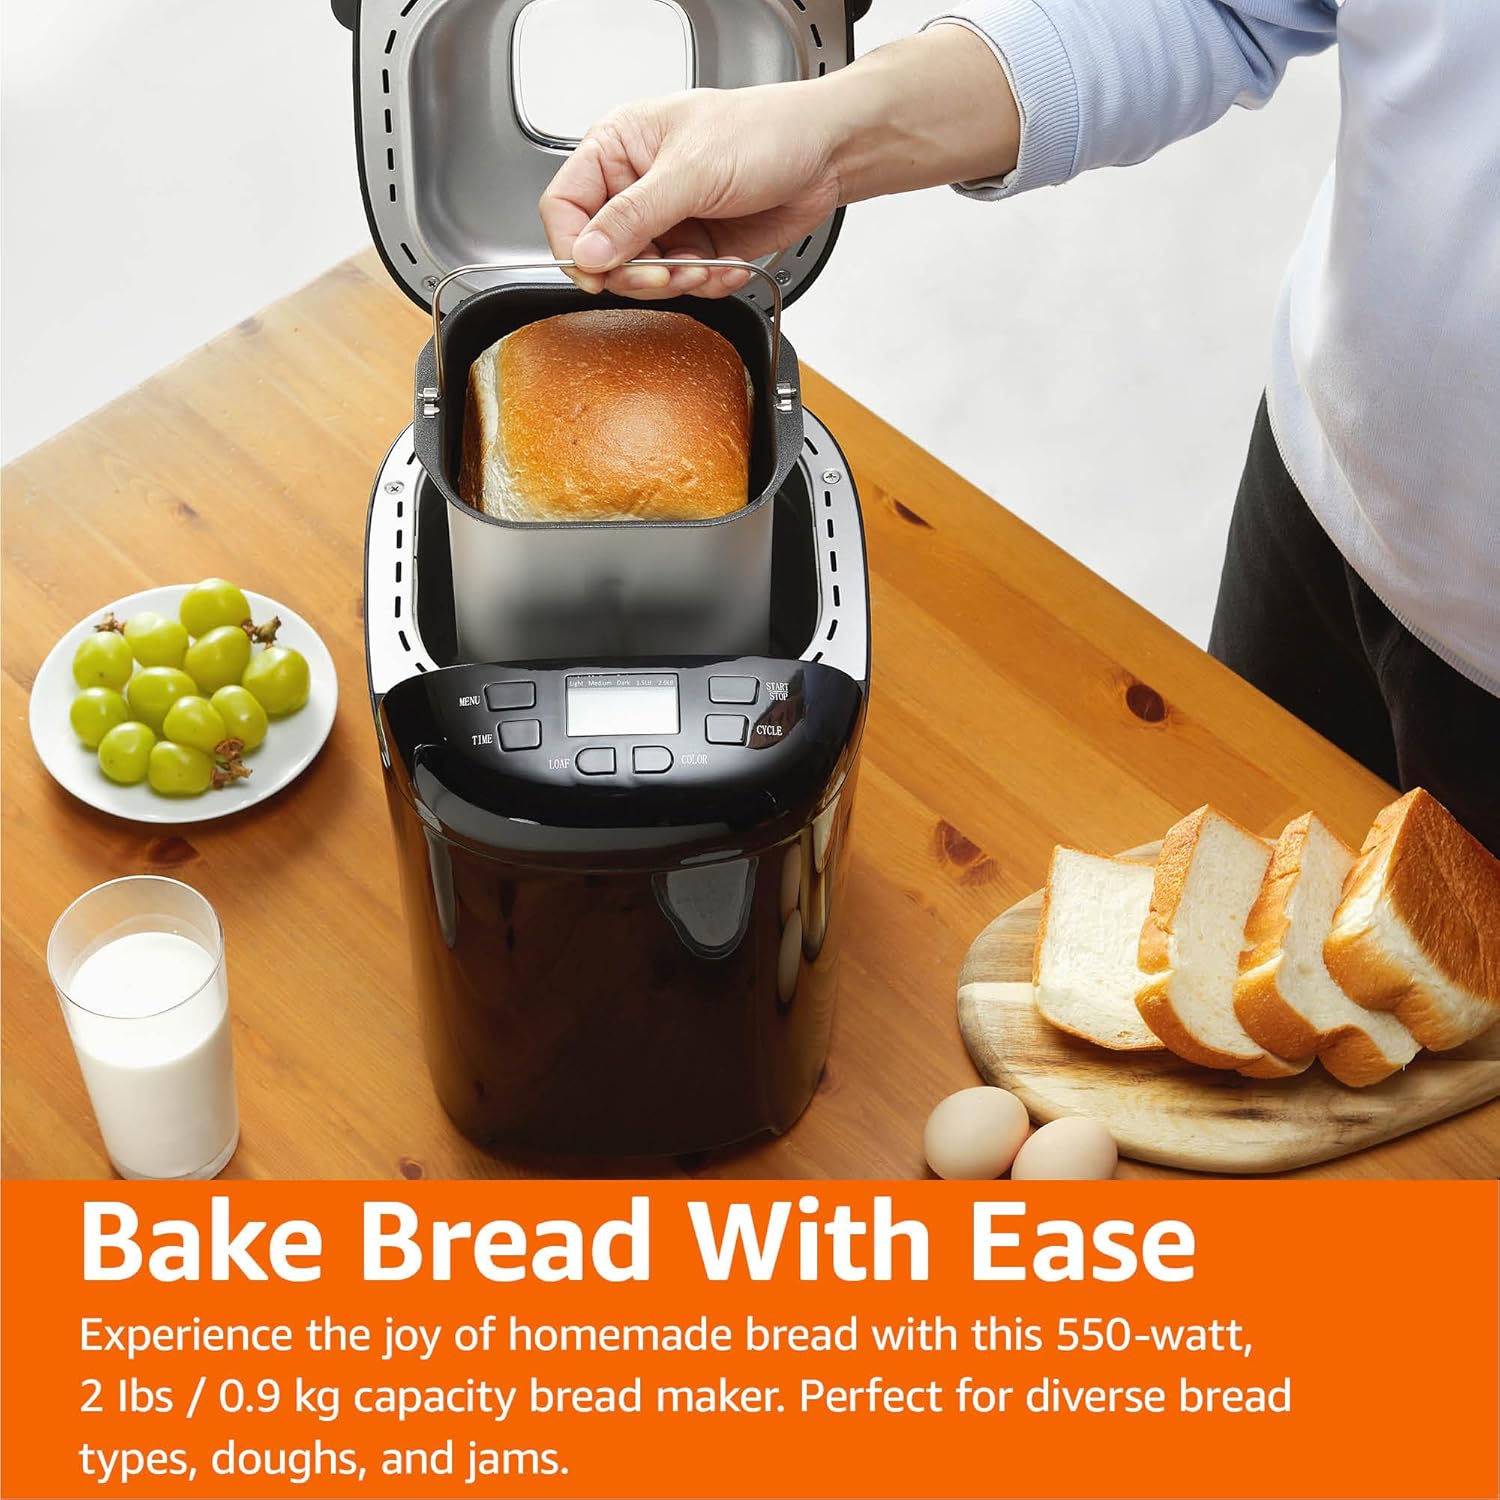
Figure 5: Freshly Baked Bread. This image shows a person carefully lifting the bread pan, containing a golden-brown loaf, out of the bread maker. Surrounding the machine are fresh grapes, a glass of milk, and slices of bread, illustrating the end result of the baking process.
Pielęgnacja i konserwacja
Prawidłowe czyszczenie i konserwacja przedłużą żywotność Twojego wypiekacz do chleba.
- Wyjąć wtyczkę: Przed przystąpieniem do czyszczenia należy zawsze odłączyć urządzenie od gniazdka elektrycznego i poczekać, aż całkowicie ostygnie.
- Forma do pieczenia chleba i mieszadło: Wash the bread pan and kneading blade with warm, soapy water. Do not use abrasive cleaners or metal scouring pads, as this can damage the non-stick coating. Rinse thoroughly and dry completely.
- Zewnętrzny: Przetrzyj zewnętrzną część maszyny do pieczenia chleba miękką szmatką.amp płótno. Nie używaj ostrych środków chemicznych ani ściernych środków czyszczących.
- Wnętrze: Wyczyść wnętrze komory pieczenia za pomocąamp szmatką. Usuń wszelkie okruszki i pozostałości.
- Składowanie: Store the bread maker in a clean, dry place. Ensure the bread pan and kneading blade are clean and dry before storing.
Podręcznik rozwiązywania problemów
Jeśli masz problemy z wypiekaczem do chleba, zapoznaj się z poniższymi, często spotykanymi problemami i ich rozwiązaniami.
| Problem | Możliwa przyczyna | Rozwiązanie |
|---|---|---|
| Chleb nie rośnie. | Expired or inactive yeast, incorrect water temperature, too much salt, not enough sugar. | Check yeast expiration date. Use lukewarm water (105-115°F / 40-46°C). Ensure correct ingredient measurements. |
| Chleb jest zbyt gęsty lub ciężki. | Too much flour, not enough liquid, incorrect yeast amount, high humidity. | Measure ingredients accurately, especially flour (use a scale if possible). Adjust liquid slightly in humid conditions. |
| Chleb zapada się w czasie pieczenia. | Too much liquid, too much yeast, high altitude, opening lid too often. | Reduce liquid slightly. Ensure correct yeast amount. Avoid opening the lid during baking. |
| Mieszadło utknęło w chlebie. | Zjawisko częste. | Use the provided hook to carefully remove the blade after the bread has cooled slightly. |
| Maszyna nie uruchamia się. | Niepodłączony, wyłącz zasilanietage, lid not closed properly, program not selected. | Check power connection. Ensure lid is fully closed. Select a program and press START. |
Specyfikacja produktu
Technical details for the Amazon Basics Programmable Bread Maker.
- Numer modelu: BM1349-UL-B
- Marka: Podstawy Amazon
- Kolor: Czarny
- Moc: 550 watów
- Pojemność bochenka: Do 2 funtów
- Liczba programów: 14
- Wymiary produktu: 11.6" gł. x 8.8" szer. x 11.4" wys.
- Waga przedmiotu: 8 funta
- Producent: Amazonka
- Instrukcje dotyczące pielęgnacji: Wytrzeć suchą szmatką (na zewnątrz)
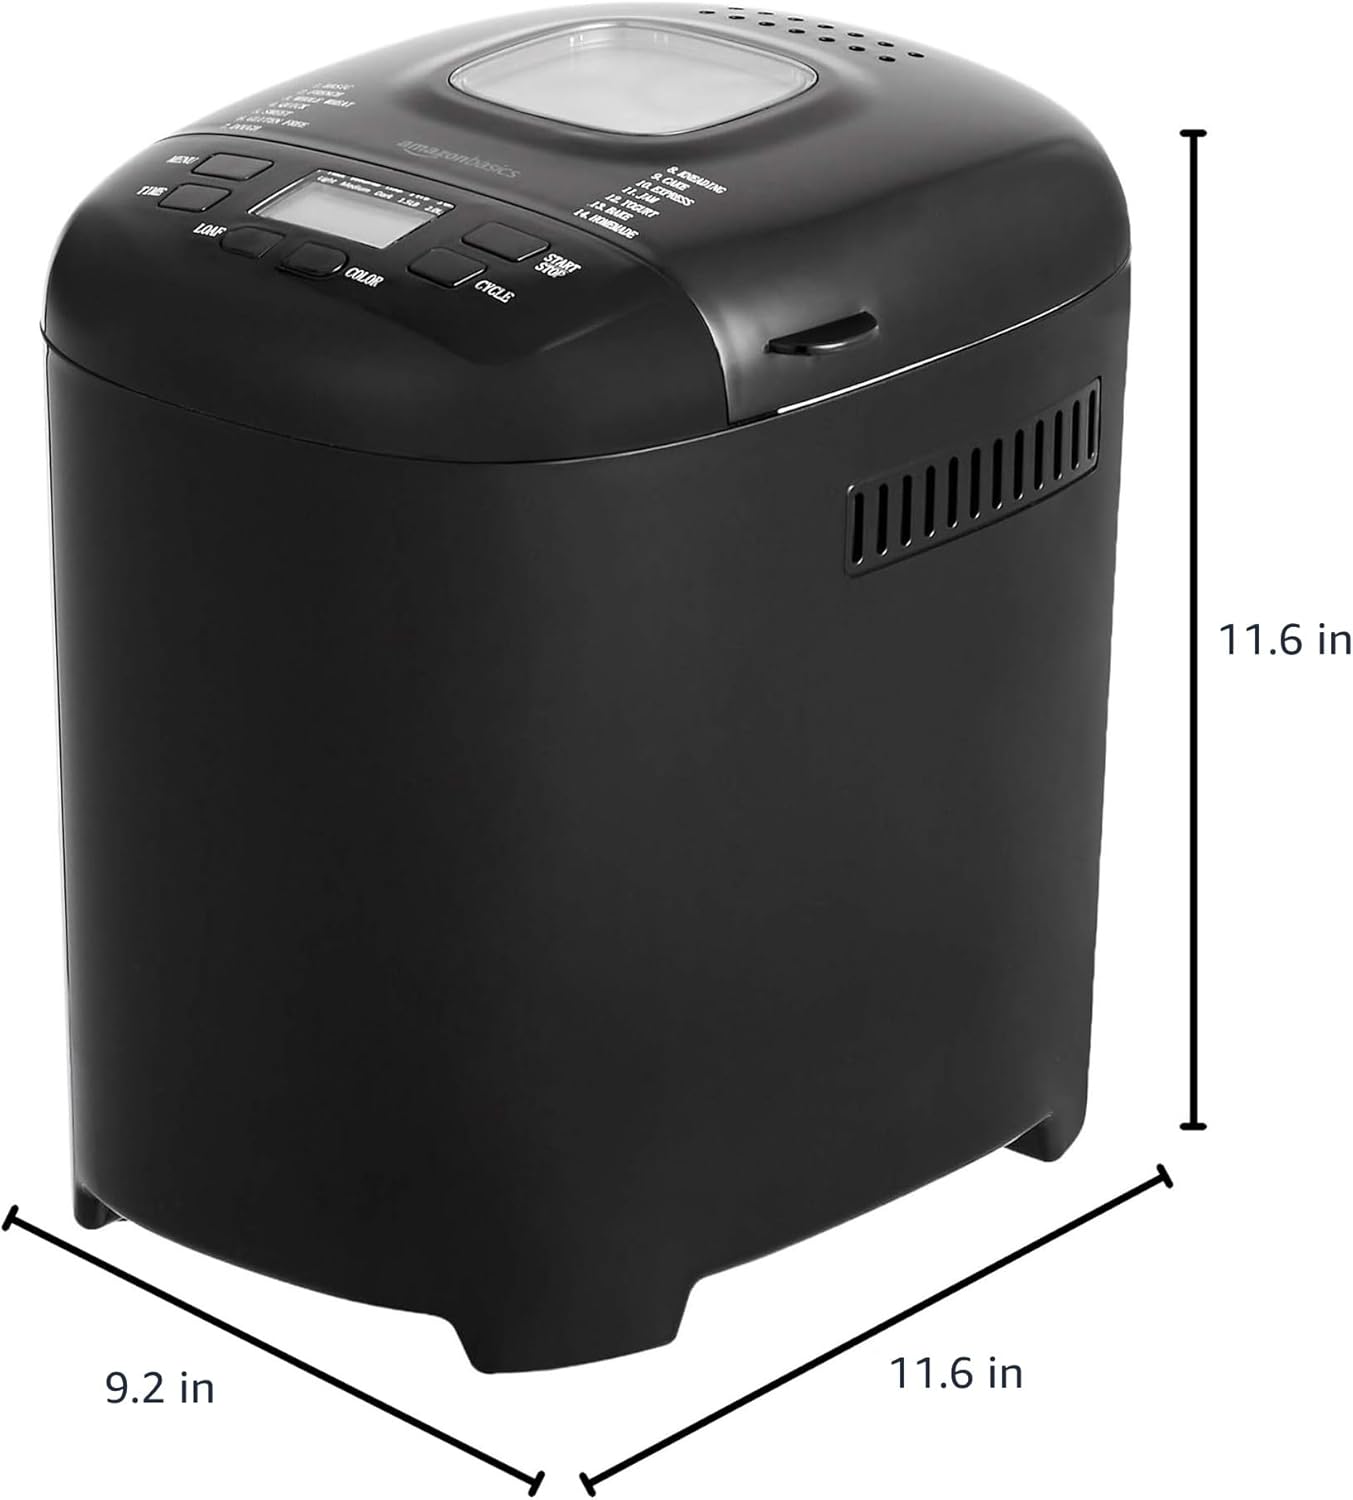
Rysunek 6: Wymiary produktu. This image provides a visual representation of the bread maker's dimensions, indicating a depth of 11.6 inches, a width of 9.2 inches, and a height of 11.6 inches.
Informacje o gwarancji
For detailed warranty information, please refer to the warranty card included with your product packaging or visit the official Amazon Basics webGwarancja zazwyczaj obejmuje wady materiałowe i wykonawcze wynikające z normalnego użytkowania.
Obsługa klienta
If you have any questions, require assistance, or need to report an issue with your Amazon Basics Bread Maker, please contact Amazon Basics Customer Service. You can typically find contact information on the Amazon website under the "Help" or "Customer Service" sections, or through your order details.
Aby uzyskać pomoc online, odwiedź stronę: Obsługa klienta Amazon