Waveshare 4.2inch E-Ink Display Module
Instrukcja obsługi modułu wyświetlacza E-Ink Waveshare 4.2 cala
Model: 4.2inch E-Ink Display Module
1. Wprowadzenie
The Waveshare 4.2inch E-Ink Display Module features a 400x300 resolution and supports partial refresh. It is designed for low power consumption, offers a wide viewing angle, and provides a paper-like display effect. This module includes an embedded controller and communicates via an SPI interface, making it compatible with various controller boards such as Raspberry Pi, Jetson Nano, Arduino, and STM32.
Its ultra-low power consumption and ability to retain display content without continuous power make it suitable for applications like electronic shelf labels and industrial instrumentation.

Image 1.1: Waveshare 4.2inch E-Ink Display Module with connection wires.
2. Główne cechy
- Technologia wyświetlania: 4.2inch E-Ink (e-Paper) with 400x300 pixel resolution.
- Efektywność energetyczna: Ultra-low power consumption; power is primarily required only during display refresh cycles.
- Trwałe wyświetlanie: No backlight required. Retains the last displayed content indefinitely, even when power is removed.
- Interfejs: SPI interface (3-wire or 4-wire) for broad compatibility.
- Kompatybilność kontrolera: Designed for use with Raspberry Pi, Jetson Nano, Arduino, STM32, and other microcontrollers.
- Tomtage Translation: na pokładzie objętośćtage translator supports both 3.3V and 5V MCUs.
- Refresh Capability: Supports partial refresh for faster updates of specific screen areas.
- Viewkąt ing: Szeroki viewing angle, offering clear visibility from over 170 degrees.

Obraz 2.1: Koniecview of the 4.2-inch E-Paper Module's key characteristics.
3. Zawartość opakowania
W opakowaniu produktu znajdują się następujące elementy:
- 1x moduł e-Paper Waveshare 4.2 cala
- 1x PH2.0 20cm 8-pin cable

Image 3.1: Contents of the product package, including the e-Paper module and connection cable.
4. Specyfikacje
Detailed technical specifications for the 4.2inch E-Ink Display Module are provided below:
| Parametr | Wartość | Parametr | Wartość |
|---|---|---|---|
| Objętość operacyjnatage | 3.3 V/5 V | Kolor wyświetlacza | Czarny, biały |
| Interfejs | SPI 3-żyłowy, SPI 4-żyłowy | Poziom szarości | 4 |
| Wymiary obrysu | 103.0 × 78.5 mm | Pełny czas odświeżania | 5s |
| Rozmiar wyświetlacza | 84.8 × 63.6 mm | Fast Refresh Time | 1s/1.5s* |
| Plamka | 0.212 × 0.212 mm | Częściowy czas odświeżania | 0.4s |
| Viewing kąt | >170° | Odśwież moc | 26.4mW (typ.) |
| Rezolucja | 400 x 300 pikseli | Prąd czuwania | <0.01uA (prawie żadne) |
*Fast refresh function is only available in V2 version.

Image 4.1: Summary of features and detailed specifications for the e-Paper module.

Image 4.2: Detailed outline dimensions of the 4.2inch E-Ink Display Module.
5. Konfiguracja i podłączenie sprzętu
The 4.2inch E-Ink Display Module communicates via an SPI interface. Ensure proper pin connections to your chosen microcontroller board.
5.1 Onboard SPI Control Interface
The module features an onboard SPI control interface. The pin definitions are crucial for correct operation.
| Szpilka | Opis |
|---|---|
| VCC | Zasilanie 3.3V/5V |
| GND | Grunt |
| HAŁAS | Pin MOSI SPI |
| CLK | Pin SPI SCK |
| CS | Wybór układu SPI, niska aktywność |
| DC | Wybór danych/poleceń (wysoki dla danych, niski dla poleceń) |
| RST | Reset zewnętrzny, niski poziom aktywności |
| ZAJĘTY | Busy status output |
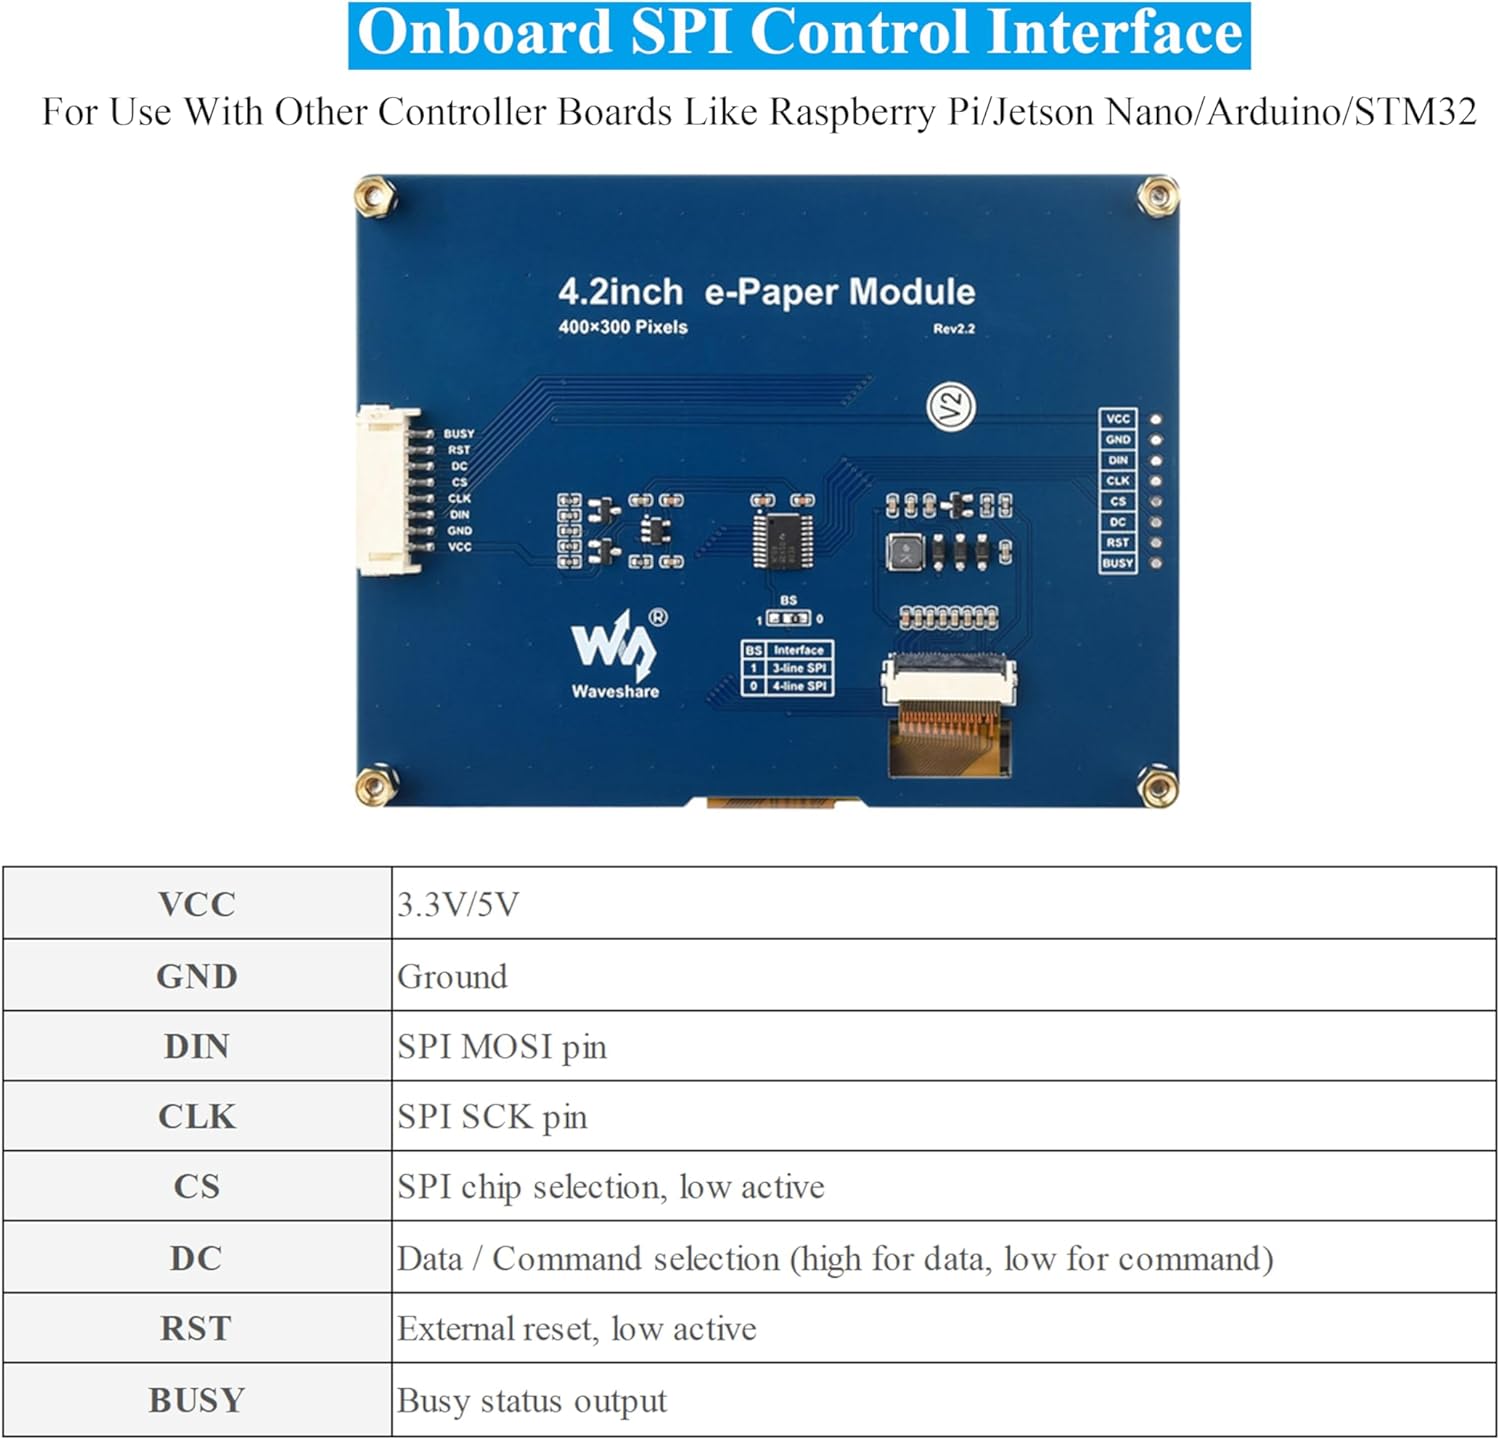
Image 5.1: Diagram of the onboard SPI control interface and its pin definitions.
5.2 Onboard Voltage Tłumacz
The module includes an onboard voltage translator, ensuring compatibility with both 3.3V and 5V microcontrollers. This simplifies integration by eliminating the need for external level shifters.
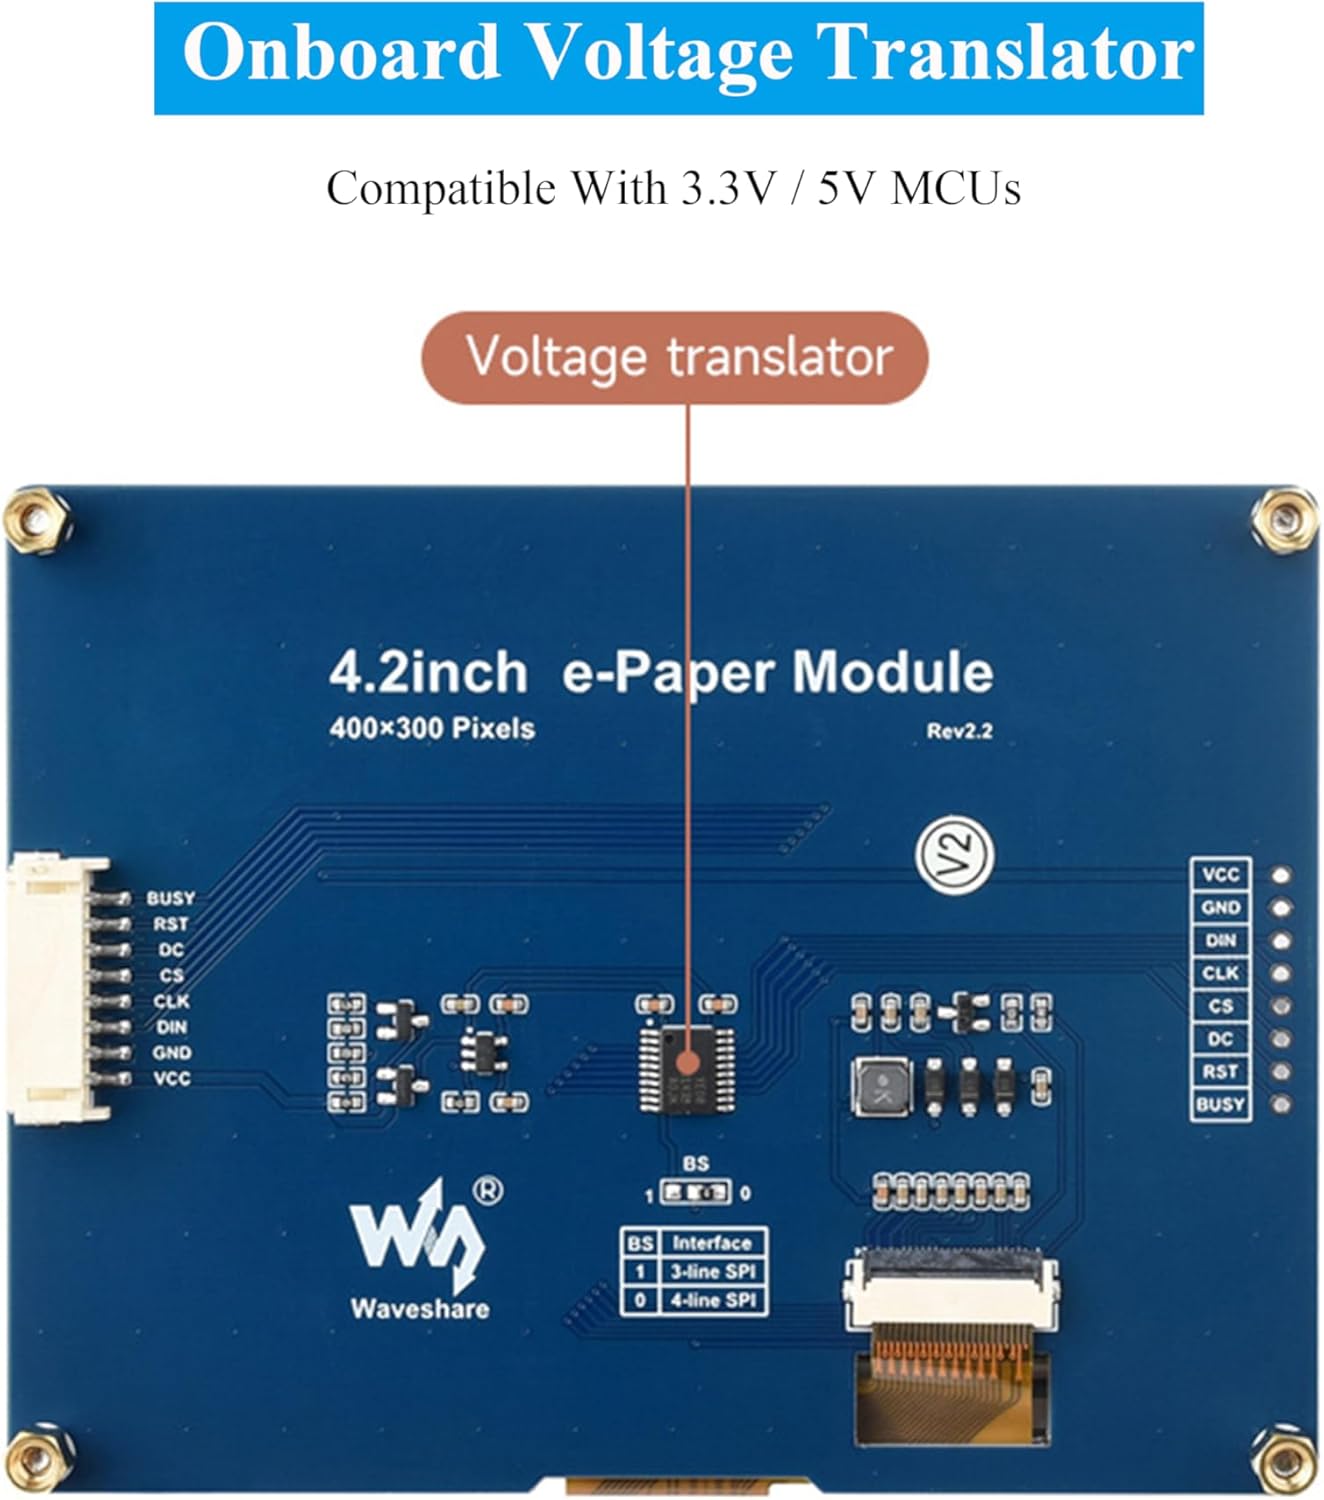
Image 5.2: Location of the onboard voltage translator on the module.
5.3 Connection with Raspberry Pi
When connecting to a Raspberry Pi, you can directly insert the module into the 40-pin GPIO header. If using an 8-pin cable, refer to the pin correspondence table below:
| e-Papier | BCM2835 | Tablica |
|---|---|---|
| VCC | 3.3 V | 3.3 V |
| GND | GND | GND |
| HAŁAS | MOSI | 19 |
| CLK | SCLK | 23 |
| CS | CE0 | 24 |
| DC | 25 | 22 |
| RST | 17 | 11 |
| ZAJĘTY | 24 | 18 |
5.4 Connection with Arduino
Use an 8-pin cable to connect the module to an Arduino board. Refer to the pin correspondence table below for Arduino UNO and Mega2560:
| e-Papier | Arduino UNO | Mega2560 |
|---|---|---|
| VCC | 5V | 5V |
| GND | GND | GND |
| HAŁAS | D11 | D51 |
| CLK | D13 | D52 |
| CS | D10 | D10 |
| DC | D9 | D9 |
| RST | D8 | D8 |
| ZAJĘTY | D7 | D7 |
5.5 Connection with Jetson Nano
The 40-pin GPIO of Jetson Nano is compatible with the 40-pin RPi GPIO. The module can be directly inserted into the 40-pin headers of the Jetson Nano when using the 40-pin interface. If you choose to connect with an 8-pin cable, refer to the pin correspondence table below:
| e-Papier | BCM2835 | Tablica |
|---|---|---|
| VCC | 3.3 V | 3.3 V |
| GND | GND | GND |
| HAŁAS | 10 (SPI0_MOSI) | 19 |
| CLK | 11 (SPI0_SCK) | 23 |
| CS | 8 (SPI0_CS0) | 24 |
| DC | 25 | 22 |
| RST | 17 | 11 |
| ZAJĘTY | 24 | 18 |
Image 5.3: Pin connection tables for Raspberry Pi, Arduino, and Jetson Nano.
6. Operating Principles (E-Ink Technology)
E-paper displays utilize microcapsule electrophoretic technology for displaying images. The principle involves charged particles suspended in a clear fluid moving to the sides of microcapsules when an electric field is applied. This process makes the microcapsule content visible by reflecting ambient light, similar to traditional printed paper.
E-paper displays offer clear visibility under lamplight or natural light, do not require a backlight, and provide a wide viewing angle of nearly 180 degrees. This paper-like effect makes them an ideal choice for applications requiring readability and low power consumption.

Image 6.1: Comparison of E-Paper display with traditional printed paper and LCD monitors, highlighting E-Ink advantagt.j.
7. Aplikacja Examples
The Waveshare 4.2inch E-Ink Display Module is versatile and suitable for various applications where low power, clear display, and persistent content are beneficial. Common uses include:
- Cena Tags in retail environments
- Asset and Equipment Tags for inventory management
- Elektroniczne etykiety na półki
- Nazwa konferencji Tags
- Industrial instrumentation displays

Obraz 7.1: Wydanie wizualneamples of the e-Paper module used in various settings such as supermarkets, hospitals, and conference venues.
8. Konserwacja
Wyświetlacze E-Ink są generalnie łatwe w utrzymaniu. Aby zapewnić długowieczność i optymalną wydajność:
- Obsługiwanie: Handle the module by its edges to avoid touching the display surface directly.
- Czyszczenie: If necessary, gently wipe the display surface with a soft, dry, lint-free cloth. Avoid using harsh chemicals or abrasive materials.
- Składowanie: Store the module in a dry, dust-free environment within its specified operating temperature range.
- Moc: Ensure stable power supply within the specified voltagZakres (3.3V/5V).
9. Rozwiązywanie Problemów
If you encounter issues with your Waveshare 4.2inch E-Ink Display Module, consider the following common troubleshooting steps:
- Brak wyświetlacza/pusty ekran:
- Verify all power connections (VCC, GND) are correct and stable.
- Check SPI data lines (DIN, CLK, CS, DC, RST, BUSY) for proper connection and continuity.
- Ensure your microcontroller code is correctly initializing the display and sending data.
- Potwierdź poprawną objętośćtage (3.3V or 5V) is being supplied to the module.
- Incorrect/Garbled Display:
- Double-check your SPI communication protocol and timing in your code.
- Ensure the correct display resolution (400x300) is configured in your software.
- Verify that the data format (e.g., black/white, grey levels) matches the display's capabilities and your code's output.
- Niska częstotliwość odświeżania:
- E-Ink displays inherently have slower refresh rates than LCDs. Refer to the specifications for expected refresh times.
- If using partial refresh, ensure your code is correctly implementing it for faster updates of specific areas.
- Moduł nie odpowiada:
- Perform a hard reset by momentarily disconnecting and reconnecting power.
- Check the BUSY pin status in your code to ensure the display is not busy before sending new commands.
For more detailed troubleshooting or specific error codes, refer to the online development resources provided by Waveshare.
10. Wsparcie i zasoby
Waveshare provides comprehensive online development resources and manuals to assist with the integration and programming of this module. These resources typically include driver board circuit diagrams and example code for Raspberry Pi, Jetson Nano, Arduino, and STM32.
Access the official online development resources here: bit.ly/4btDibU
Aby uzyskać dalszą pomoc, odwiedź oficjalną stronę Waveshare webodwiedź witrynę lub skontaktuj się z działem obsługi klienta.
11. Informacje o gwarancji
Warranty information for the Waveshare 4.2inch E-Ink Display Module is typically provided by the seller or manufacturer at the time of purchase. Please retain your proof of purchase for any warranty claims.
For specific details regarding warranty terms, duration, and claim procedures, refer to the documentation included with your product or contact the retailer/manufacturer directly.