1. Wprowadzenie
This manual provides essential information for the safe and efficient operation of your RAGGIE RGS 1500W 12V Solar Power Inverter. This device is designed to convert 12V DC electricity from batteries or solar panels into 220V AC electricity, allowing you to power standard household appliances from a DC power source. Please read this manual thoroughly before installation and use.
2. Informacje dotyczące bezpieczeństwa
OSTRZEŻENIE: Nieprzestrzeganie tych instrukcji bezpieczeństwa może spowodować porażenie prądem, pożar, poważne obrażenia lub śmierć.
- Ensure the inverter is installed in a well-ventilated, dry, and cool environment, away from direct sunlight, heat sources, and flammable materials.
- Do not expose the inverter to rain, moisture, or liquids.
- Connect the inverter only to a 12V DC power source. Connecting to a different voltage może uszkodzić urządzenie.
- Always connect the battery terminals with correct polarity: positive (+) to positive, and negative (-) to negative. Reverse polarity will damage the unit.
- Upewnij się, że wszystkie połączenia są dobrze dokręcone i bezpieczne, aby zapobiec przegrzaniu i łukowi elektrycznemu.
- Nie otwierać falownika casing. Wewnątrz nie ma żadnych części, które mogłyby być naprawiane przez użytkownika. Wszelkie prace serwisowe należy zlecać wykwalifikowanemu personelowi.
- Trzymaj dzieci z dala od falownika i jego złączy.
- Always disconnect the DC power source before performing any maintenance or troubleshooting.
- Upewnij się, że falownik jest prawidłowo uziemiony.
3. Koniec produktuview
The RAGGIE RGS 1500W inverter features robust construction and essential ports for reliable power conversion.
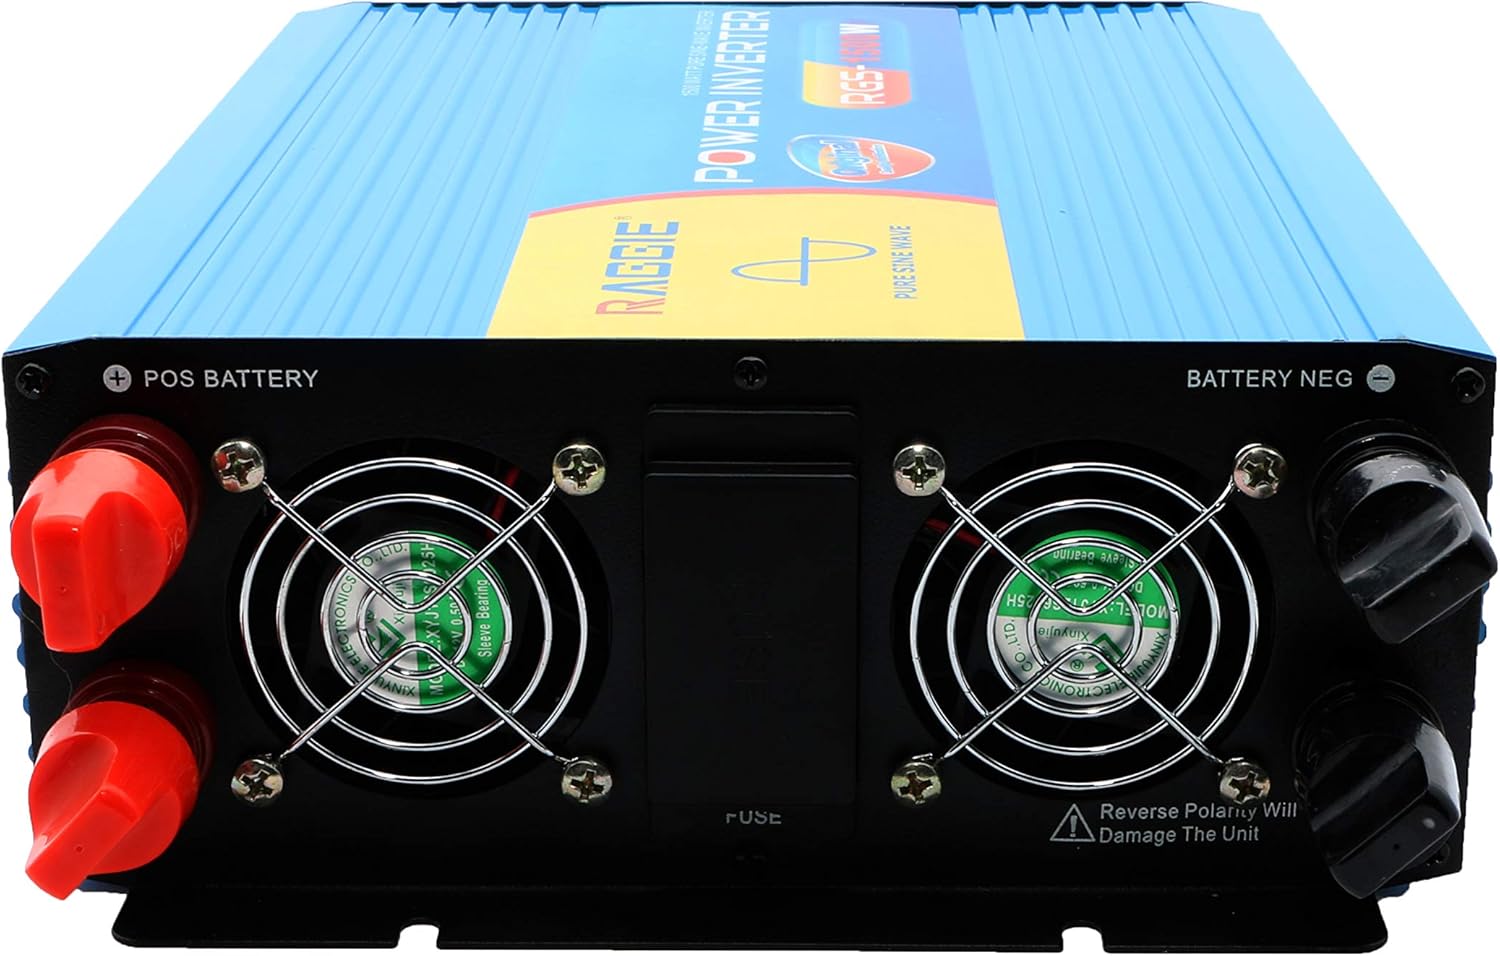
3.1 Elementy panelu tylnego
The rear panel includes the DC input terminals for connecting to your 12V battery or solar array, along with cooling fans and a fuse compartment.
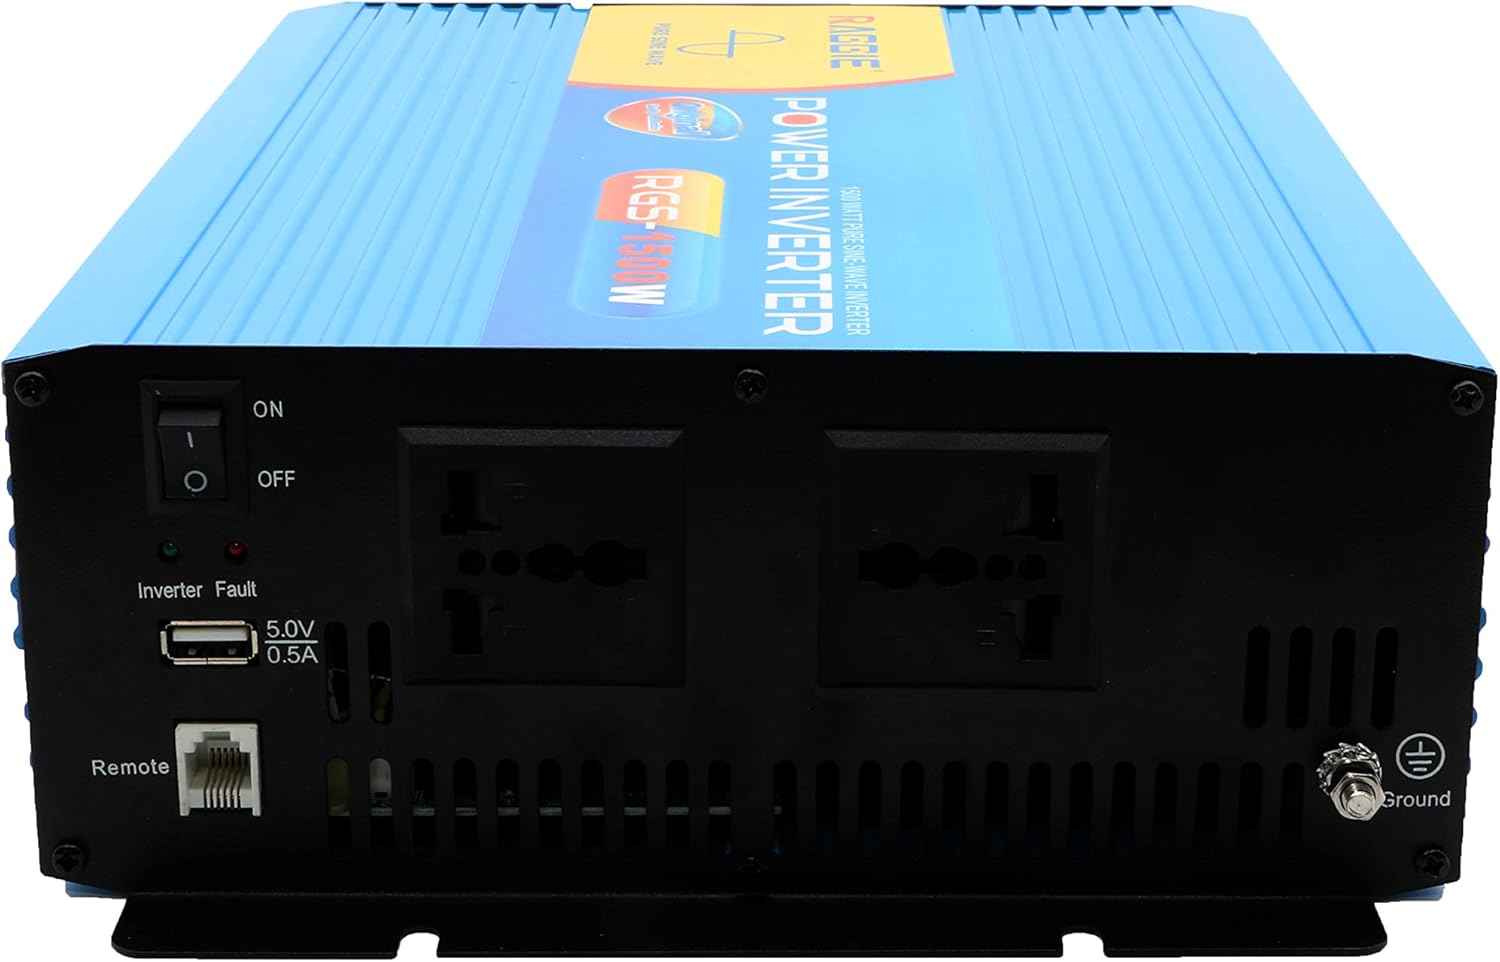
3.2 Elementy panelu przedniego
The front panel provides the AC output sockets for connecting your appliances, the main power switch, a USB charging port, and a remote control port.
4. Konfiguracja i instalacja
Follow these steps for proper installation of your inverter.
4.1 Rozpakowanie i kontrola
- Ostrożnie wyjmij falownik z opakowania.
- Inspect the unit for any signs of damage during transit. If damage is found, do not proceed with installation and contact your supplier.
- Sprawdź, czy wszystkie akcesoria są obecne.
4.2 Umieszczenie
- Wybierz miejsce suche, chłodne i dobrze wentylowane.
- Avoid areas with direct sunlight, high temperatures, or excessive dust.
- Zamontuj falownik w sposób stabilny i bezpieczny na stabilnej powierzchni.
- Ensure there is adequate clearance around the cooling fans for proper airflow.
4.3 DC Input Connection (Battery/Solar)
IMPORTANT: Ensure the inverter's power switch is in the OFF position before making any connections.
- Use appropriate gauge cables for your 12V DC input. Refer to the specifications for recommended cable sizes.
- Połącz CZERWONY (+) cable to the positive terminal of your 12V battery/solar array.
- Podłącz drugi koniec CZERWONY (+) cable to the positive terminal (POS BATTERY) on the inverter's rear panel.
- Połącz CZARNY (-) cable to the negative terminal of your 12V battery/solar array.
- Podłącz drugi koniec CZARNY (-) cable to the negative terminal (BATTERY NEG) on the inverter's rear panel.
- Sprawdź, czy wszystkie połączenia są dobrze dokręcone i bezpieczne.
4.4 Uziemienie
Ze względów bezpieczeństwa falownik musi być prawidłowo uziemiony.
- Connect a grounding wire from the ground terminal on the inverter's front panel to a suitable earth ground point (e.g., vehicle chassis, ground rod).
4.5 AC Output Connection (Appliances)
- Plug your AC appliances directly into the AC output sockets on the inverter's front panel.
- Zapewnij całkowitą moctage of all connected appliances does not exceed the inverter's continuous output power (1500W).
5. Instrukcja obsługi
5.1 Włączanie falownika
- Ensure all DC and AC connections are correctly made and secure.
- Switch the main power switch on the inverter's front panel to the ON pozycja.
- The inverter will typically emit a short beep and an indicator light will illuminate, indicating it is operational.
5.2 Turning Off the Inverter
- Disconnect all AC appliances from the inverter.
- Switch the main power switch on the inverter's front panel to the WYŁĄCZONY pozycja.
5.3 porty USB do ładowania
- The inverter includes a 5.0V 0.5A USB port for charging small electronic devices.
- Plug your USB device into this port for charging.
6. Konserwacja
Regularna konserwacja zapewnia optymalną wydajność i długą żywotność falownika.
- Czyszczenie: Okresowo czyść zewnętrzną część falownika suchą, miękką ściereczką. Upewnij się, że otwory wentylacyjne są wolne od kurzu i zanieczyszczeń. Nie używaj płynnych środków czyszczących.
- Kontrola połączenia: Regularly inspect all DC and AC connections to ensure they remain tight and free from corrosion. Loose connections can cause overheating and power loss.
- Wymiana bezpiecznika: The inverter is equipped with internal fuses. If the inverter stops working and troubleshooting does not resolve the issue, the fuse may need replacement. This should only be performed by qualified personnel.
7. Rozwiązywanie Problemów
W tej sekcji omówiono typowe problemy, jakie mogą wystąpić podczas korzystania z falownika.
| Problem | Możliwa przyczyna | Rozwiązanie |
|---|---|---|
| Brak mocy wyjściowej / Falownik się nie włącza | Luźne połączenia prądu stałego Niski poziom naładowania akumulatoratage Przepalony bezpiecznik Wyłącznik falownika wyłączony | Check and tighten DC cables Naładuj lub wymień baterię Check and replace fuse (by qualified personnel) Turn inverter switch ON |
| Overload warning / Inverter shuts down | Podłączone obciążenie przekracza 1500 W Surge power too high | Zmniejsz całkowitą ilość watówtage of connected appliances Ensure appliance starting current is within inverter's peak capacity |
| Overheating warning / Inverter shuts down | Słaba wentylacja Nadmierna temperatura otoczenia Blocked cooling fans | Ensure adequate airflow around the inverter Move inverter to a cooler location Clean cooling fans and vents |
| Niski poziom naładowania akumulatoratagostrzeżenie | Niski poziom naładowania baterii | Naładuj baterię |
8. Specyfikacje
| Funkcja | Specyfikacja |
|---|---|
| Marka | RAGGIE |
| Numer modelu | RGS 1500W |
| Ciągła moc wyjściowa | 1500 watów |
| Wejście Voltage | 12 woltów prądu stałego |
| Objętość wyjściatage | AC (Standard for region, typically 220V) |
| Źródło zasilania | External (Battery/Solar) |
| Zalecane zastosowania | Provide AC power from a DC source, operate AC devices using DC power. |
| Moc wyjściowa szczytowa | 18000 Watts (Momentary Surge) |
| Certyfikaty | UL, ETL, CE |
| Data pierwszej dostępności | 9 lipca 2019 r. |
9. Gwarancja i wsparcie
For warranty information or technical support, please refer to the documentation provided with your purchase or contact the manufacturer directly. Keep your purchase receipt as proof of purchase.