
1. Wprowadzenie
This manual provides essential information for the installation, operation, and maintenance of your new WFLNHB Carburetor. This carburetor is designed as a direct replacement for Yamaha Raptor 660R YFM660R models manufactured between 2001 and 2005. Please read these instructions thoroughly before attempting any installation or maintenance procedures.
2. Informacje dotyczące bezpieczeństwa
Ostrzeżenie: Working with fuel systems can be hazardous. Always observe the following safety precautions:
- Przed rozpoczęciem jakichkolwiek prac należy upewnić się, że silnik jest zimny.
- Odłącz akumulator, aby zapobiec przypadkowemu uruchomieniu.
- Aby uniknąć wdychania oparów paliwa, należy wykonywać pracę w dobrze wentylowanym pomieszczeniu.
- Trzymaj otwarty ogień, iskry i inne źródła zapłonu z dala od miejsca pracy.
- Należy nosić odpowiedni sprzęt ochrony osobistej, obejmujący rękawice i okulary ochronne.
- Fuel is highly flammable. Handle with extreme care and dispose of any spilled fuel properly.
- Aby zapewnić optymalną wydajność i bezpieczeństwo, zaleca się zlecenie instalacji profesjonaliście.
3. Zawartość opakowania
Przed przystąpieniem do instalacji sprawdź, czy wszystkie komponenty są obecne i nieuszkodzone.
- WFLNHB Carburetor Assembly
- Fuel Filters (2)
- Spark Plugs (2)
- Uszczelka
- Assorted Jets and Screws
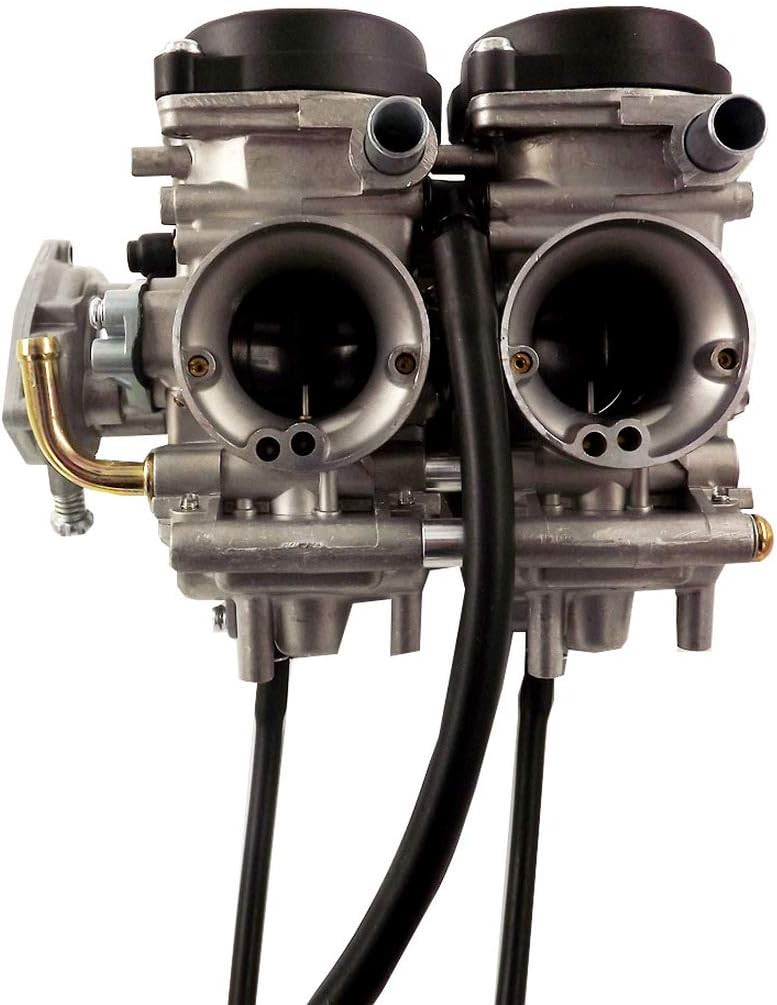
Figure 3.1: Included accessories with the WFLNHB Carburetor.
4. Zgodność
This WFLNHB Carburetor is compatible with the following Yamaha ATV models:
- Yamaha Raptor 660R YFM660R (2001)
- Yamaha Raptor 660R YFM660R (2002)
- Yamaha Raptor 660R YFM660R (2003)
- Yamaha Raptor 660R YFM660R (2004)
- Yamaha Raptor 660R YFM660R (2005)
Numery części zamiennych: 5LP-14900-00-00, 5LP-14900-20-00, 5LP-14900-30-00.
Always verify the part number and compare photos with your original part before purchase and installation to ensure correct fitment.
5. Konfiguracja i instalacja
The following steps outline a general procedure for carburetor replacement. Refer to your vehicle's specific service manual for detailed instructions and torque specifications. Professional installation is highly recommended.
- Przygotowanie: Park the ATV on a level surface. Ensure the engine is cool. Turn off the fuel supply and disconnect the battery.
- Access Carburetor: Remove any body panels, air box components, or fuel lines that obstruct access to the existing carburetor.
- Spuszczanie paliwa: Place a suitable container under the carburetor and open the drain screw to drain any remaining fuel.
- Odłącz komponenty: Carefully disconnect all fuel lines, vacuum lines, throttle cables, and choke cables from the old carburetor. Note their positions for reassembly.
- Demontaż starego gaźnika: Rozluźnij clamps securing the carburetor to the intake manifold and airbox. Carefully remove the old carburetor.
- Montaż nowego gaźnika: Install the new WFLNHB Carburetor, ensuring the gasket is properly seated. Connect it to the intake manifold and airbox, tightening clampjest bezpiecznie.
- Ponowne podłączenie komponentów: Reconnect all fuel lines, vacuum lines, throttle cables, and choke cables to their correct positions on the new carburetor. Ensure cables operate smoothly without binding.
- Install Fuel Filters and Spark Plugs: Replace the old fuel filters with the new ones provided. Install the new spark plugs, ensuring they are gapped correctly according to your vehicle's specifications.
- Kontrole końcowe: Reconnect the battery. Turn on the fuel supply. Inspect all connections for leaks.
- Pierwsze uruchomienie: Start the engine. It may take a few cranks for fuel to reach the carburetor. Allow the engine to warm up and check for smooth operation. Adjust idle speed and mixture if necessary (refer to your vehicle's service manual for tuning procedures).

Rycina 5.1: Przód view of the WFLNHB Carburetor assembly.

Rysunek 5.2: Eksplodowany view or component diagram of the carburetor.
6. Instrukcja obsługi
Once installed and properly tuned, the carburetor will regulate the air-fuel mixture for your engine. Proper operation relies on correct tuning for your specific environment and engine condition. The carburetor is designed to provide stable performance and sensitive reaction due to improved air intake holes and airflow structure.
- Choke Operation: Use the choke for cold starts as needed. Fully open the choke once the engine warms up to prevent rich running.
- Reakcja przepustnicy: The carburetor is designed for responsive throttle action. If you experience hesitation or bogging, refer to the Troubleshooting section or consult a professional.
- Regulacja biegu jałowego: The idle speed can be adjusted via the idle screw. Refer to your ATV's service manual for the recommended idle RPM.
7. Konserwacja
Regular maintenance ensures the longevity and optimal performance of your carburetor.
- Jakość paliwa: Always use clean, fresh fuel. Stale or contaminated fuel can clog jets and passages.
- Wymiana filtra paliwa: Regularly inspect and replace fuel filters to prevent debris from entering the carburetor.
- Konserwacja filtra powietrza: A clean air filter is crucial for proper air-fuel mixture. Clean or replace the air filter according to your ATV's service schedule.
- Czyszczenie gaźnika: If the ATV experiences performance issues, the carburetor may require cleaning. This involves disassembling the carburetor and cleaning all jets and passages with carburetor cleaner. This procedure should be performed by an experienced technician.
- Kontrola kabla: Periodically check throttle and choke cables for wear, fraying, or sticking. Lubricate as necessary.

Rysunek 7.1: Strona view of the carburetor, illustrating external components for inspection.
8. Rozwiązywanie Problemów
This section addresses common issues you might encounter. For complex problems, consult a qualified mechanic.
| Problem | Możliwa przyczyna | Rozwiązanie |
|---|---|---|
| Silnik nie uruchamia się lub uruchamia się z trudnością | No fuel, clogged fuel filter, incorrect choke setting, fouled spark plugs, improper jetting. | Check fuel level and flow. Replace fuel filter. Adjust choke. Inspect/replace spark plugs. Verify jetting is appropriate for your altitude/conditions. |
| Engine runs rough, bogs, or lacks power | Clogged jets, improper air-fuel mixture, air leak in intake, dirty air filter. | Clean carburetor jets. Adjust air-fuel mixture screw. Check intake boots for cracks. Clean/replace air filter. |
| Engine idles poorly or stalls | Incorrect idle speed adjustment, clogged pilot jet, vacuum leak. | Adjust idle screw. Clean pilot jet. Inspect vacuum lines and intake for leaks. |
| Wycieki paliwa z gaźnika | Damaged float, stuck float needle, loose drain screw, worn gasket. | Inspect float and needle valve. Tighten drain screw. Replace gaskets. |
Note on Jetting: The carburetor comes with standard jetting. Depending on your altitude, temperature, and specific engine modifications, you may need to adjust the main and pilot jets for optimal performance. Consult a service manual or a professional for proper jetting procedures.
9. Specyfikacje
- Marka: WFLNHB
- Rodzaj serwisu pojazdu: Quad
- Typ kołnierza: Przykręcić
- Zalecane zastosowanie: Motorcycle, UTV
- Konkretne zastosowania: Wydajność
- Wymiary produktu: 7.64" gł. x 5.91" szer. x 5.2" wys.
- Waga przedmiotu: 3.45 funta
- Numer części producenta: 5LP-14900-00-00 (Replacement)
10. Informacje o gwarancji
For specific warranty details regarding your WFLNHB Carburetor, please refer to the product packaging or contact WFLNHB customer support directly. Warranty terms typically cover manufacturing defects and material flaws under normal use conditions.
11. Wsparcie i kontakt
If you require further assistance, have questions about installation, or need to report an issue, please contact WFLNHB customer support. You can often find contact information on the product packaging or by visiting the official WFLNHB store page online.
WFLNHB Store: Visit the WFLNHB Store on Amazon