
1. Wprowadzenie
The Jansite P009 Car Camera is a versatile and durable camera designed to enhance driving safety by providing clear visibility in blind spots. This camera can be utilized as a side-view, przód-view, or rear-view camera, offering flexibility for various vehicle applications. It features a wide-angle lens, IP68 waterproofing, and night vision capabilities for reliable performance in diverse conditions.
2. Zawartość opakowania
Sprawdź, czy w przesyłce znajdują się wszystkie elementy:
- Camera Unit (1)
- Camera Power Cable (1)
- Video Extension Cable (1)

Obraz: Contents of the Jansite P009 car camera package, including the camera, power cable, and video extension cable.
3. Funkcje produktu
- Wszechstronne zastosowanie: Can be used as a side, front, or rear camera to eliminate blind spots.
- Obiektyw szerokokątny: Equipped with a 120-degree diagonal wide-angle lens for broad visibility.
- Image Orientation Control: Supports switching between positive and mirror images.
- Parking Line Function: Ability to enable or disable parking reference lines.
- Trwałe i wodoodporne: Klasa wodoodporności IP68 gwarantuje niezawodną pracę w różnych warunkach pogodowych.
- Widzenie nocne: Features low-light night vision compatibility for clear images in dim environments.
- Regulowany obiektyw: The camera lens can rotate 360 degrees for optimal angle adjustment.
- Łatwy montaż: Bracket design allows for surface mounting without the need for drilling.

Obraz: Illustration of the camera's key features, including 120° wide-angle, IP68 waterproof rating, and the function of cutting white and green cables for image and parking line settings.
4. Konfiguracja i instalacja
4.1 Umiejscowienie kamery
The camera is designed for surface mounting. Choose a location on your vehicle that provides the desired viewing angle (e.g., side mirror, front bumper, rear bumper). The bracket allows for direct adhesion without drilling.

Obraz: Diagram showing typical installation points for the camera (B) and monitor (A) on a car, illustrating the 'no drilling' adhesive mounting method.
4.2 Podłączenie okablowania
- Connect the camera's power cable to a 12V power source in your vehicle. Ensure proper polarity (red to positive, black to negative).
- Connect the camera's video output (RCA connector) to the video input of your car monitor or display unit using the provided video extension cable.
4.3 Regulacja obiektywu
The camera features a 360-degree rotatable lens. After mounting, gently rotate the lens to achieve the optimal viewing angle for your application.

Obraz: Illustration demonstrating the 360-degree free rotation capability of the camera lens, allowing for flexible angle adjustment.
5. Działanie
5.1 Image Orientation (Positive/Mirror Image)
The camera's default setting is typically a mirror image (suitable for rear view). To switch to a positive image (suitable for front or side view), locate the small white cable loop on the camera's wiring harness. Cut this white cable loop to change the image from mirror to positive. If the cable is already cut, connecting it will revert to a positive image (though typically, cutting is for switching).
5.2 Parking Reference Lines
The camera's default setting may have parking reference lines enabled or disabled. To toggle the parking lines, locate the small green cable loop on the camera's wiring harness. Cut this green cable loop to enable or disable the parking reference lines. If the cable is already cut, connecting it will toggle the state.
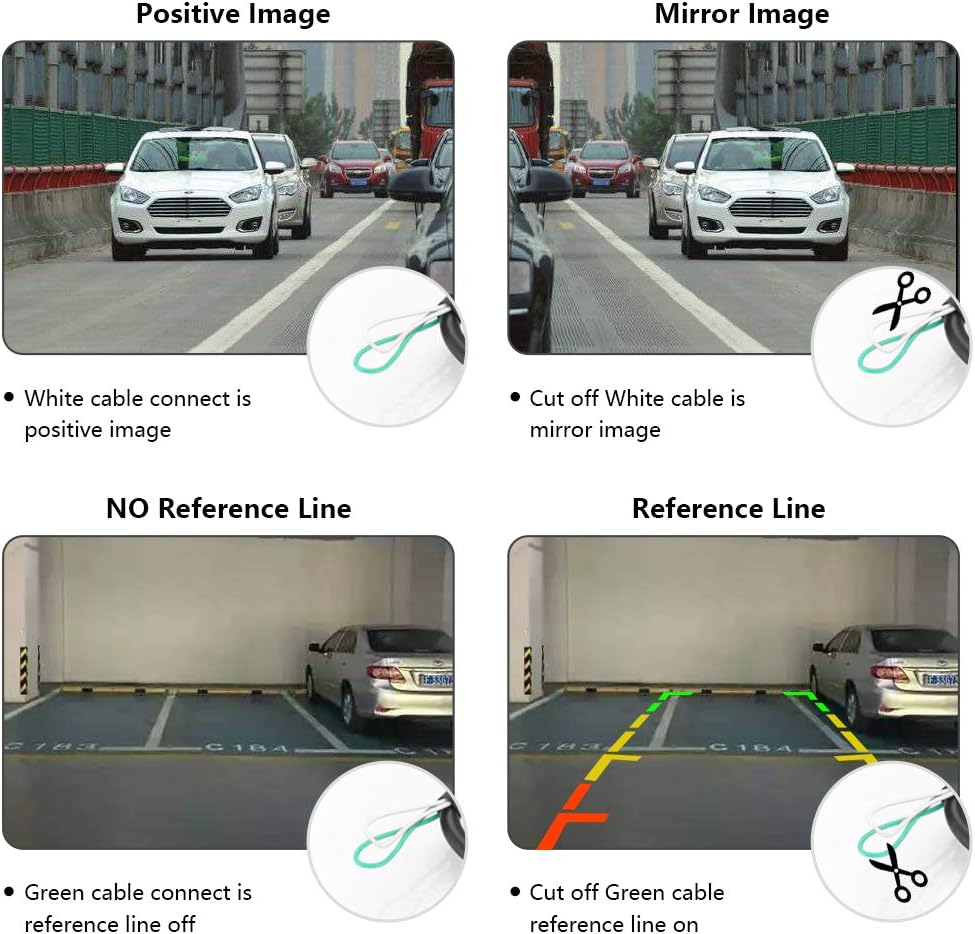
Obraz: Visual guide showing how cutting the white cable switches between positive and mirror images, and cutting the green cable toggles the parking reference lines on or off.
6. Konserwacja
- Czyszczenie: Regularnie czyść obiektyw aparatu miękką,amp ściereczką, aby zapewnić wysoką jakość obrazu. Unikaj środków czyszczących o działaniu ściernym.
- Kontrola połączenia: Periodically inspect all cable connections to ensure they are secure and free from corrosion.
- Bezpieczeństwo montażu: Verify that the camera remains firmly attached to its mounting surface.
7. Rozwiązywanie Problemów
- Brak obrazu na monitorze:
- Check all power connections to the camera and monitor.
- Ensure the video cable is securely connected to both the camera and the monitor's video input.
- Verify the monitor is set to the correct video input channel.
- Migotanie lub zniekształcenie obrazu:
- Sprawdź, czy połączenia kabli wideo nie są luźne.
- Ensure the power supply to the camera is stable (12V).
- Avoid routing video cables near high-voltage wires or sources of electromagnetic interference.
- Incorrect Image Orientation (Mirror/Positive):
- Refer to Section 5.1 and check the status of the white cable loop. Cut or reconnect as needed to achieve the desired image orientation.
- Linie parkingowe nie pojawiają się/znikają:
- Refer to Section 5.2 and check the status of the green cable loop. Cut or reconnect as needed to toggle the parking lines.
8. Specyfikacje
| Funkcja | Specyfikacja |
|---|---|
| Numer modelu | P009 |
| Marka | Jansit |
| Wymiary (dł. x szer. x wys.) | 45 x 25 x 25 milimetrów |
| Kompatybilne urządzenia | Monitor |
| Typ instalacji | Montaż powierzchniowy |
| Tomtage | 12 wolty |
| Technologia czujnika optycznego | CCD |
| Typ soczewki | Szeroki kąt |
| Rzeczywisty View Kąt | 120 stopnia |
| Typ złącza | RCA |
| Rozmiar czujnika optycznego | 1/4 inch or 1/3 inch |
| Technologia wyświetlania | LCD (for compatible monitors) |
| Rozdzielczość przechwytywania wideo | 1080p (output resolution, depends on monitor) |
| Format przechwytywania wideo | MP4 (for compatible recording devices) |
| Stopień wodoodporności | IP68 |

Obraz: Przód i bok views of the Jansite P009 car camera with key dimensions (45mm length, 25mm height) and an illustration of its blind spot coverage.
9. Gwarancja i wsparcie
For warranty information or technical support, please refer to the documentation provided with your purchase or contact Jansite customer service through their official channels. Keep your purchase receipt for warranty claims.