1. Wprowadzenie
The MASTECH MS8260E is a versatile 2000-count digital multimeter designed for a wide range of electrical and electronic measurements. It features a large LCD display, non-contact voltage (NCV) detection, and capabilities for measuring AC/DC voltage, AC/DC current, resistance, capacitance, and inductance. This manual provides essential information for the safe and effective operation, maintenance, and troubleshooting of your device.
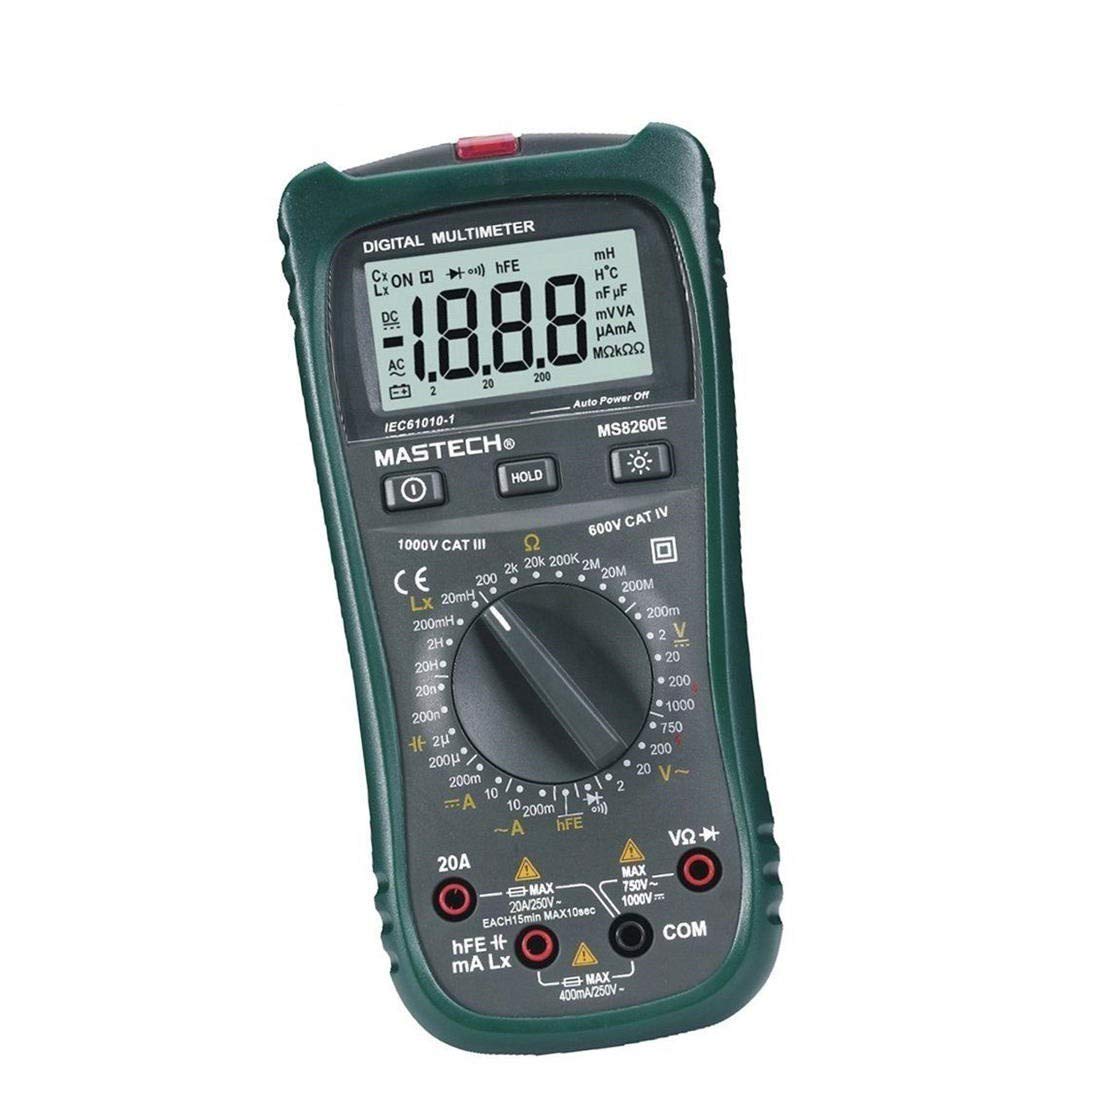
Rycina 1: Przód view of the MASTECH MS8260E Digital Multimeter, showing the LCD display, function rotary switch, and input jacks.
2. Informacje dotyczące bezpieczeństwa
To ensure safe operation and service of the meter, follow these safety guidelines:
- Read and understand all instructions in this manual before using the meter.
- Zawsze przestrzegaj lokalnych i krajowych przepisów bezpieczeństwa.
- Nie używaj miernika, jeśli wygląda na uszkodzony lub jeśli izolacja przewodów pomiarowych jest naruszona.
- Observe the input limits for each measurement range to prevent electrical shock or damage to the meter. This meter is rated for CAT.IV 600V.
- Zachowaj ostrożność podczas pracy z objętościątagpowyżej 30 V AC RMS, 42 V szczytowo lub 60 V DC. Te wartościtagStwarzają ryzyko porażenia prądem.
- Zawsze odłączaj zasilanie obwodu i rozładuj wszystkie ładunki wysokiego napięcia.tage capacitors before making resistance, continuity, diode, or capacitance measurements.
- Aby zapewnić dokładne odczyty, należy natychmiast wymienić baterię, gdy tylko pojawi się wskaźnik niskiego poziomu naładowania.
- Nie należy używać miernika w środowiskach, w których występuje zagrożenie wybuchem gazów, oparów lub pyłów.
3. Koniec produktuview
The MS8260E multimeter is equipped with several features to facilitate accurate and convenient measurements:
- Large 2000 Counts LCD Display: Zapewnia wyraźne odczyty cyfrowe.
- Wbudowany bezdotykowy objtage (NCV) Detektor: Wykrywa objętość ACtage greater than 110V without physical contact, indicated by a flash warning.
- Funkcja zatrzymania danych: Zamraża wyświetlany odczyt, umożliwiając łatwe zapisanie.
- Podświetlenie wyświetlacza: Improves visibility in dimly lit conditions.
- Automatyczne wyłączanie: Oszczędza baterię poprzez automatyczne wyłączenie miernika po pewnym okresie bezczynności.
- Wskaźnik niskiego poziomu naładowania baterii: Alerts the user when the battery needs replacement.
- Wskazanie biegunowości: Automatically displays negative polarity.
- 30-Range Rotary Switch: Selects various measurement functions including AC/DC voltage, AC/DC current, resistance, capacitance, inductance, diode check, continuity test, and transistor (hFE) check.
4. Konfiguracja
4.1 Instalacja baterii
The MS8260E requires one 9V battery (NEDA 1604/6F22). To install or replace the battery:
- Ensure the meter is turned off and disconnect all test leads from the input terminals.
- Znajdź pokrywę komory baterii znajdującą się z tyłu miernika.
- Odkręć śrubę(y) mocującą(e) i zdejmij pokrywę.
- Insert the 9V battery, observing the correct polarity.
- Załóż pokrywę komory baterii i zabezpiecz ją śrubą(ami).
4.2 Podłączanie przewodów pomiarowych
Always connect the black test lead to the "COM" (common) input jack. Connect the red test lead to the appropriate input jack based on the desired measurement:
- dla objtage, Resistance, Capacitance, Inductance, Diode, Continuity, and hFE measurements: Connect the red lead to the "VΩCAPHz" jack.
- For Current measurements up to 200mA: Connect the red lead to the "mA" jack.
- For Current measurements up to 10A: Connect the red lead to the "10A" jack.
Ensure test leads are fully inserted into the jacks before taking measurements.
5. Instrukcja obsługi
Turn the rotary switch to the desired function. The meter will display "OL" (Overload) if no input is present or if the input exceeds the range.
5.1 Objętość DCtage Pomiar (DCV)
- Set the rotary switch to the desired DCV range (200mV, 2V, 20V, 200V, 1000V).
- Connect the black test lead to the "COM" jack and the red test lead to the "VΩCAPHz" jack.
- Podłącz przewody pomiarowe do mierzonego elementu lub obwodu, zwracając uwagę na biegunowość.
- Przeczytaj tomtage wartość na wyświetlaczu LCD.
5.2 Objętość ACtage Pomiar (ACV)
- Set the rotary switch to the desired ACV range (2V, 20V, 200V, 750V).
- Connect the black test lead to the "COM" jack and the red test lead to the "VΩCAPHz" jack.
- Podłącz przewody pomiarowe do obwodu prądu przemiennegotagŹródło.
- Przeczytaj tomtage wartość na wyświetlaczu LCD.
5.3 Pomiar prądu stałego (DCA)
- Set the rotary switch to the desired DCA range (200mA, 10A).
- For measurements up to 200mA, connect the red lead to the "mA" jack. For measurements up to 10A, connect the red lead to the "10A" jack. The black lead connects to "COM".
- Otwórz obwód, w którym będziesz mierzyć prąd i podłącz miernik szeregowo z obciążeniem.
- Odczytaj aktualną wartość na wyświetlaczu LCD.
5.4 Pomiar prądu przemiennego (ACA)
- Set the rotary switch to the desired ACA range (200mA, 10A).
- For measurements up to 200mA, connect the red lead to the "mA" jack. For measurements up to 10A, connect the red lead to the "10A" jack. The black lead connects to "COM".
- Otwórz obwód, w którym będziesz mierzyć prąd i podłącz miernik szeregowo z obciążeniem.
- Odczytaj aktualną wartość na wyświetlaczu LCD.
5.5 Pomiar rezystancji (Ω)
- Set the rotary switch to the desired Ω range (200Ω, 2kΩ, 20kΩ, 200kΩ, 2MΩ, 20MΩ, 200MΩ).
- Connect the black test lead to "COM" and the red test lead to "VΩCAPHz".
- Upewnij się, że obwód jest odłączony od napięcia i wszystkie kondensatory są rozładowane.
- Podłącz przewody pomiarowe do rezystora lub elementu.
- Odczytaj wartość rezystancji na wyświetlaczu LCD.
5.6 Capacitance Measurement (CAP)
- Set the rotary switch to the desired CAP range (20nF, 200nF, 2uF, 200uF).
- Connect the black test lead to "COM" and the red test lead to "VΩCAPHz".
- Przed podłączeniem przewodów pomiarowych należy upewnić się, że kondensator jest całkowicie rozładowany.
- Podłącz przewody pomiarowe do kondensatora.
- Odczytaj wartość pojemności na wyświetlaczu LCD.
5.7 Inductance Measurement (L)
- Set the rotary switch to the desired Inductance range (20mH, 200mH, 2H, 20H).
- Connect the black test lead to "COM" and the red test lead to "VΩCAPHz".
- Podłącz przewody pomiarowe do cewki indukcyjnej.
- Read the inductance value on the LCD display.
5.8 Test diody
- Ustaw przełącznik obrotowy na symbol diody.
- Connect the black test lead to "COM" and the red test lead to "VΩCAPHz".
- Podłącz czerwony przewód do anody, a czarny przewód do katody diody. Objętość w kierunku przewodzeniatagWyświetlany będzie spadek napięcia (zwykle od 0.5 V do 0.8 V dla diod krzemowych).
- Reverse the leads. The display should show "OL" for a good diode.
5.9 Test ciągłości
- Set the rotary switch to the Continuity symbol.
- Connect the black test lead to "COM" and the red test lead to "VΩCAPHz".
- Podłącz przewody pomiarowe do obwodu lub elementu.
- Jeżeli rezystancja jest mniejsza niż około 30Ω, rozlegnie się sygnał dźwiękowy wskazujący ciągłość.
5.10 Test tranzystora (hFE)
- Ustaw przełącznik obrotowy w pozycji hFE.
- Identify the type (NPN or PNP) and pinout (Emitter, Base, Collector) of the transistor.
- Insert the transistor leads into the corresponding sockets in the hFE test socket on the meter.
- Odczytaj wartość hFE (wzmocnienia prądu stałego) na wyświetlaczu LCD.
5.11 tom bez kontaktutage (NCV) Wykrywanie
- Ustaw przełącznik obrotowy w pozycji NCV.
- Hold the top front part of the meter near the AC voltage source (e.g., an electrical outlet or insulated wire).
- Jeśli AC objtage greater than 110V is detected, the NCV indicator light will flash, and the buzzer may sound.
6. Konserwacja
6.1 Czyszczenie
Wytrzyj licznik reklamąamp cloth and a mild detergent. Do not use abrasives or solvents. Ensure the meter is dry before use.
6.2 Wymiana baterii
When the "BAT" symbol appears on the display, the battery needs to be replaced. Refer to Section 4.1 for battery installation instructions.
6.3 Wymiana bezpiecznika
If the current measurement function fails, the fuse may need replacement. This operation should only be performed by qualified personnel. Refer to the service manual or contact customer support for fuse specifications and replacement procedures.
6.4 Przechowywanie
If the meter is not to be used for an extended period, remove the battery to prevent leakage and damage to the meter. Store the meter in a cool, dry place away from direct sunlight.
7. Rozwiązywanie Problemów
| Problem | Możliwa przyczyna | Rozwiązanie |
|---|---|---|
| Brak wyświetlacza lub słaby wyświetlacz | Low battery; Meter off | Replace battery; Turn on meter |
| Wyświetlany jest komunikat „OL” | Input exceeds range; Open circuit (for resistance/continuity) | Select higher range; Check circuit connection |
| Błędne odczyty | Low battery; Incorrect range selected; Poor test lead contact | Replace battery; Select appropriate range; Ensure good contact |
| Pomiar prądu nie działa | Przepalony bezpiecznik | Replace fuse (by qualified personnel) |
8. Specyfikacje
| Funkcja pomiaru | Zakres | Dokładność |
|---|---|---|
| Objętość DCtage (prąd stały) | 200mV, 2V, 20V, 200V, 1000V | ±0.5% (200mV-200V), ±0.8% (1000V) |
| AC Objętośćtage (ACV) | 2V, 20V, 200V, 750V | ±0.8% (2V-200V), ±1.2% (750V) |
| Prąd stały (DCA) | 200mA, 10A | ±1.5% (200mA), ±2.0% (10A) |
| Prąd AC (ACA) | 200mA, 10A | ±1.8% (200mA), ±3.0% (10A) |
| Odporność (Ω) | 200Ω, 2kΩ, 20kΩ, 200kΩ, 2MΩ, 20MΩ, 200MΩ | ±0.8% (200Ω-2MΩ), ±1.0% (20MΩ), ±5.0% (200MΩ) |
| Pojemność (CAP) | 20nF, 200nF, 2uF, 200uF | ±4.0% (20nF-2uF), ±5.0% (200uF) |
| Indukcyjność (L) | 20mH, 200mH, 2H, 20H | ±3.0% |
| Ciągłość słyszalna | Buzzer sounds at <30Ω | Brak |
| Test Diody | 1mA, 2.8V | Brak |
| Tranzystor (hFE) | 0-1,000 | Brak |
Dane ogólne:
- Wyświetlacz: 2000 zliczeń LCD
- Ocena bezpieczeństwa: CAT.IV 600V
- Moc: 9V battery (NEDA 1604/6F22)
- Waga: Około 1 kg (wraz z baterią)
9. Gwarancja i wsparcie
For warranty information, technical support, or service inquiries, please refer to the warranty card included with your product or visit the official Mastech website. Do not attempt to repair the meter yourself, as this may void the warranty and pose safety risks.