CLIPSTER FarmClipper Akku2
Instrukcja obsługi maszynki bezprzewodowej Kerbl FarmClipper Akku2
Model: FarmClipper Akku2 (181881)
1. Wprowadzenie
This instruction manual provides essential information for the safe and effective use of your Kerbl FarmClipper Akku2 Cordless Clipper. Please read this manual thoroughly before operating the device to ensure proper handling, maintenance, and to prevent injury or damage. Keep this manual for future reference.
Ostrzeżenia dotyczące bezpieczeństwa
- Do not use the device near water or in humid conditions. Water contact can lead to electric shock.
- Keep the device away from human skin and eyes. This clipper is designed for animal use only.
- Regularly clean and maintain the device zgodnie z instrukcjami podanymi w tym podręczniku.
- Ensure the device is switched off and unplugged before cleaning, maintenance, or changing blades.
- Store the clipper and its accessories out of reach of children and untrained individuals.
2. Koniec produktuview
The Kerbl FarmClipper Akku2 is a cordless clipper designed for efficient grooming of horses and cattle. It offers excellent versatility and handling properties, making it suitable for various clipping tasks.
Główne cechy:
- Działanie bezprzewodowe: Powered by two 10.8 V Lithium-ion batteries for uninterrupted clipping.
- Zoptymalizowana wydajność: Approximately 1.5 hours of working time and charging time for continuous use.
- Ergonomiczna konstrukcja: Special non-slip casing texture and balanced center of gravity for fatigue-free operation.
- Compact Grip: Plastik casing circumference designed for a firm grip, even for smaller hands.
- Trwałe ostrza: Equipped with stainless steel blades for effective and precise clipping.
Zawartość opakowania:
Po rozpakowaniu należy sprawdzić, czy wszystkie elementy są obecne i nieuszkodzone.
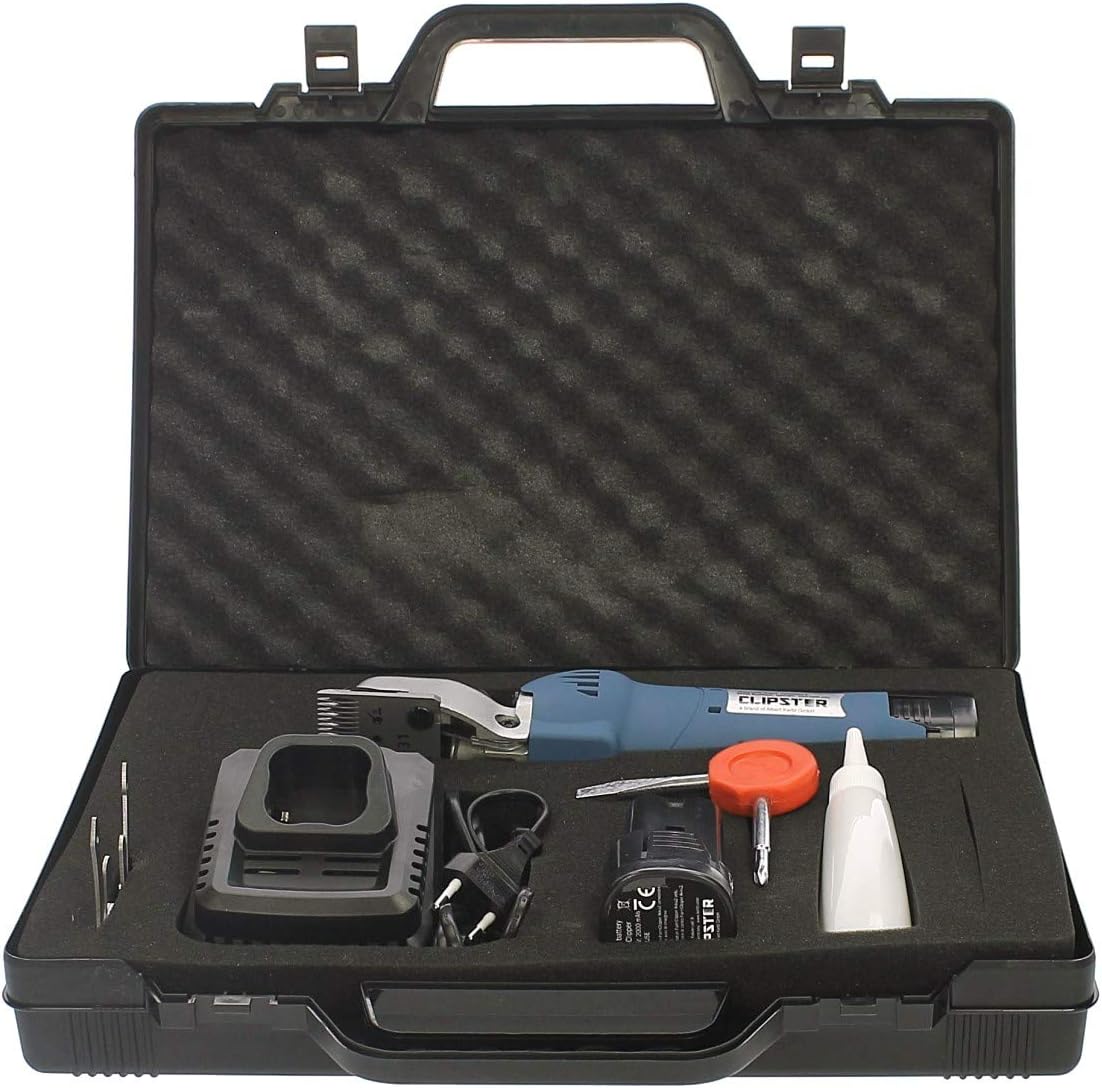
Image 2.1: The Kerbl FarmClipper Akku2, two batteries, charger, oil, cleaning brush, and blade removal tool, all neatly organized within a durable black carrying case.

Image 2.2: All components of the FarmClipper Akku2 kit, including the clipper, two rechargeable batteries, a charging station, lubricating oil, a cleaning brush, and a blade adjustment tool.
3. Konfiguracja
3.1 Ładowanie akumulatora
The FarmClipper Akku2 operates on 10.8V Lithium-ion batteries. For optimal performance and battery life, fully charge the battery before first use and whenever the battery level is low.
- Connect the charging station to a suitable power outlet.
- Insert a battery into the charging station. Ensure it is seated correctly.
- Kontrolka na ładowarce pokazuje stan ładowania (np. czerwona oznacza ładowanie, zielona oznacza pełne naładowanie).
- Pełne naładowanie trwa zazwyczaj około 1.5 godzin.
- Po całkowitym naładowaniu wyjmij akumulator z ładowarki.

Image 3.1: The battery charging station with a 10.8V Lithium-ion battery inserted, ready for charging.

Image 3.2: A single 10.8V Lithium-ion battery, providing power for the cordless clipper.
3.2 Attaching the Battery to the Clipper
- Upewnij się, że maszynka jest wyłączona.
- Align the charged battery with the battery compartment at the base of the clipper handle.
- Wsuń baterię mocno na miejsce, aż usłyszysz kliknięcie, oznaczające, że bateria jest dobrze podłączona.

Image 3.3: The Kerbl FarmClipper Akku2 cordless clipper with a battery securely attached, ready for operation.
3.3 Montaż i regulacja ostrza
The clipper comes with pre-installed blades. If you need to change or adjust them:
- Ensure the clipper is switched off and the battery is removed.
- Use the provided blade removal tool to loosen the blade tension screw.
- Carefully remove the existing blades.
- Place the new blades onto the clipper head, ensuring they are correctly aligned.
- Tighten the blade tension screw until the blades are secure but can still move freely for adjustment.
- Adjust the blade overlap as per your clipping requirements. The top blade should slightly overlap the bottom blade.
- Once adjusted, tighten the tension screw firmly. Do not overtighten.
4. Instrukcja obsługi
4.1 Preparing the Animal
- Ensure the animal is clean and dry. Dirt and debris can dull blades quickly.
- Brush the animal thoroughly to remove loose hair and tangles.
- Acclimate the animal to the sound and vibration of the clipper before starting.
4.2 Clipping Procedure
- Switch on the clipper using the power switch.
- Hold the clipper firmly with a balanced grip, utilizing its ergonomic design.
- Apply the clipper to the animal's coat, moving against the direction of hair growth for an even cut.
- Use long, even strokes. Avoid pressing too hard, as this can cause discomfort to the animal and wear out the blades faster.
- Regularly check the blades for heat. If they become too hot, switch off the clipper, clean, and lubricate them, or allow them to cool.
- Periodically brush away clipped hair from the blades to maintain cutting efficiency.
- When finished, switch off the clipper and remove the battery.
5. Konserwacja
Proper maintenance ensures the longevity and optimal performance of your FarmClipper Akku2.
5.1 Czyszczenie maszynki do strzyżenia
- Always ensure the clipper is switched off and the battery is removed before cleaning.
- Use the provided cleaning brush to remove hair and debris from the blades and clipper head.
- For thorough cleaning, remove the blades (refer to Section 3.3) and clean all surfaces.
- Wipe the clipper body with a dry or slightly damp cloth. Do not use harsh chemicals or immerse the clipper in water.
5.2 Smarowanie ostrza
Lubricating the blades is crucial for smooth operation, reduced friction, and preventing overheating. Lubricate before, during (every 10-15 minutes of continuous use), and after each clipping session.
- Apply a few drops of the supplied clipper oil (or a suitable alternative) to the top and bottom blades while the clipper is running (briefly, for even distribution).
- Ensure oil reaches all moving parts of the blades.
- Wipe off any excess oil from the clipper body.

Image 5.1: A "Premium 31 by Aesculap" blade, highlighting the recommendation for lubrication every 10 minutes to maintain performance.

Image 5.2: A "Premium 23 by Aesculap" blade, another type of stainless steel blade compatible with the clipper.
5.3 Ostrzenie ostrzy
Over time, blades will become dull and require sharpening. This should be done by a professional blade sharpening service to ensure proper cutting angles and performance.
6. Rozwiązywanie Problemów
This section addresses common issues you might encounter with your clipper. If the problem persists, contact customer support.
| Problem | Możliwa przyczyna | Rozwiązanie |
|---|---|---|
| Clipper się nie włącza. | Akumulator nie jest naładowany lub nie jest prawidłowo włożony. | Sprawdź, czy akumulator jest całkowicie naładowany i bezpiecznie podłączony. |
| Słaba wydajność cięcia / wyrywanie włosów. | Dull blades, insufficient lubrication, or dirty blades. | Clean and lubricate blades. If still dull, consider professional sharpening or replacement. |
| Blades get hot quickly. | Lack of lubrication, excessive pressure, or prolonged use. | Apply more oil. Reduce pressure. Take breaks to allow blades to cool. |
| Nadmierne wibracje lub hałas. | Loose blades or internal component issue. | Check blade tension. If problem persists, contact support. |
7. Specyfikacje
| Funkcja | Szczegół |
|---|---|
| Nazwa modelu | FarmClipper Akku2 |
| Numer modelu | 181881 |
| Marka | CLIPSTER (Manufactured by Albert Kerbl GmbH) |
| Źródło zasilania | Zasilany bateryjnie |
| Typ baterii | 10.8V Lithium-ion (2 included) |
| Czas pracy na jednym ładowaniu | Około 1.5 godzin |
| Czas ładowania | Około 1.5 godzin |
| Materiał ostrza | Stal nierdzewna |
| Wymiary produktu (dł. x szer. x wys.) | Wymiary 41 x 34 x 9 cm |
| Waga przedmiotu | 1.2 kilograma |
| Materiał główny | Plastikowy |
| Cechy specjalne | Ergonomic casing, balanced center of gravity |
| Zalecane zastosowanie | Horse and cattle grooming |
8. Gwarancja i wsparcie
For warranty information, please refer to the documentation provided at the time of purchase or contact your retailer. The manufacturer of this product is Albert Kerbl GmbH.
For technical support or inquiries, please contact the manufacturer or your local distributor. Contact details can typically be found on the product packaging or the manufacturer's official webstrona.
Ask a question about this manual
Ask about setup, troubleshooting, compatibility, parts, safety, or missing instructions. Manuals+ will review the question and use this page’s manual context to help answer it.