1. Wprowadzenie
This manual provides essential instructions for the safe and effective use of your DT321B Digital Multimeter. This portable device is designed for measuring AC/DC voltage, DC current, resistance, and includes features for diode testing, continuity, battery testing, and transistor (hFE) measurements. Please read this manual thoroughly before operation and retain it for future reference.
2. Informacje dotyczące bezpieczeństwa
Always observe basic safety precautions when using this multimeter to reduce the risk of fire, electric shock, or personal injury.
- Nie stosować objętościtaglub prąd przekraczający maksymalne wartości graniczne określone dla multimetru.
- Przed przystąpieniem do pomiarów należy upewnić się, że przewody pomiarowe są w dobrym stanie i prawidłowo podłączone.
- Nigdy nie używaj multimetru, jeśli wygląda na uszkodzony lub jeśli przewody pomiarowe są uszkodzone.
- Zachowaj ostrożność podczas pracy z wolumenemtagpowyżej 30 V AC RMS, 42 V szczytowo lub 60 V DC. Te wartościtagStwarzają ryzyko porażenia prądem.
- Przed pomiarem rezystancji lub ciągłości należy zawsze odłączyć zasilanie od testowanego obwodu.
- Do not operate the multimeter in explosive atmospheres.
- Aby zapewnić dokładne odczyty, należy wymienić baterie, gdy pojawi się wskaźnik niskiego poziomu naładowania baterii.
3. Koniec produktuview
The DT321B Digital Multimeter features a clear LCD display and a rotary switch for selecting various measurement functions. Input jacks are provided for connecting test leads.

Rycina 3.1: Przód view of the DT321B Digital Multimeter with key components labeled. The display shows numerical readings, the hold button freezes the current reading, and the rotary switch selects measurement functions. The '10A' jack is for high current measurements, 'COM' is the common ground, and 'VΩmA' is for voltagpomiary e, rezystancji i niskiego natężenia prądu.
The multimeter includes a blue backlight for improved visibility in low-light conditions and a data hold function to freeze the displayed reading.
4. Konfiguracja
4.1 Instalacja baterii
The DT321B Digital Multimeter requires two 1.5V batteries (Type 7, typically AAA) for operation. To install or replace batteries:
- Upewnij się, że multimetr jest wyłączony.
- Znajdź pokrywę komory baterii z tyłu urządzenia.
- Odkręć śrubę(y) mocującą(e) i zdejmij pokrywę.
- Insert the two 1.5V batteries, observing the correct polarity (+ and -) as indicated inside the compartment.
- Załóż pokrywę komory baterii i zabezpiecz ją śrubą(ami).
5. Instrukcja obsługi
Before making any measurements, ensure the test leads are securely plugged into the correct input jacks.

Figure 5.1: The DT321B Multimeter with test probes connected. The black probe is connected to the 'COM' (common) jack, and the red probe is connected to the 'VΩmA' jack for most voltagpomiary e, rezystancji i niskiego natężenia prądu.
5.1 Pomiar objętości prądu stałegotage (V–)
- Podłącz czerwony przewód pomiarowy do gniazda „VΩmA”, a czarny przewód pomiarowy do gniazda „COM”.
- Ustaw przełącznik obrotowy na żądaną wartość DC Vol.tage (V–) range (e.g., 200m, 2, 20, 200, 1000V). If the voltagJeśli wartość e jest nieznana, zacznij od najwyższego zakresu i posuwaj się w dół.
- Podłącz sondy pomiarowe do mierzonego elementu lub obwodu.
- Przeczytaj tomtage wartość na wyświetlaczu LCD.
5.2 Pomiar objętości prądu przemiennegotage (V∼)
- Podłącz czerwony przewód pomiarowy do gniazda „VΩmA”, a czarny przewód pomiarowy do gniazda „COM”.
- Ustaw przełącznik obrotowy na żądaną głośność prądu zmiennego.tage (V∼) range (e.g., 200, 750V).
- Podłącz sondy pomiarowe do mierzonego elementu lub obwodu.
- Przeczytaj tomtage wartość na wyświetlaczu LCD.
5.3 Measuring DC Current (A–)
OSTROŻNOŚĆ: To avoid damage to the multimeter or the circuit, never connect the test leads in parallel across a voltage source when measuring current. Always connect in series.
- For currents up to 200mA, insert the red test lead into the 'VΩmA' jack. For currents up to 10A, insert the red test lead into the '10A MAX' jack. The black test lead always goes into the 'COM' jack.
- Set the rotary switch to the desired DC Current (A–) range (e.g., 200u, 2m, 20m, 200m, 10A).
- Otwórz obwód, w którym będziesz mierzyć prąd i podłącz multimetr szeregowo do obwodu.
- Odczytaj aktualną wartość na wyświetlaczu LCD.
5.4 Pomiar rezystancji (Ω)
OSTROŻNOŚĆ: Ensure the circuit under test is completely de-energized before measuring resistance.
- Podłącz czerwony przewód pomiarowy do gniazda „VΩmA”, a czarny przewód pomiarowy do gniazda „COM”.
- Set the rotary switch to the desired Resistance (Ω) range (e.g., 200, 2k, 20k, 200k, 2M).
- Podłącz sondy pomiarowe do mierzonego elementu.
- Odczytaj wartość rezystancji na wyświetlaczu LCD.
5.5 Test diody
- Podłącz czerwony przewód pomiarowy do gniazda „VΩmA”, a czarny przewód pomiarowy do gniazda „COM”.
- Set the rotary switch to the diode symbol (→|).
- Podłącz czerwoną sondę do anody, a czarną do katody diody. Na wyświetlaczu pojawi się napięcie przewodzenia.tagkropla.
- Reverse the probes. The display should show 'OL' (open loop) for a good diode.
5.6 Test ciągłości
- Podłącz czerwony przewód pomiarowy do gniazda „VΩmA”, a czarny przewód pomiarowy do gniazda „COM”.
- Set the rotary switch to the continuity symbol (♫).
- Connect the test probes across the circuit or component. If continuity exists (resistance below a certain threshold), the buzzer will sound.
5.7 Battery Testing (1.5V / 9V)
- Podłącz czerwony przewód pomiarowy do gniazda „VΩmA”, a czarny przewód pomiarowy do gniazda „COM”.
- Set the rotary switch to the '1.5V BATT' or '9V BATT' position.
- Podłącz czerwoną sondę do dodatniego bieguna akumulatora, a czarną sondę do ujemnego bieguna akumulatora.
- Odczytaj objętość bateriitage na wyświetlaczu.
5.8 Test tranzystora (hFE)
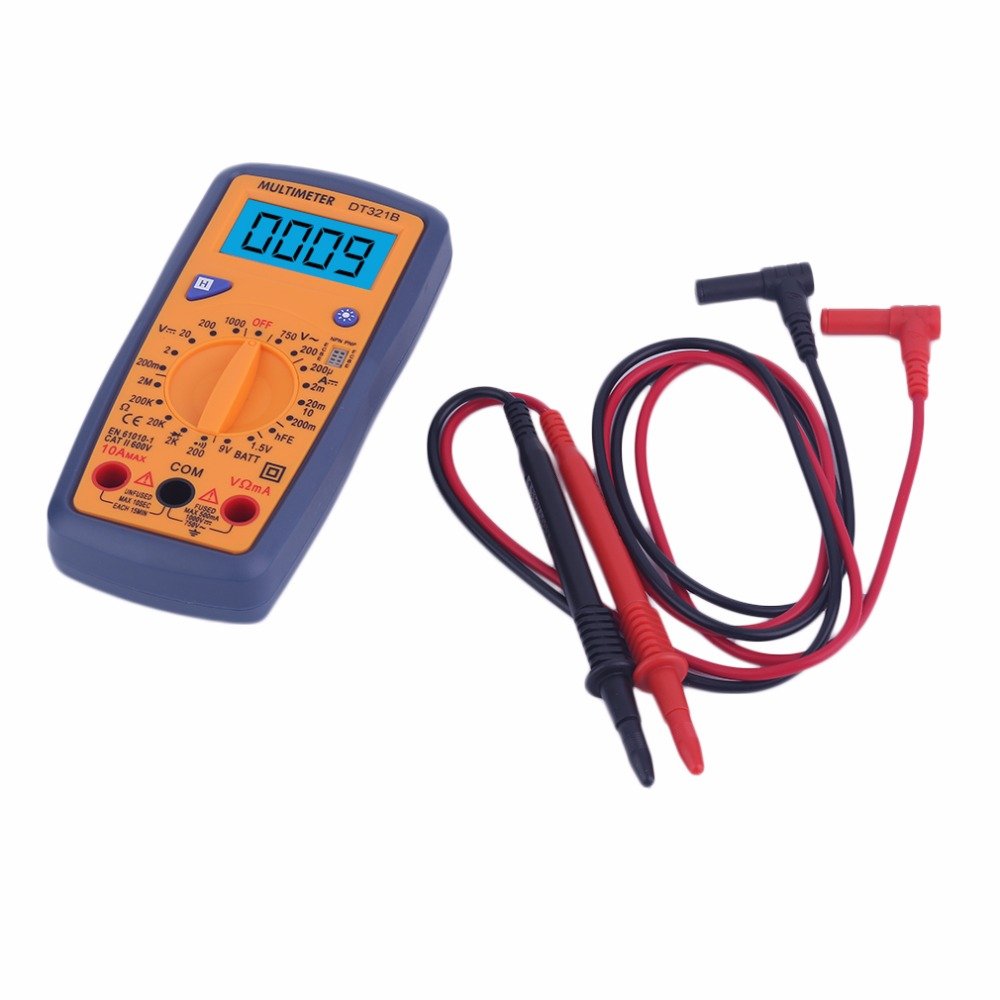
Figure 5.2: The DT321B Multimeter in use, with an inset showing a transistor being tested. The multimeter can measure the hFE (current gain) of NPN and PNP transistors.
- Ustaw przełącznik obrotowy w pozycji „hFE”.
- Określ typ tranzystora NPN lub PNP.
- Insert the transistor leads (Emitter, Base, Collector) into the corresponding sockets in the 'hFE' test socket on the multimeter.
- Odczytaj wartość hFE na wyświetlaczu LCD.
5.9 Funkcja zatrzymania danych
Press the 'Hold' button to freeze the current reading on the display. Press it again to release the hold function and resume live readings.
5.10 Funkcja podświetlenia
The multimeter features a blue backlight. Press the backlight button (often integrated with the 'Hold' button or a separate button with a light symbol) to turn the backlight on or off for improved visibility.
6. Konserwacja
6.1 Czyszczenie
Wyczyść obudowę za pomocą reklamyamp Ściereczką i łagodnym detergentem. Nie używaj środków ściernych ani rozpuszczalników. Przed użyciem upewnij się, że multimetr jest całkowicie suchy.
6.2 Wymiana baterii
When the low battery symbol appears on the display, replace the batteries as described in Section 4.1. Remove batteries if the multimeter is not used for extended periods to prevent leakage.
7. Rozwiązywanie Problemów
- Brak obrazu lub słaby obraz: Sprawdź instalację i ładowanie baterii. W razie potrzeby wymień baterie.
- Nieprawidłowe odczyty: Ensure the rotary switch is set to the correct function and range. Check test lead connections. Verify the circuit under test is properly prepared (e.g., de-energized for resistance).
- Wyświetlono komunikat „OL” (Przeciążenie): Zmierzona wartość przekracza wybrany zakres. Zmień zakres na wyższy lub sprawdź, czy nie ma przerwy w obwodzie.
- No continuity buzzer: Ensure the multimeter is in continuity mode and the circuit is closed.
8. Specyfikacje
| Pomiar | Zakres | Dokładność |
|---|---|---|
| Objętość DCtage | 200mV, 2V, 20V, 200V, 1000V | ±0.5% |
| AC Objętośćtage | 200V, 750V | ±1.0% |
| Prąd stały | 200uA, 2mA, 20mA, 200mA, 10A | ±1.8% |
| Opór | 200Ω, 2kΩ, 20kΩ, 200kΩ, 2MΩ | ±1.0% |
Dane ogólne:
- Rozmiar ekranu LCD: 45x23mm
- Rozmiar produktu: 160x76x32mm
- Zasilanie: 2 x 1.5V batteries (Type 7 / AAA)
- Niska objętośćtagWyświetlacz symboli: Tak
- Zabezpieczenie przed przeciążeniem: Tak
- Diode Detection: Tak
- On-off Detection & Buzzer: Tak
- Wykrywanie pojemności baterii: 1.5V / 9V
- Transistor Detection (hFE): Tak
- Przechowywanie danych: Tak
- Wyświetlacz z podświetleniem: Tak
9. Gwarancja i wsparcie
Specific warranty and support information for the DT321B Digital Multimeter is not available in the provided product details. Please refer to the retailer or manufacturer's website for any applicable warranty terms or customer support contacts.