1. Koniec produktuview
The ANENG Q1 is a 9999 counts True RMS digital multimeter designed for accurate measurement of various electrical parameters. It features an EBTN black screen with a large, backlit LCD for clear readability in diverse lighting conditions. This device supports both automatic and manual ranging, offering flexibility for different measurement needs. It includes an analog bar graph display for quick visual indication of readings.
Główne cechy:
- Pomiar prawdziwej wartości skutecznej: Zapewnia dokładne odczyty przebiegów niesinusoidalnych.
- NCV (objętość bez kontaktutage) Wykrywanie: For safe identification of live wires without direct contact.
- Zakres automatyczny/ręczny: User-selectable measurement range for convenience and precision.
- Analog Bar Graph: Visual representation of measurement trends.
- Duży podświetlany wyświetlacz LCD: Lepsza widoczność w warunkach słabego oświetlenia.
- Zabezpieczenie przed przeciążeniem: Zapewnia bezpieczeństwo we wszystkich zakresach pomiarowych.
- Wskaźnik niskiego poziomu naładowania baterii: Ostrzega, gdy konieczna jest wymiana baterii.
- Funkcja zatrzymania danych: Zamraża wyświetlany odczyt, umożliwiając łatwe zapisanie.
- Automatyczne wyłączanie: Oszczędza baterię.
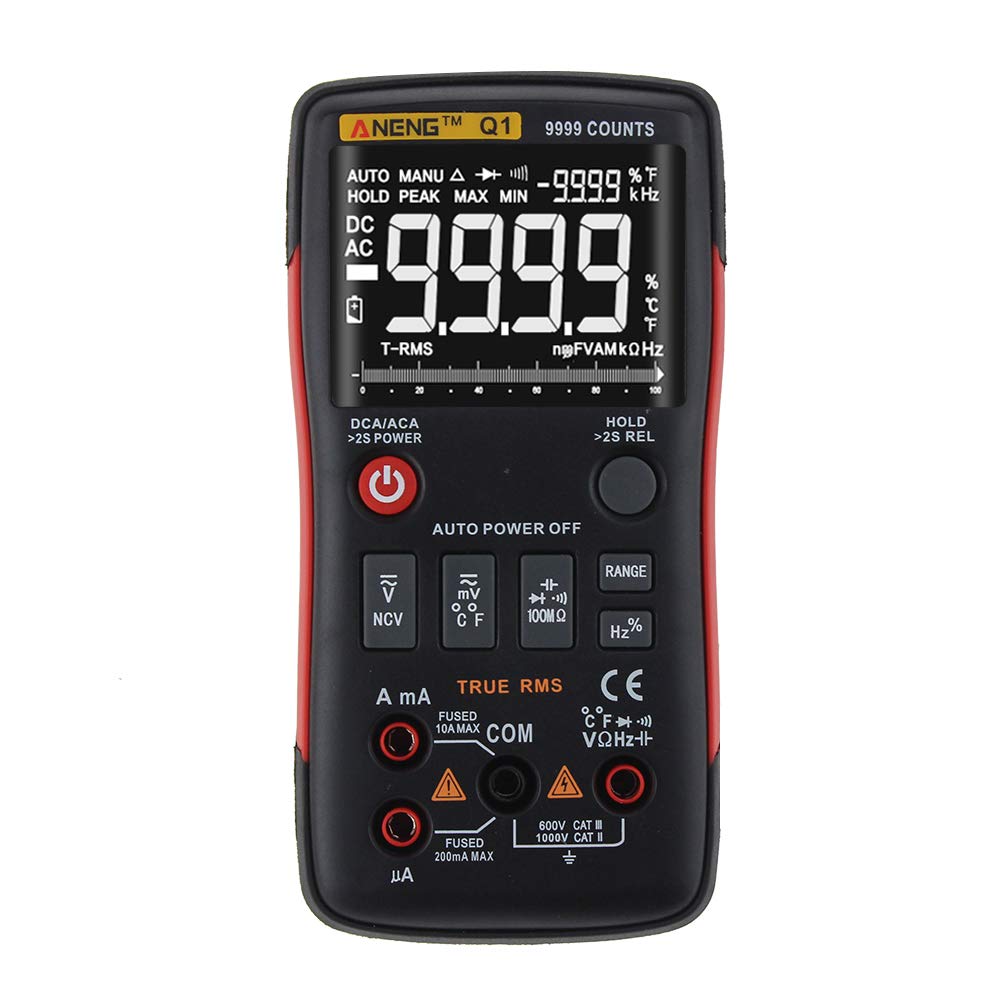
Figure 1: ANENG Q1 Digital Multimeter with its display and function buttons.
2. Informacje dotyczące bezpieczeństwa
Always observe basic safety precautions when using this multimeter to prevent personal injury or damage to the device. Read and understand all safety information before operation.
- Nie należy przekraczać maksymalnych wartości wejściowych dla żadnej funkcji.
- Zachowaj ostrożność podczas pracy z objętościątagpowyżej 30 V AC RMS, 42 V szczytowo lub 60 V DC. Te wartościtagStwarzają ryzyko porażenia prądem.
- Before measuring current, ensure the circuit is de-energized and the multimeter is connected in series.
- Przed zmianą funkcji należy zawsze odłączyć przewody pomiarowe od obwodu.
- Przed użyciem sprawdź przewody pomiarowe pod kątem uszkodzonej izolacji lub odsłoniętego metalu. W przypadku uszkodzenia wymień je.
- Nie używaj multimetru, jeśli pokrywa baterii nie jest prawidłowo zamknięta.
- Aby zapewnić dokładne odczyty, należy natychmiast wymienić baterie, gdy tylko pojawi się wskaźnik niskiego poziomu naładowania baterii.
- Przestrzegaj lokalnych i krajowych przepisów bezpieczeństwa.
3. Konfiguracja
3.1 Instalacja baterii
- Upewnij się, że multimetr jest wyłączony.
- Znajdź komorę baterii z tyłu urządzenia.
- Odkręć pokrywę komory baterii i zdejmij ją.
- Włóż dwie baterie AA 1.5 V, zwracając uwagę na prawidłową biegunowość (+/-).
- Załóż pokrywę baterii i zabezpiecz ją śrubą.
3.2 Podłączanie przewodów pomiarowych
The multimeter comes with a set of test leads. Always connect the black lead to the 'COM' (Common) jack. Connect the red lead to the appropriate input jack based on the measurement function:
- VΩHz+ jack dla tomutage, pomiary rezystancji, częstotliwości, pojemności, diody i ciągłości.
- mA jack for current measurements up to 999.9mA.
- 10A jack for current measurements up to 10A.

Figure 2: Included test leads and probes.

Figure 3: Complete ANENG Q1 Multimeter kit with accessories.
4. Instrukcja obsługi
The ANENG Q1 multimeter offers both automatic and manual ranging. Press the 'RANGE' button to switch between auto and manual modes. In manual mode, press 'RANGE' repeatedly to cycle through available ranges.
4.1 Włączanie/wyłączanie zasilania
Press the red power button to turn the multimeter on or off. The device features an auto power-off function to conserve battery life after a period of inactivity.
4.2 Pomiar objętości AC/DCtagmi (V)
- Connect the black test lead to the 'COM' jack and the red test lead to the 'VΩHz+' jack.
- Wybierz głośnośćtage measurement function (AC V or DC V) using the function button.
- Podłącz sondy pomiarowe równolegle do obwodu lub elementu, który chcesz zmierzyć.
- Przeczytaj tomtage wartość na wyświetlaczu.
4.3 Measuring AC/DC Current (A/mA/µA)
- Ważny: Ensure the circuit is de-energized before connecting the multimeter for current measurement.
- Connect the black test lead to the 'COM' jack. Connect the red test lead to the 'mA' jack for currents up to 999.9mA, or to the '10A' jack for currents up to 10A.
- Select the current measurement function (AC A or DC A).
- Otwórz obwód i podłącz multimetr szeregowo do obciążenia.
- Ponownie podłącz obwód do prądu i odczytaj wartość prądu na wyświetlaczu.
4.4 Pomiar rezystancji (Ω)
- Connect the black test lead to 'COM' and the red test lead to 'VΩHz+'.
- Select the resistance measurement function.
- Przed pomiarem rezystancji należy upewnić się, że obwód lub element jest odłączony od napięcia.
- Podłącz sondy pomiarowe do komponentu.
- Odczytaj wartość rezystancji z wyświetlacza.
4.5 Pomiar pojemności (F)
- Connect the black test lead to 'COM' and the red test lead to 'VΩHz+'.
- Select the capacitance measurement function.
- Aby zapobiec uszkodzeniu multimetru, przed dokonaniem pomiaru należy upewnić się, że kondensator jest całkowicie rozładowany.
- Podłącz sondy pomiarowe do zacisków kondensatora.
- Odczytaj wartość pojemności na wyświetlaczu.
4.6 Pomiar częstotliwości (Hz) i współczynnika wypełnienia (%)
- Connect the black test lead to 'COM' and the red test lead to 'VΩHz+'.
- Select the frequency/duty cycle measurement function.
- Podłącz sondy pomiarowe do źródła sygnału.
- Odczytaj wartość częstotliwości lub współczynnika wypełnienia na wyświetlaczu.
4.7 Pomiar temperatury (°C/°F)
- Connect the temperature probe to the appropriate input jacks (usually 'COM' and 'VΩHz+' or dedicated temperature jacks if available).
- Select the temperature measurement function.
- Umieść końcówkę sondy temperatury na obiekcie, którego temperaturę chcesz zmierzyć, lub w jego pobliżu.
- Odczytaj wartość temperatury na wyświetlaczu.
4.8 Test diody
- Connect the black test lead to 'COM' and the red test lead to 'VΩHz+'.
- Select the diode test function.
- Podłącz czerwoną sondę do anody, a czarną sondę do katody diody.
- Na wyświetlaczu pojawi się wartość głośności do przodutagspadek. Zamień miejscami sondy; przerwa w obwodzie (OL) wskazuje na dobrą diodę.
4.9 Test ciągłości
- Connect the black test lead to 'COM' and the red test lead to 'VΩHz+'.
- Wybierz funkcję testu ciągłości.
- Podłącz sondy pomiarowe do obwodu lub elementu.
- Ciągły sygnał dźwiękowy oznacza, że ścieżka ma niską rezystancję (ciągłość).
4.10 NCV (objętość bezkontaktowa)tage) Wykrywanie
- Wybierz funkcję NCV.
- Bring the top of the multimeter close to the conductor or outlet.
- Urządzenie wskaże obecność prądu przemiennegotagpoprzez alarm dźwiękowy i/lub wskaźnik wizualny.
5. Konserwacja
5.1 Czyszczenie
Wyczyść obudowę za pomocą reklamyamp Ściereczką i łagodnym detergentem. Nie używaj środków ściernych ani rozpuszczalników. Przed użyciem upewnij się, że urządzenie jest całkowicie suche.
5.2 Przechowywanie
When not in use for extended periods, remove the batteries to prevent leakage. Store the multimeter in a cool, dry place, away from direct sunlight and extreme temperatures. The recommended storage conditions are -20°C to 60°C (-4°F to 140°F) with humidity less than 80% RH.
6. Rozwiązywanie Problemów
- Brak wyświetlacza: Sprawdź instalację baterii i upewnij się, że nie są rozładowane. W razie potrzeby wymień je.
- Nieprawidłowe odczyty: Verify that the correct function and range are selected. Ensure test leads are properly connected and not damaged. Check battery level.
- Wyświetlacz „OL” (Przeciążenie): The measured value exceeds the selected range or the maximum input limit. Switch to a higher range or ensure the input is within the device's specifications.
- Brak sygnału dźwiękowego ciągłości: Check if the circuit is truly continuous and has very low resistance. Ensure test leads are making good contact.
7. Specyfikacje
7.1 Specyfikacje elektryczne

Figure 4: Electrical Specifications - DC and AC Voltage.

Figure 5: Electrical Specifications - DC and AC Current, and Resistance.

Figure 6: Electrical Specifications - Capacitance, Frequency, and Duty Cycle.

Figure 7: Electrical Specifications - Temperature, Diode, Continuity, and NCV.
7.2 General, Mechanical, and Environmental Specifications

Figure 8: General, Mechanical, and Environmental Specifications.
| Parametr | Wartość |
|---|---|
| Wyświetlacz | 9999 Counts LCD |
| Nośny | Automatyczny/ręczny |
| Tworzywo | ABS+TPE |
| Aktualizuj częstotliwość | 3 razy/sekundę |
| Prawdziwy RMS | Tak |
| Wstrzymanie danych | Tak |
| Podświetlenie | Tak |
| Wskaźnik niskiego poziomu naładowania baterii | Tak |
| Automatyczne wyłączanie zasilania | Tak |
| Parametr | Wartość |
|---|---|
| Wymiar | Wymiary: 146*74*34mm |
| Waga | 125g |
| Typ baterii | 2 bateria AA 1.5 V (brak w zestawie) |
| Parametr | Wartość |
|---|---|
| Temperatura pracy | 0~40°C |
| Wilgotność robocza | <75% wilgotności względnej |
| Temperatura przechowywania | -20~60°C |
| Wilgotność przechowywania | <80% wilgotności względnej |
8. Gwarancja i wsparcie
8.1 Gwarancja
This ANENG Q1 Digital Multimeter comes with a roczna gwarancja from the date of purchase, covering manufacturing defects. This warranty does not cover damage caused by misuse, accident, unauthorized modification, or normal wear and tear. Please retain your proof of purchase for warranty claims.
8.2 Obsługa klienta
For technical assistance, troubleshooting, or warranty inquiries, please contact the retailer or manufacturer's customer service. Refer to your purchase documentation for specific contact details.