
1. Koniec produktuview
The MEAN WELL HDR-150-24 is a 150W Ultra Slim Step Shape DIN Rail Power Supply designed for industrial control applications. It provides a stable +24V DC output at 6.25 Amps, converting AC input power efficiently. Its compact design allows for easy integration into control cabinets and systems.

Rycina 1: Przód view of the HDR-150-24 DIN Rail Power Supply.
2. Specyfikacje
| Funkcja | Opis |
|---|---|
| Numer modelu | HDR-150-24 |
| Wejście Voltage | 100-240 V AC (50/60 Hz) |
| Objętość wyjściatage | 24 V prądu stałego |
| Prąd wyjściowy | 6.25 Amps |
| Moc wyjściowa | 150 W |
| Wymiary | 4 x 5 x 4 cale (w przybliżeniu) |
| Waga | 0.31 kilograma |
| Montowanie | Szyna DIN |
| Chłodzenie | Passive (vented enclosure) |
| Wskaźniki | Dioda DC OK |
| Możliwość regulacji | Objętość wyjściowatage adjustable via potentiometer |
3. Informacje dotyczące bezpieczeństwa
Please read and understand all safety instructions before installing or operating the power supply. Failure to follow these instructions may result in electric shock, fire, or serious injury.
- Wykwalifikowany personel: Instalację i konserwację powinien wykonywać wyłącznie wykwalifikowany personel.
- Środowisko kontrolowane: This device is intended for use in a controlled environment.
- Odłączenie zasilania: Zawsze odłączaj zasilanie przed przystąpieniem do prac instalacyjnych, okablowania lub konserwacji.
- Prawidłowe uziemienie: Aby zapobiec porażeniu prądem elektrycznym, należy upewnić się, że źródło zasilania jest prawidłowo uziemione.
- Wentylacja: Maintain adequate clearance around the unit for proper passive cooling. Do not block ventilation holes.
- Moment obrotowy na końcu: Ensure all terminal screws are tightened to the specified torque (typically 3.0 Lb-In for input/output terminals) to prevent loose connections and overheating.
4. Konfiguracja
4.1 Montaż
The HDR-150-24 is designed for mounting on a standard DIN rail. Locate the DIN rail clip on the back of the unit. To mount, hook the top edge of the power supply onto the DIN rail, then push the bottom edge firmly until it clicks into place. To remove, pull down the release lever at the bottom of the clip and lift the unit off the rail.
4.2 Okablowanie
Refer to the wiring diagram below for proper connection of input and output terminals. Ensure all wires are stripped to the appropriate length and securely inserted into the screw terminals before tightening.
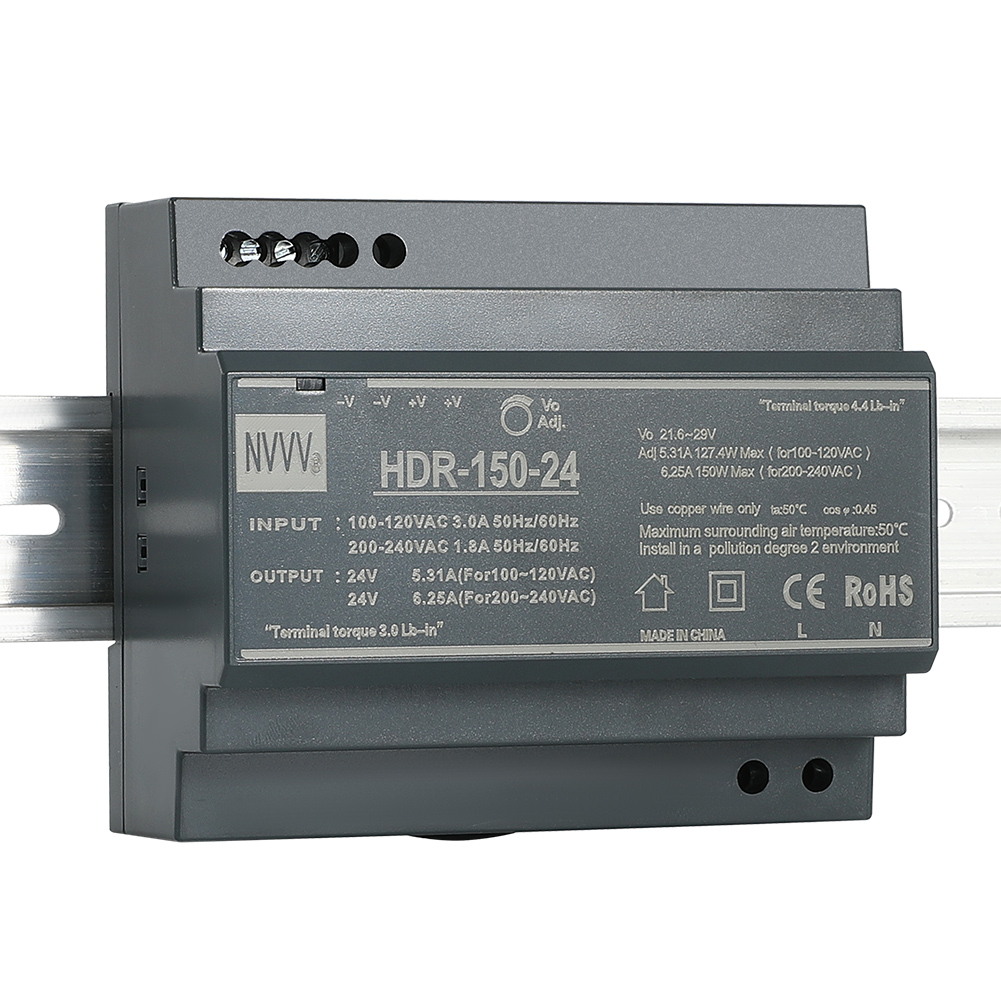
Figure 2: Wiring Diagram for HDR-150-24. Input terminals (L, N, PE) are at the bottom, and output terminals (+V, -V) are at the top. An adjustable potentiometer is also visible.
- Połączenia wejściowe: Connect the AC Line (L), Neutral (N), and Protective Earth (PE) wires to the corresponding input terminals.
- Połączenia wyjściowe: Connect the positive (+V) and negative (-V) DC load wires to the corresponding output terminals. The unit provides multiple output terminals for convenience.
4.3 wyjście Voltage Regulacja
Objętość wyjściowatage can be finely adjusted using the potentiometer located on the front panel. Use a small screwdriver to turn the potentiometer clockwise to increase the voltage or counter-clockwise to decrease it. Always verify the output voltage with a multimeter after adjustment.
Video 1: This video demonstrates the physical features, unboxing, and basic wiring of the HDR-150-24 DIN Rail Power Supply, including the terminal connections and voltage regulacja.
5. Instrukcja obsługi
Once properly installed and wired, the power supply is ready for operation.
- Włączanie: Apply AC input power to the L and N terminals.
- DC OK Indicator: Observe the 'DC OK' LED on the front panel. A green light indicates that the output voltage mieści się w normalnym zakresie roboczym.
- Wyłączone: Disconnect the AC input power to shut down the unit.
6. Konserwacja
To ensure optimal performance and longevity of your HDR-150-24 power supply, follow these maintenance guidelines:
- Regularna kontrola: Okresowo należy sprawdzać, czy urządzenie nie wykazuje oznak uszkodzeń, luźnych połączeń lub nadmiernego nagromadzenia kurzu.
- Czyszczenie: If dust accumulates, gently clean the ventilation holes and the unit's surface with a soft, dry cloth or compressed air. Ensure power is disconnected before cleaning.
- Warunki środowiskowe: Aby zapobiec przedwczesnej awarii, należy upewnić się, że środowisko pracy mieści się w określonym zakresie temperatur i wilgotności.
7. Rozwiązywanie Problemów
If you encounter issues with your power supply, refer to the following troubleshooting steps:
- No Power / No DC OK LED:
- Check the AC input power source and connections.
- Sprawdź, czy objętość wejściowatage mieści się w określonym zakresie (100-240VAC).
- Inspect for any tripped circuit breakers or blown fuses in the input line.
- Brak objętości wyjściowejtage / DC OK LED Off:
- Check the output connections for shorts or open circuits.
- Ensure the load connected does not exceed the power supply's maximum output current (6.25A) or power (150W). Overload protection may have activated.
- If the unit has been overloaded, disconnect the load, power cycle the unit, and re-test with a reduced load.
- Nieprawidłowa objętość wyjściowatage:
- Za pomocą multimetru zmierz głośność wyjściowątage.
- Dostosuj głośność wyjściowątage potentiometer as described in Section 4.3.
8. Gwarancja i wsparcie
The MEAN WELL HDR-150-24 power supply comes with a standard manufacturer's warranty. For warranty claims, technical support, or service inquiries, please contact your authorized MEAN WELL distributor or visit the official MEAN WELL webwitryna do informacji kontaktowych.
9. Dodatkowe zasoby
Video 2: This video provides a comprehensive full view of the product, highlighting its design and features.