
1. Wprowadzenie
This manual provides detailed instructions for the installation, operation, and maintenance of your ANNKE 3K/5MP Lite 5-in-1 8-Channel DVR with 2TB HDD. Please read this manual thoroughly before using the product to ensure proper setup and functionality. This DVR is designed for comprehensive security surveillance, offering advanced features such as intelligent detection and remote access.

Image: ANNKE 5-in-1 Hybrid DVR device, highlighting its AI capabilities.
2. Co znajduje się w pudełku
Sprawdź, czy wszystkie wymienione poniżej elementy znajdują się w Twojej paczce. Jeśli brakuje któregokolwiek z nich lub jest on uszkodzony, skontaktuj się z obsługą klienta ANNKE.
- 1x ANNKE 3K Lite DVR with 2TB Hard Drive
- Zasilacz 1x12 V
- 1x mysz USB
- 1x kabel HDMI
- 1x kabel sieciowy
- 1x Naklejka ścienna
- 1x Instrukcja obsługi
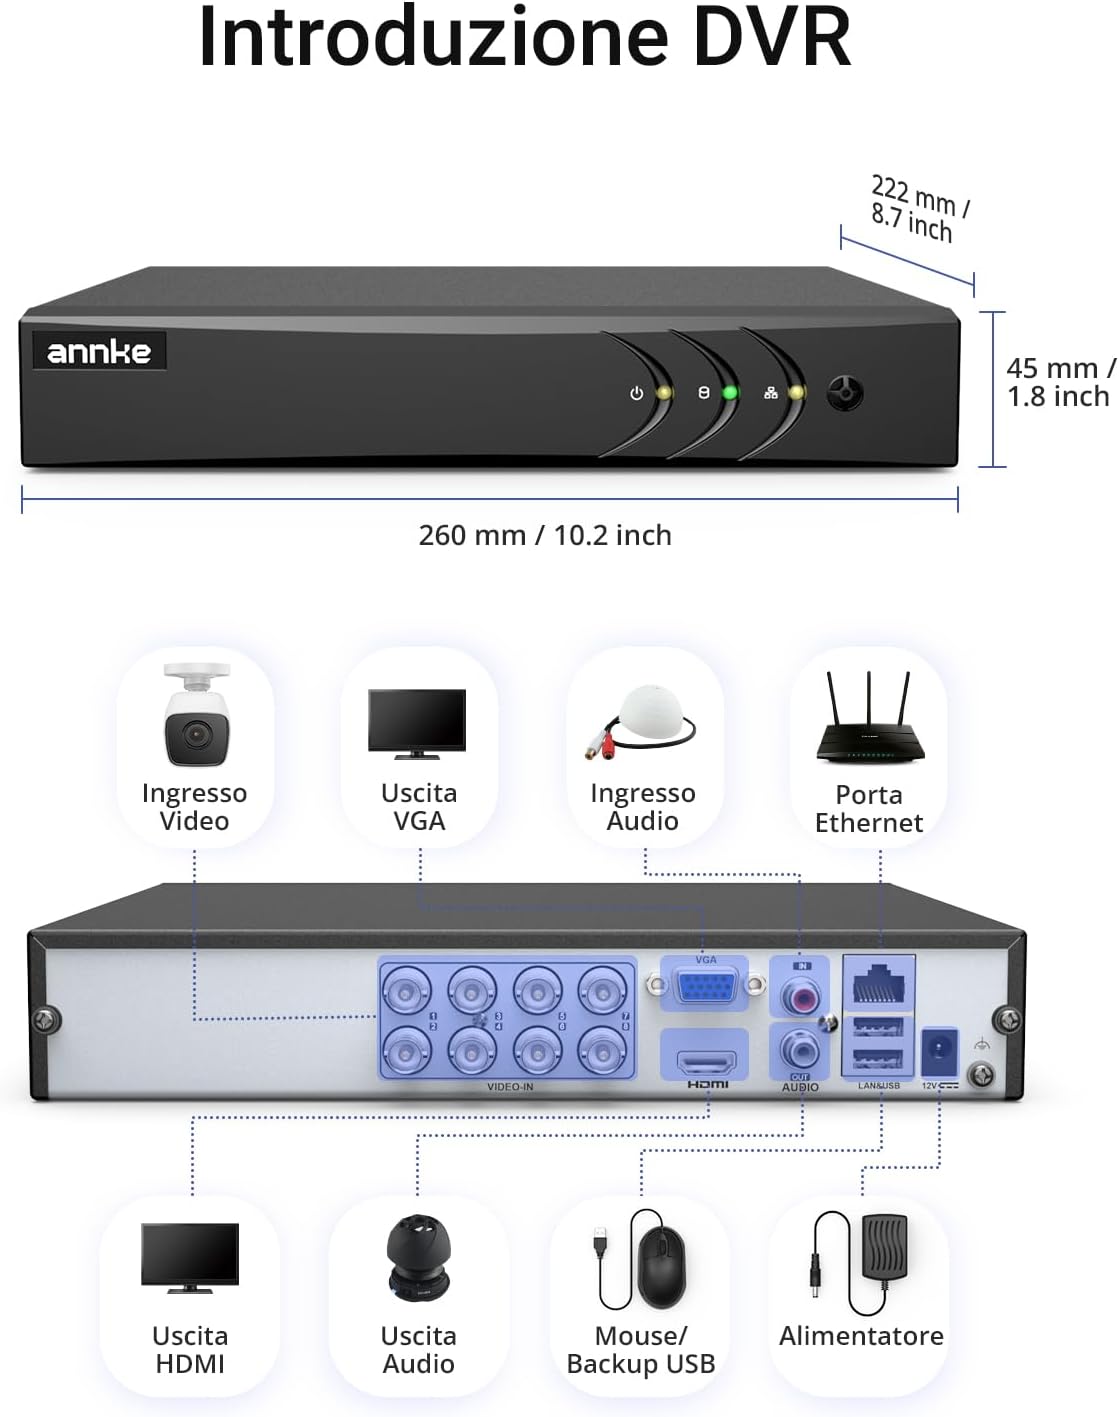
Image: All components included in the ANNKE DVR package.
3. Koniec produktuview
The ANNKE 3K/5MP Lite 5-in-1 DVR is a versatile digital video recorder supporting multiple camera technologies. It features an 8-channel input for analog cameras and can integrate additional IP cameras, making it suitable for various surveillance needs.
3.1 Funkcje rejestratora DVR
- Zgodność 5 w 1: Supports 5MP TVI, 4MP AHD, CVI, CVBS analog cameras, and 6MP IP cameras.
- Wejście 8-kanałowe: Connect up to 8 analog cameras.
- Expandable IP Channels: Supports 2 additional 6MP IP cameras, or up to 12 IP cameras when switched to IP signal mode (ANNKE IP cameras only).
- 2TB Security-Grade HDD: Pre-installed for continuous, reliable recording.
- H.265+ Video Encoding: Efficiently saves storage space by up to 80% compared to H.264.
- Inteligentne wykrywanie: Advanced person and vehicle detection to minimize false alarms.
- Dostęp zdalny: Monitor your property from anywhere using smartphones, tablets, or computers.

Image: The ANNKE 5-in-1 DVR demonstrating compatibility with multiple camera types.
3.2 Porty i połączenia DVR
Familiarize yourself with the ports on the rear panel of the DVR for proper connection of cameras, display, network, and power.

Obraz: Szczegółowy view of the DVR's rear panel with labeled ports.
- Wejście wideo (BNC): Connect analog cameras.
- Wyjście VGA: Connect to a monitor or display.
- Wyjście HDMI: Connect to an HD monitor or TV.
- Wejście/wyjście audio (RCA): Do nagrywania i odtwarzania dźwięku.
- Port Ethernet (RJ45): Connect to your network for remote access.
- Porty USB: For mouse, USB backup, or external storage.
- Wejście zasilania 12 V: Podłącz dołączony zasilacz.
4. Konfiguracja
Follow these steps to set up your ANNKE DVR system.
4.1 Początkowe połączenie sprzętowe
- Podłącz kamery: Connect your analog cameras to the BNC video input ports on the DVR. If using IP cameras, ensure they are connected to your network.
- Podłącz wyświetlacz: Podłącz monitor lub telewizor do rejestratora DVR za pomocą portu VGA lub HDMI.
- Podłącz mysz: Podłącz mysz USB do jednego z portów USB w rejestratorze DVR.
- Połącz się z siecią (opcjonalne, ale zalecane): Podłącz rejestrator DVR do routera za pomocą kabla Ethernet, aby uzyskać zdalny dostęp i możliwość aktualizacji oprogramowania sprzętowego.
- Podłącz zasilanie: Podłącz zasilacz 12 V do wejścia zasilania rejestratora DVR, a następnie do gniazdka elektrycznego. Rejestrator DVR włączy się automatycznie.
4.2 Kreator pierwszej konfiguracji
Upon first boot, the DVR will guide you through a setup wizard. Follow the on-screen prompts to configure basic settings:
- Wybór języka: Wybierz preferowany język.
- Tworzenie hasła: Utwórz silne hasło do konta administratora. Jest to kluczowe dla bezpieczeństwa.
- Ustawienia sieciowe: Skonfiguruj ustawienia sieciowe (DHCP jest zazwyczaj wystarczający dla większości sieci domowych).
- Czas i data: Ustaw prawidłową strefę czasową, datę i godzinę.
- Inicjalizacja dysku twardego: The pre-installed 2TB HDD may need to be initialized. Follow the instructions to format it.
5. Instrukcja obsługi
5.1 Tryby nagrywania
The DVR offers flexible recording options to suit your surveillance needs:
- Nagrywanie ciągłe 24/7: Records continuously, overwriting the oldest footage gdy dysk twardy jest pełny.
- Nagrywanie wyzwalane ruchem: Rejestruje tylko po wykryciu ruchu, oszczędzając miejsce na dysku.
- Zaplanowane nagrywanie: Ustaw konkretne godziny nagrywania.
- Event-Based Recording: Records when specific events (e.g., alarm input, intelligent detection) are triggered.

Image: Visual representation of 24/7 continuous recording.
5.2 Intelligent Person and Vehicle Detection
This feature significantly reduces false alarms by distinguishing between human and vehicle movement and other environmental factors.
- Konfiguracja: Access the DVR's menu, navigate to 'Event' or 'Smart Detection' settings.
- Area Setup: Zdefiniuj określone strefy wykrywania w obrębie kamery view.
- Alerty: Configure alerts such as app push notifications, email alerts, or buzzer sounds when a person or vehicle is detected.

Image: How AI person and vehicle detection works, showing detection zones and alert methods.
5.3 Dostęp zdalny
Monitor your surveillance system remotely using the ANNKE Vision app or web przeglądarka.
- Pobierz aplikację: Download the ANNKE Vision app from the App Store (iOS) or Google Play (Android).
- Utwórz konto: Register for an ANNKE Vision account.
- Dodaj urządzenie: Scan the QR code on your DVR or manually enter its serial number to add it to your account.
- Dostęp: View żyćtage, play back recordings, and receive alerts from your smartphone, tablet, or computer.

Image: Remote access to the DVR system via the ANNKE Vision mobile application.
5.4 Inteligentne odtwarzanie
Quickly find specific events in your recorded footage.
- Inteligentne wyszukiwanie: Use the smart search function to filter recordings by event type (e.g., motion, person, vehicle).
- Nawigacja na osi czasu: Easily navigate through the recording timeline to pinpoint specific moments.

Image: Smart playback interface on a computer, demonstrating search filters for human and vehicle events.
6. Konserwacja
Regularna konserwacja zapewnia długowieczność i optymalną wydajność systemu DVR.
6.1 Zarządzanie dyskiem twardym
- Sprawdź stan dysku twardego: Periodically check the health status of the 2TB HDD through the DVR's menu.
- Automatyczne nadpisywanie: Rejestrator DVR jest skonfigurowany tak, aby automatycznie nadpisywać najstarsze pliki footage when the HDD is full. Ensure this setting is enabled if continuous recording is desired.
- Kopia zapasowa ważnych danychtage: Regularly back up any critical recordings to an external USB drive or network storage.

Image: Icon symbolizing automatic data overwrite on the hard drive.
6.2 aktualizacji oprogramowania sprzętowego
Keep your DVR's firmware updated to benefit from the latest features and security enhancements. Check the ANNKE website or the DVR's system settings for available updates.
6.3 Czyszczenie
Gently clean the DVR unit and camera lenses with a soft, dry cloth. Avoid using harsh chemicals or abrasive materials.
7. Rozwiązywanie Problemów
This section addresses common issues you might encounter with your ANNKE DVR.
7.1 Brak wyjścia wideo
- Sprawdź kable: Ensure HDMI/VGA cables are securely connected to both the DVR and the display.
- Cykl zasilania: Restart the DVR and the display device.
- Rezolucja: Verify that the display resolution is supported by your monitor. You might need to try a different display or reset the DVR's display settings.
7.2 No Camera Image
- Moc aparatu: Ensure cameras are powered on and receiving adequate power.
- Połączenia kablowe: Check BNC cable connections between cameras and DVR.
- Zgodność: Confirm that your cameras are compatible with the DVR's supported video input types (TVI, AHD, CVI, CVBS, IP).
- IP Camera Setup: For IP cameras, ensure they are correctly added and configured on the network and within the DVR settings.
7.3 Problemy ze zdalnym dostępem
- Połączenie internetowe: Verify the DVR is connected to the internet (check network cable and router status).
- Aplikacja/Oprogramowanie: Ensure the ANNKE Vision app or client software is up-to-date.
- Login do konta: Double-check your login credentials for the ANNKE Vision account.
- Ustawienia zapory/routera: Your router's firewall or port forwarding settings might need adjustment. Refer to your router's manual or contact your ISP for assistance.
7.4 Fałszywe alerty ruchu
- Dostosuj czułość: Reduce the motion detection sensitivity in the DVR settings.
- Refine Detection Zones: Adjust the detection zones to exclude areas with frequent irrelevant movement (e.g., trees swaying, busy roads).
- Włącz wykrywanie osób/pojazdów: Ensure the intelligent person and vehicle detection feature is enabled and configured correctly to filter out non-human/non-vehicle movements.
8. Specyfikacje
| Funkcja | Specyfikacja |
|---|---|
| Marka | ANNKA |
| Numer modelu | DW81KN200 |
| Technologia łączności | VGA, HDMI, BNC, USB |
| Kompatybilne urządzenia | Smartfon, Tablet |
| Wymiary produktu (dł. x szer. x wys.) | Wymiary 36 x 28 x 8 cm |
| Pojemność magazynowa | Dysk twardy 2TB |
| Liczba kanałów | 8 (Analog) + 2 (IP) / 12 (IP Mode) |
| Format cyfrowego nośnika wideo | Dysk twardy |
| Wejście audio | AHD |
| Supported Video Input Types | TVI, AHD, CVI, CVBS, IP |
| Producent | ANNKA |
| Kraj pochodzenia | Chiny |
9. Gwarancja i wsparcie
ANNKE is committed to providing high-quality products and excellent customer service.
9.1 Informacje o gwarancji
- Dostępność części zamiennych w UE: 2 lat.
- For specific warranty terms and conditions, please refer to the warranty card included with your product or visit the official ANNKE webstrona.
9.2 Obsługa klienta
If you encounter any issues or have questions regarding your ANNKE DVR, please contact our support team. We offer:
- Wsparcie posprzedażowe
- Szybka odpowiedź na zapytania
- Podejście zorientowane na klienta
- Dożywotnie wsparcie techniczne

Image: ANNKE's commitment to customer support.
Aby uzyskać dalszą pomoc, odwiedź oficjalną stronę ANNKE webodwiedź witrynę lub zapoznaj się z informacjami kontaktowymi znajdującymi się na opakowaniu produktu.