
1. Wprowadzenie
The AIYIMA GE5654 (TUBE-A3 Pro) is a compact and versatile tube preamplifier designed to enhance your home audio system. It features Bluetooth 5.0 connectivity and AUX input, along with independent treble and bass adjustments, allowing for a personalized audio experience. This device functions as a preamplifier and requires connection to a power ampgłośniki lub aktywne głośniki.
- Lepsza jakość dźwięku: Utilizes GE5654 vacuum tubes for a warm and sweet audio output, with adjustable bass and treble controls.
- Dual Audio Inputs: Supports both Bluetooth 5.0 and AUX (3.5mm) audio input modes, switchable via a dedicated button.
- Replaceable Tubes: Designed for easy tube replacement, compatible with 6J1/6J2/6K4/GE5654/6AK5/6Ж1n tubes.
- Zoptymalizowane obwody: Features a power circuit separate from the audio circuit to minimize interference and ensure clear sound.
- Ważna uwaga: To jest preamplifier, a nie moc amplifier. It must be connected to powered speakers or a separate power amplifier. It is not suitable for direct connection to passive speakers without an amplifier, nor for use with record players or phonographs without an appropriate phono preamp.
2. Koniec produktuview
2.1. Elementy sterujące na panelu przednim

Obraz: Przód view of the AIYIMA GE5654 (TUBE-A3 Pro) showing the power switch, working indicator, bass control, treble control, and volume control knobs.
- Przycisk zasilania: Włącza/wyłącza urządzenie.
- Wskaźnik pracy: Świeci się, gdy urządzenie jest włączone.
- Kontrola basu: Dostosowuje wyjście audio o niskiej częstotliwości.
- Kontrola tonów wysokich: Dostosowuje wyjście audio o wysokiej częstotliwości.
- Regulacja głośności: Reguluje ogólny poziom wyjściowy dźwięku.
2.2. Złącza panelu tylnego
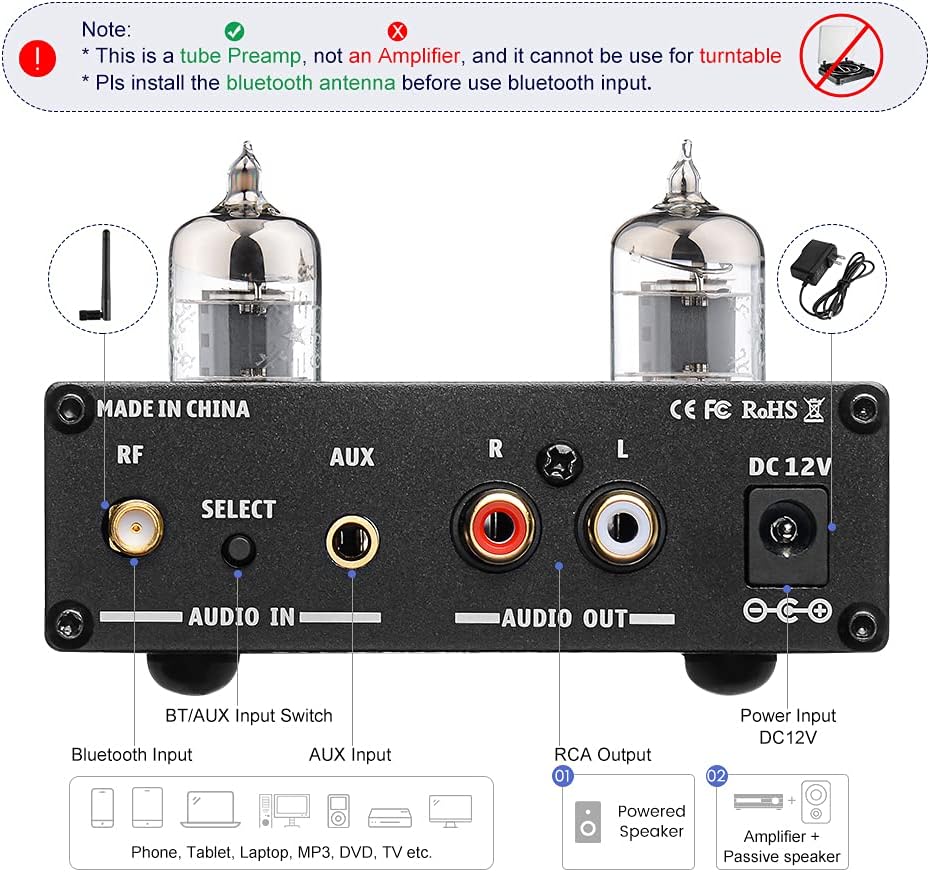
Obraz: Tył view of the AIYIMA GE5654 (TUBE-A3 Pro) showing the Bluetooth antenna connector, input selector, AUX input, RCA audio outputs, and DC 12V power input.
- RF (antena Bluetooth): Złącze anteny Bluetooth.
- Select (Audio Input Switch): Button to switch between Bluetooth and AUX input modes.
- Wejście AUX: 3.5mm stereo input for wired audio sources.
- Audio Out (RCA L/R): RCA stereo outputs to connect to a power ampgłośniki lub aktywne głośniki.
- 12V DC: Power input jack for the DC12V/1A power adapter.
2.3. Wymiary produktu

Obraz: widok z góry view of the AIYIMA GE5654 (TUBE-A3 Pro) with dimensions: 118mm (4.65in) length, 95mm (3.74in) width, 30mm (1.18in) height.
3. Instrukcje konfiguracji
- Rozpakuj i sprawdź: Ostrożnie usuń preamplifier and all accessories from the packaging. Ensure all components are present and undamaged.
- Zainstaluj antenę Bluetooth: Screw the provided Bluetooth antenna into the 'RF' connector on the rear panel. Ensure it is securely tightened for optimal signal reception.
- Podłącz wyjście audio: Connect the RCA 'Audio Out' ports (L/R) on the rear panel of the preamplifier to the input ports of your power ampwzmacniacza lub głośników aktywnych przy użyciu odpowiednich kabli RCA.
- Connect Audio Input (Choose One):
- Wejście Bluetooth: Upewnij się, że preamplifier is in Bluetooth mode (indicated by a purple light, or red and blue flashing for search status). On your audio source device (e.g., smartphone, tablet), search for and connect to 'AIYIMA A3 Pro'.
- Wejście AUX: Connect your audio source (e.g., CD player, computer) to the 'AUX' 3.5mm input jack on the rear panel using a 3.5mm audio cable. Press the 'Select' button to switch to AUX input mode (indicated by a red light).
- Podłącz zasilanie: Connect the DC12V/1A power adapter to the 'DC 12V' input jack on the rear panel, then plug the adapter into a wall outlet. Caution: Do not use a power supply exceeding 12V.
- Włączanie: Flip the 'Power' switch on the front panel to the ON position. The working indicator will light up.
Film demonstracyjny konfiguracji
Video: This video demonstrates the connection of the AIYIMA GE5654 (TUBE-A3 Pro) preamplifier to an AIYIMA A07 power amplifier and speakers, showcasing both AUX and Bluetooth input modes and the treble/bass adjustment.
4. Instrukcja obsługi
- Włączanie/wyłączanie: Use the 'Power' switch on the front panel to turn the unit on or off.
- Wybierz wejście: Press the 'Select' button on the rear panel to toggle between AUX and Bluetooth input modes. The working indicator light color will change to reflect the active input (Red for AUX, Purple for Bluetooth).
- Dostosuj głośność: Rotate the 'Volume' knob on the front panel to increase or decrease the audio output level.
- Dostosuj ton: Use the 'Bass' and 'Treble' control knobs on the front panel to fine-tune the low and high frequencies according to your preference.

Image: The AIYIMA GE5654 (TUBE-A3 Pro) connected to a smartphone via Bluetooth and outputting to a speaker, demonstrating a typical usage scenario.
5. Wymiana rurki
The GE5654 (TUBE-A3 Pro) preamplifier allows for easy replacement of its vacuum tubes, offering flexibility for sound customization. Compatible tube models include 6J1, 6J2, 6K4, GE5654, 6AK5, and 6Ж1n.
- Wyłącz i odłącz: Before attempting to replace tubes, ensure the preamplifier is powered off and disconnected from the main power supply. Allow the unit to cool down completely.
- Gently Remove Old Tubes: Carefully grasp the existing tube and pull it straight upwards from its socket. Avoid twisting or bending the tube pins.
- Włóż nowe rurki: Align the pins of the new tube with the holes in the socket. Gently push the tube straight down until it is firmly seated. Do not force it.
- Sprawdź miejsca siedzące: Ensure both tubes are properly seated in their sockets before reconnecting power.

Image: A hand demonstrating the process of replacing a vacuum tube on the AIYIMA GE5654 (TUBE-A3 Pro) preampliyfikator.
6. Konserwacja
- Utrzymuj urządzenie w czystości, wycierając je miękką, suchą szmatką.
- Unikaj stosowania silnych środków chemicznych i ściernych środków czyszczących.
- Zapewnij odpowiednią wentylację wokół urządzenia, aby zapobiec przegrzaniu.
- Protect the unit from moisture, direct sunlight, and extreme temperatures.
7. Rozwiązywanie Problemów
- Brak dźwięku:
- Check if the power adapter is correctly connected and the unit is powered on.
- Verify all audio cables are securely connected to the correct input and output ports.
- Sprawdź, czy wybrano właściwy tryb wprowadzania danych (Bluetooth lub AUX).
- Confirm the volume knob is not set to minimum and the connected power amplifier/powered speakers are also powered on and at an audible volume.
- Check if the vacuum tubes are properly seated in their sockets.
- Zniekształcony dźwięk:
- Reduce the volume level on both the preamplifier i źródło dźwięku.
- Ensure your audio source is providing a clean signal. A noisy source will be amplifikowany przez preampliyfikator.
- Adjust bass and treble controls to a neutral position or to your preference.
- Verify that the power supply is DC12V/1A and not exceeding 12V.
- Problemy z połączeniem Bluetooth:
- Ensure the Bluetooth antenna is securely installed.
- Potwierdź wstępnieamplifier is in Bluetooth input mode (purple indicator light).
- Make sure your audio source device's Bluetooth is enabled and within range.
- Spróbuj rozparować i ponownie sparować urządzenie.
- Urządzenie nie włącza się:
- Sprawdź zasilacz i gniazdko ścienne.
- Ensure the power switch is fully in the ON position.
8. Specyfikacje
| Funkcja | Specyfikacja |
|---|---|
| Nazwa marki | AIYIMA |
| Model | AIYIMA GE5654 (TUBE-A3 Pro) |
| Pozycja Wymiary (dł. x szer. x wys.) | 4.69 x 3.74 x 1.22 cala (118 x 95 x 30 mm) |
| Waga przedmiotu | 520 gram |
| Tomtage | 12 V (prąd stały) |
| Maksymalna objętość dostawtage | 12 V (prąd stały) |
| Minimalna podaż objtage | 12 V (prąd stały) |
| Liczba kanałów | 2 |
| Typ montażu | Montaż powierzchniowy |
| UPC | 749789527314 |
| Producent | YIMA TECH |
9. Gwarancja i wsparcie
For warranty information and technical support, please refer to the documentation included with your purchase or contact AIYIMA customer service directly. Keep your purchase receipt for warranty claims.