Wstęp
This manual provides comprehensive instructions for the installation, operation, and maintenance of your NB POWER TFT Display Electric Bike Controller and Display Set. This system includes a 48V-72V, 80A, 3000W Sabvoton V2 Controller, a TFT color display, an alarm lock, a twist throttle, brake levers, and a PAS sensor. Please read this manual thoroughly before installation and use to ensure proper function and safety.
Zawartość opakowania
Sprawdź, czy w przesyłce znajdują się wszystkie wymienione poniżej elementy:
- 1x NB POWER TFT Color Display (48V-72V compatible)
- 1x Sabvoton V2 Controller (48V-72V, 3000W, 80A)
- 1x Alarm Lock
- 1x Twist Throttle
- 1x Pair of Brake Levers
- 1x PAS (Pedal Assist System) Sensor
- Necessary wiring and connectors

Obraz: The complete package contents, including the controller, TFT display, and various accessories, neatly packed in a box.
Konfiguracja i instalacja
Proper installation is crucial for the safe and efficient operation of your electric bike system. If you are unsure about any step, consult a qualified technician.
1. Controller Installation
Mount the Sabvoton V2 Controller securely to your electric bike frame. Ensure it is protected from direct water exposure and excessive vibration. Refer to the dimensions for proper fitment.
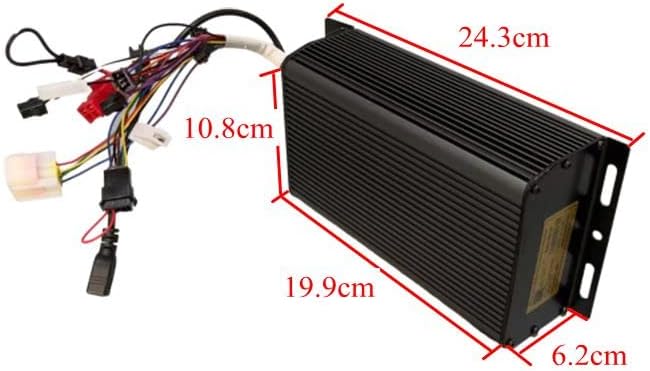
Obraz: The Sabvoton V2 Controller with its wiring harness, showing approximate dimensions for installation planning. The controller measures approximately 24.3cm in length, 10.8cm in width, and 6.2cm in height.
2. TFT Display Mounting
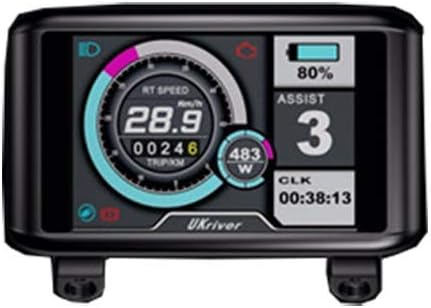
Attach the TFT color display to your handlebars in a position that is easily visible and accessible while riding. Secure it firmly to prevent movement.

Obraz: The TFT color display, illustrating its clear interface with speed, trip distance, wattage, and battery level indicators.
3. Połączenia okablowania
Connect the components to the controller according to the wiring diagram (not provided in this manual, refer to product packaging or manufacturer's website for detailed diagrams). Ensure all connections are secure and waterproof where necessary.
- Podłączenie silnika: Podłącz przewody fazowe silnika i przewody czujnika Halla do odpowiednich portów sterownika.
- Podłączenie akumulatora: Connect the battery positive and negative terminals to the controller's power input. Ensure correct polarity.
- Wyświetlacz TFT: Connect the display cable to the designated port on the controller.
- Przepustnica skrętna: Connect the throttle to its dedicated port.
- Dźwignie hamulca: Connect the brake levers to the controller. These typically provide a signal to cut motor power when brakes are applied.
- Czujnik PAS: Install the PAS sensor on your pedal crank and connect its wire to the controller.
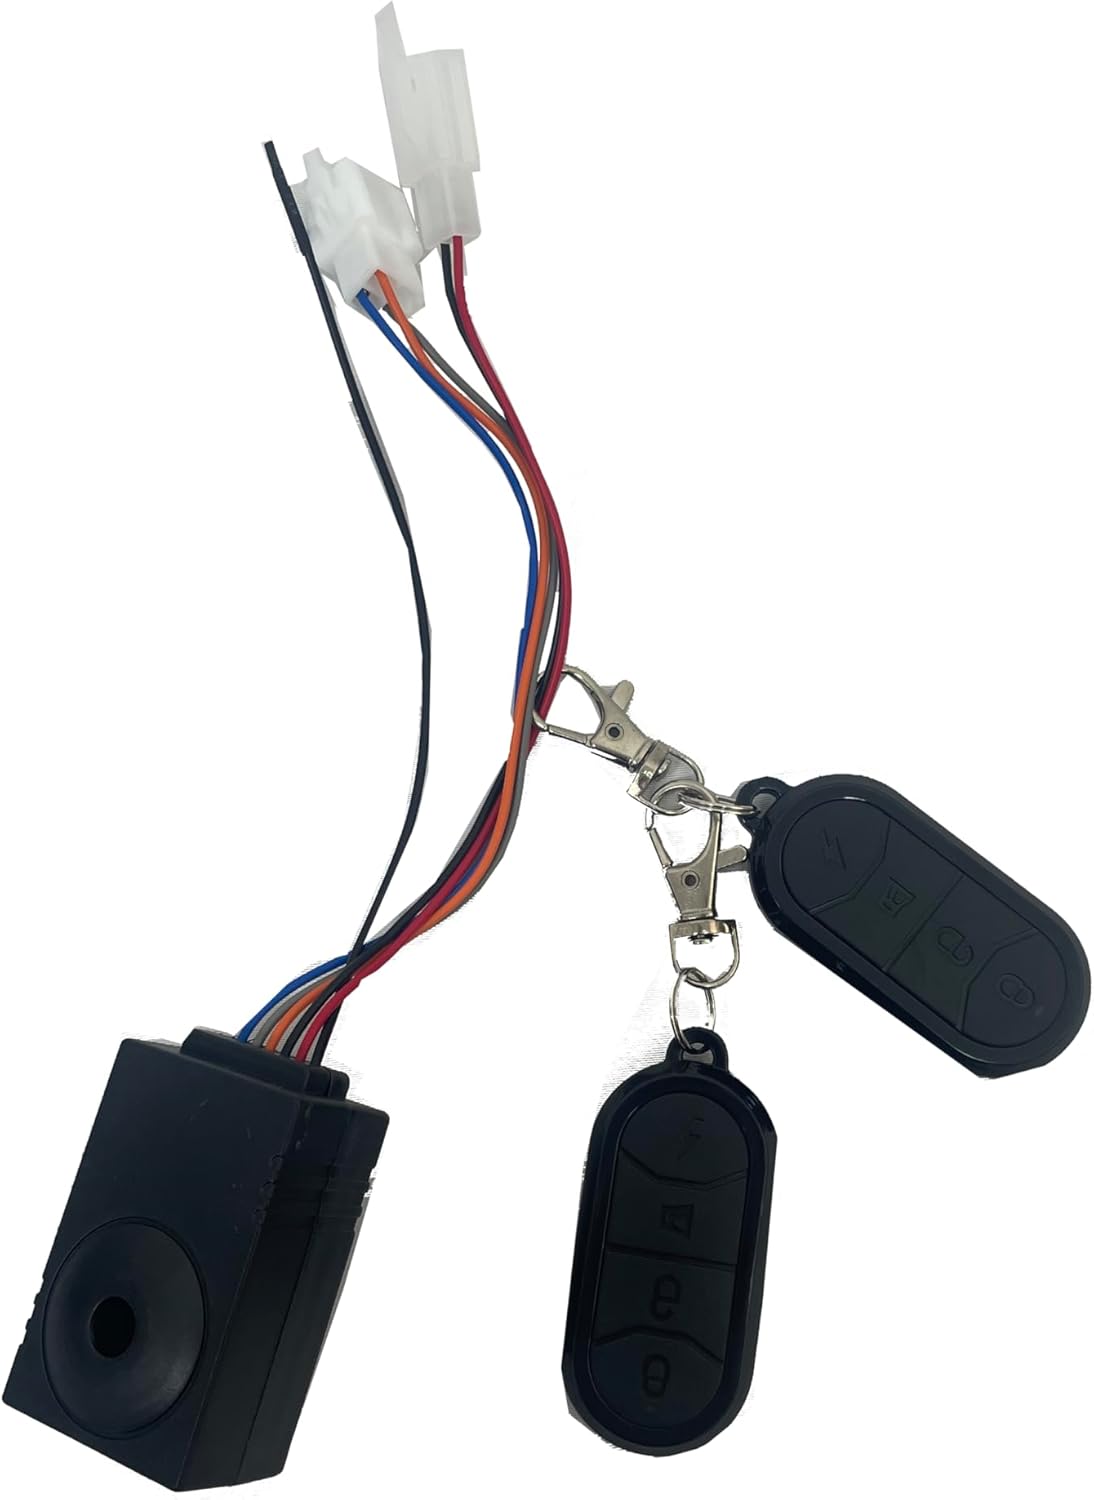
- Alarm Lock: Connect the alarm lock system.
Obraz: Alternatywa view of a TFT display, showing various metrics and a different branding, indicating display compatibility.
Obraz: The twist throttle assembly, featuring an integrated key switch for power control and a separate matching grip.

Obraz: The alarm lock system, including the main unit and two remote controls for arming and disarming.
Instrukcja obsługi
1. Włączanie/wyłączanie zasilania
Turn the key on the twist throttle to power on the system. The TFT display will illuminate. To power off, turn the key to the off position.
2. Funkcje wyświetlacza TFT
The TFT display provides real-time information and allows for system adjustments:
- Prędkość: Wyświetla aktualną prędkość jazdy.
- Dystans: Pokazuje przebytą odległość i całkowity licznik kilometrów.
- Cotage: Indicates real-time power consumption.
- Wskaźnik baterii: Pokazuje poziom naładowania baterii.
- Czas: Aktualny czas.
- Speed Levers (PAS Levels): Adjust pedal assist levels (typically 5 levels).
- Regulacja rozmiaru koła: Allows calibration for accurate speed and distance readings.
- Pojemność bateriitagRegulacja: Configures the display for your specific battery voltage (48 V-72 V).
Navigate through display settings using the buttons on the display unit. Refer to the specific display model's mini-manual for detailed button functions.
3. Działanie przepustnicy
Gently twist the throttle grip to engage motor power. The amount of twist corresponds to the power output. Release the throttle to disengage power.
4. System wspomagania pedałowania (PAS)
The PAS sensor detects pedaling motion and provides motor assistance based on the selected assist level on the TFT display. Higher assist levels provide more motor power with less pedaling effort.
5. Dźwignie hamulca
Activating the brake levers will cut power to the motor, ensuring safe stopping. Always use your brakes as needed.
6. Alarm Lock
Use the remote control to arm and disarm the alarm system. When armed, any movement or tampering with the bike will trigger an audible alarm.
Konserwacja
Regular maintenance ensures the longevity and optimal performance of your electric bike system.
- Zachowaj czystosc: Regularly wipe down the controller and display with a soft, damp płótno. Unikaj stosowania ostrych chemikaliów lub materiałów ściernych.
- Sprawdź połączenia: Periodically inspect all wiring connections for tightness and signs of wear or corrosion. Secure any loose connections.
- Ochrona wody: While components are designed to be water-resistant, avoid submerging them or exposing them to heavy rain for extended periods.
- Pielęgnacja baterii: Follow the manufacturer's instructions for your specific battery pack regarding charging, storage, and discharge cycles.
Rozwiązywanie problemów
Jeśli napotkasz problemy, zapoznaj się z poniższymi typowymi problemami i rozwiązaniami:
| Problem | Możliwa przyczyna | Rozwiązanie |
|---|---|---|
| System nie włącza się. | Loose battery connection, dead battery, faulty key switch. | Check battery connections. Charge battery. Inspect key switch wiring. |
| Silnik nie reaguje na przepustnicę. | Loose throttle connection, faulty throttle, brake levers engaged, motor/controller fault. | Check throttle wiring. Ensure brake levers are not engaged. Consult a technician if problem persists. |
| Display shows incorrect speed/distance. | Nieprawidłowe ustawienie rozmiaru koła. | Adjust wheel size setting in the TFT display menu. |
| PAS not working. | Loose PAS sensor connection, faulty PAS sensor, incorrect PAS level setting. | Check PAS sensor wiring. Ensure PAS level is set above 0 on the display. |
Specyfikacje
| Funkcja | Szczegół |
|---|---|
| Marka | NB POWER |
| Nazwa modelu | TFT Display Sabvoton V2 Controller Set |
| Typ kontrolera | Sabvoton V2 Sine Wave System |
| Tomtage Kompatybilność | 48 V-72 V |
| Obecny limit | 80A |
| Maksymalna moctage | 3000 W |
| Typ wyświetlacza | Kolorowy wyświetlacz TFT |
| Funkcje wyświetlania | Speed, Distance, Wattage, Battery Indicator, Time, Wheel Size Adjust, Battery Voltage Adjust, 5 PAS Levels |
| Zawarte komponenty | Controller, TFT Display, Alarm Lock, Twist Throttle, Brake Levers, PAS Sensor |
| ASIN | B07PF2S481 |
| UPC | 715444174148 |
Demonstracja wideo
Watch the official product video for a visual guide on the controller and display functionality.
Wideo: This video demonstrates the MQCON APP, testing the controller and display. It shows the display responding to throttle input and the motor wheel spinning, illustrating the system's operational response.
Gwarancja i wsparcie
For warranty information or technical support, please contact NB POWER customer service through your purchase platform or the manufacturer's official webZachowaj dowód zakupu na wypadek roszczeń gwarancyjnych.
Mogą być dostępne do nabycia dodatkowe plany ochrony:
- Plan ochrony na 2 rok (płatność jednorazowa)
- Complete Protect (subskrypcja miesięczna)
Refer to the specific terms and conditions of these plans at the time of purchase.