
1. Wprowadzenie
This manual provides detailed instructions for the installation, operation, and maintenance of your EMANER Model 7042-WH Dual-Head LED Security Light. Please read this manual thoroughly before installation and retain it for future reference.

Przód view of the EMANER Dual-Head LED Security Light, highlighting its two rotatable light heads and motion sensor. A 120V warning label is visible.
2. Informacje dotyczące bezpieczeństwa
OSTRZEŻENIE: Risk of electric shock. Disconnect power at the fuse or circuit breaker before installation or servicing. All wiring connections must be in accordance with local and national electrical codes.
- Ensure the power supply is 120V AC.
- Nie instaluj w pobliżu materiałów palnych.
- This product is designed for outdoor use and is IP65 waterproof rated.
- Jeśli nie masz pewności co do procesu instalacji, skonsultuj się z wykwalifikowanym elektrykiem.
- Nie należy patrzeć bezpośrednio na źródło światła LED, gdy jest ono włączone.
3. Koniec produktuview i komponenty
The EMANER Model 7042-WH is a dual-head LED security light featuring a rotatable design and multiple intelligent control modes. Key components include:
- Rotatable Light Heads: Two adjustable LED light panels.
- Czujnik ruchu PIR: Pasywny czujnik podczerwieni do wykrywania ruchu.
- Pokrętła sterujące: For adjusting time delay and sensitivity.
- Sprzęt montażowy: Includes mounting strap, screws, and wire nuts.

A diagram providing precise measurements of the security light's length, width, height, and the dimensions of the rotatable light heads and PIR motion sensor.
4. Specyfikacje
| Funkcja | Specyfikacja |
|---|---|
| Marka | EMANER |
| Numer modelu | 7042-WH |
| Kolor | White Fixture |
| Tworzywo | ABS Plastic + Aluminum internal |
| Typ źródła światła | PROWADZONY |
| Cotage | 28 watów |
| Jasność | 2800 lumenów |
| Temperatura barwowa | 5000 K białe światło dzienne |
| Tomtage | 120 wolty |
| Poziom wodoodporności | Wodoodporność IP65 |
| Kąt wykrywania | 180 stopnia |
| Odległość wykrywania | 20-70 stóp (regulowany) |
| Typ montażu | Wall mount, Eave/Soffit mount |
| Wymiary produktu | 9" dł. x 7.4" szer. x 6.4" wys. |
| Waga przedmiotu | 1.74 funtów |
5. Konfiguracja i instalacja
This LED security light is designed for easy installation. Follow these steps carefully:
5.1 Wstępna instalacja
- Wyłącz zasilanie: Disconnect power at the circuit breaker or fuse box before beginning installation.
- Select mounting location: Choose a wall or eave/soffit location that provides the desired coverage and is within reach of existing wiring. Recommended mounting height is 6.5-12 feet.
- Rozpakuj zawartość: Ensure all components are present: light fixture, mounting strap, screws, and wire nuts.
5.2 Okablowanie i montaż
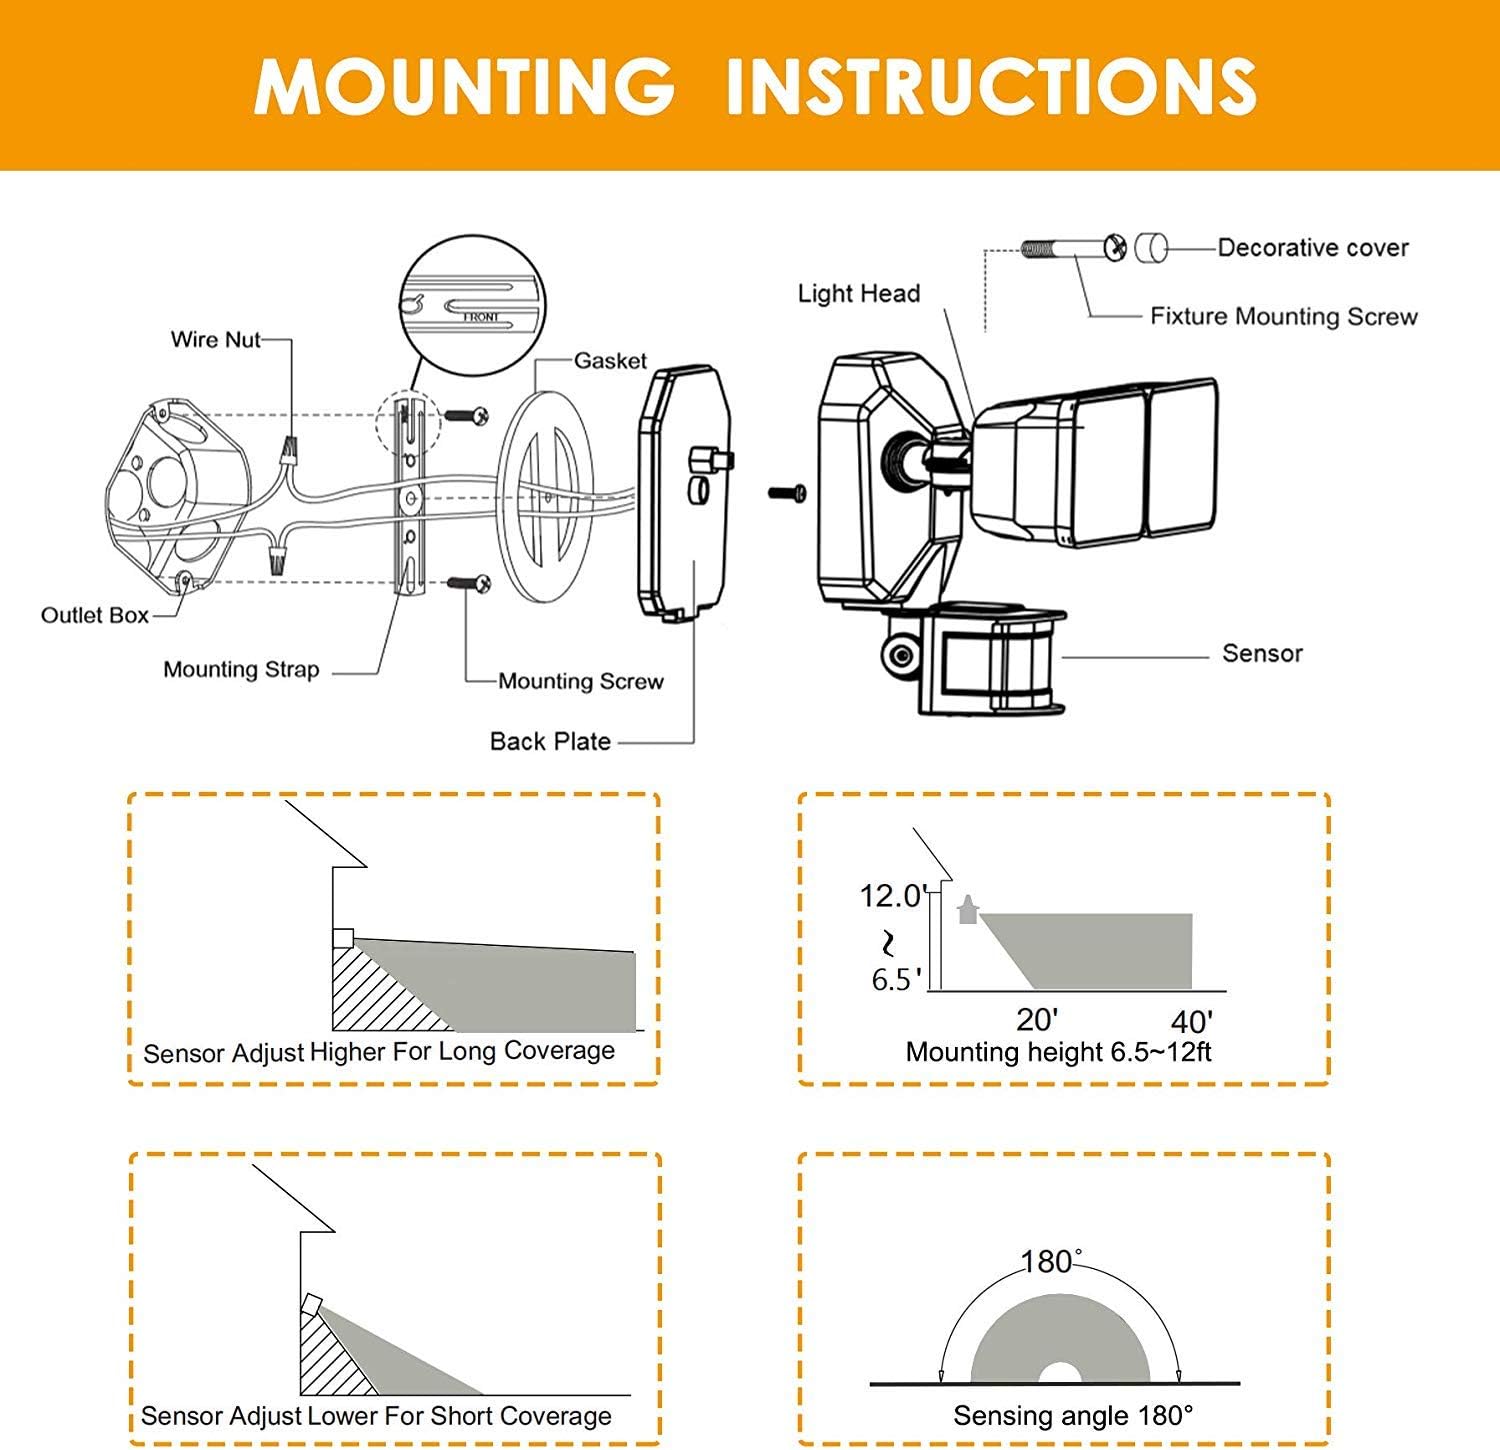
- Attach the mounting strap to your existing electrical outlet box using the provided screws.
- Podłącz przewody elektryczne:
- Połącz czarny Przewód (pod napięciem) od oprawy do czarny Przewód (pod napięciem) z puszki gniazdowej.
- Połącz biały Przewód (neutralny) od oprawy do biały Przewód (neutralny) z puszki gniazdowej.
- Połącz green/bare copper Przewód (uziemiający) od oprawy do green/bare copper Przewód (uziemiający) z puszki gniazdowej.
- Carefully tuck the wires into the outlet box.
- Align the light fixture with the mounting strap and secure it with the decorative cover and fixture mounting screw.
- Adjust the light heads and motion sensor to your desired angles.
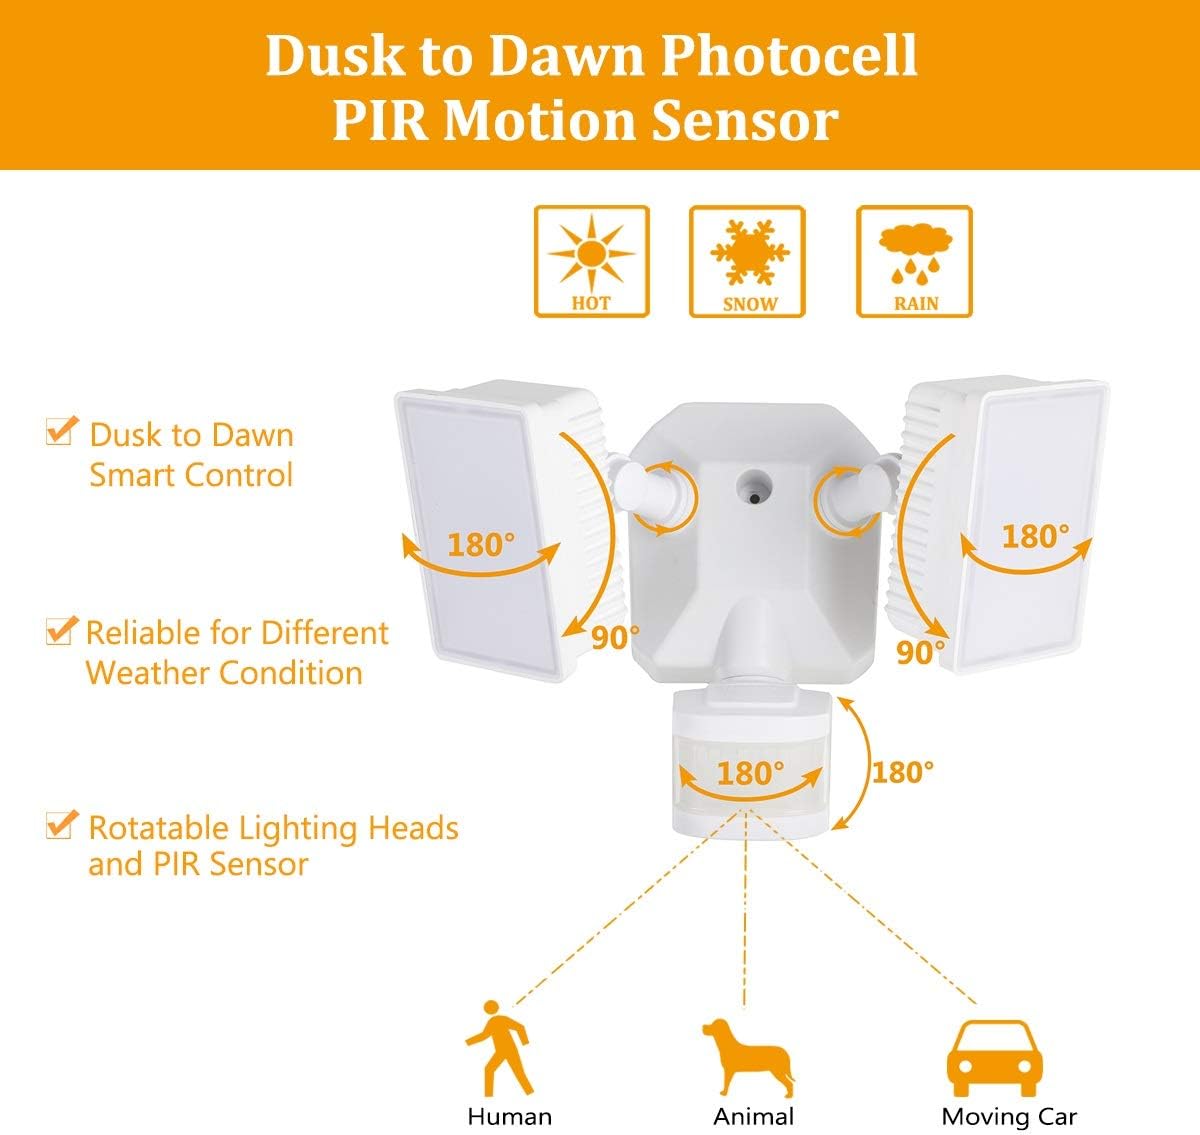
Diagram for installing the security light, detailing wire connections, mounting strap, back plate, and attaching the light head and sensor.
Illustrations showing two common installation methods: mounting the light under an eave or soffit, and mounting it directly onto a wall.
6. Tryby pracy i ustawienia
The security light features a control panel with dials for TIME and SENSITIVITY, and a slide switch for selecting operating modes. All modes operate only at night or in dark environments, automatically turning off at dawn.

An infographic explaining the various operating modes: TEST, AUTO, Motion Sensor, 6 Hours, and Dusk to Dawn (PC) modes, along with their respective time delay and sensitivity settings.
6.1 Panel sterowania ponadview

Szczegółowy view of the control panel, showing the 'TIME' dial (5S, 3MIN, TEST) and 'SENSITIVITY' dial (+/-) for adjusting light duration and motion detection range.
- Tarcza CZASU: Adjusts how long the light stays on after motion is detected (5 seconds to 3 minutes). The 'TEST' setting is for initial setup.
- SENSITIVITY Dial: Adjusts the motion sensor's detection range (Low to High sensitivity, 20-70 feet).
- Przełącznik trybu: Selects between AUTO, OFF (Motion Sensor), 6H (6 Hours), and PC (Dusk to Dawn Stay On) modes.
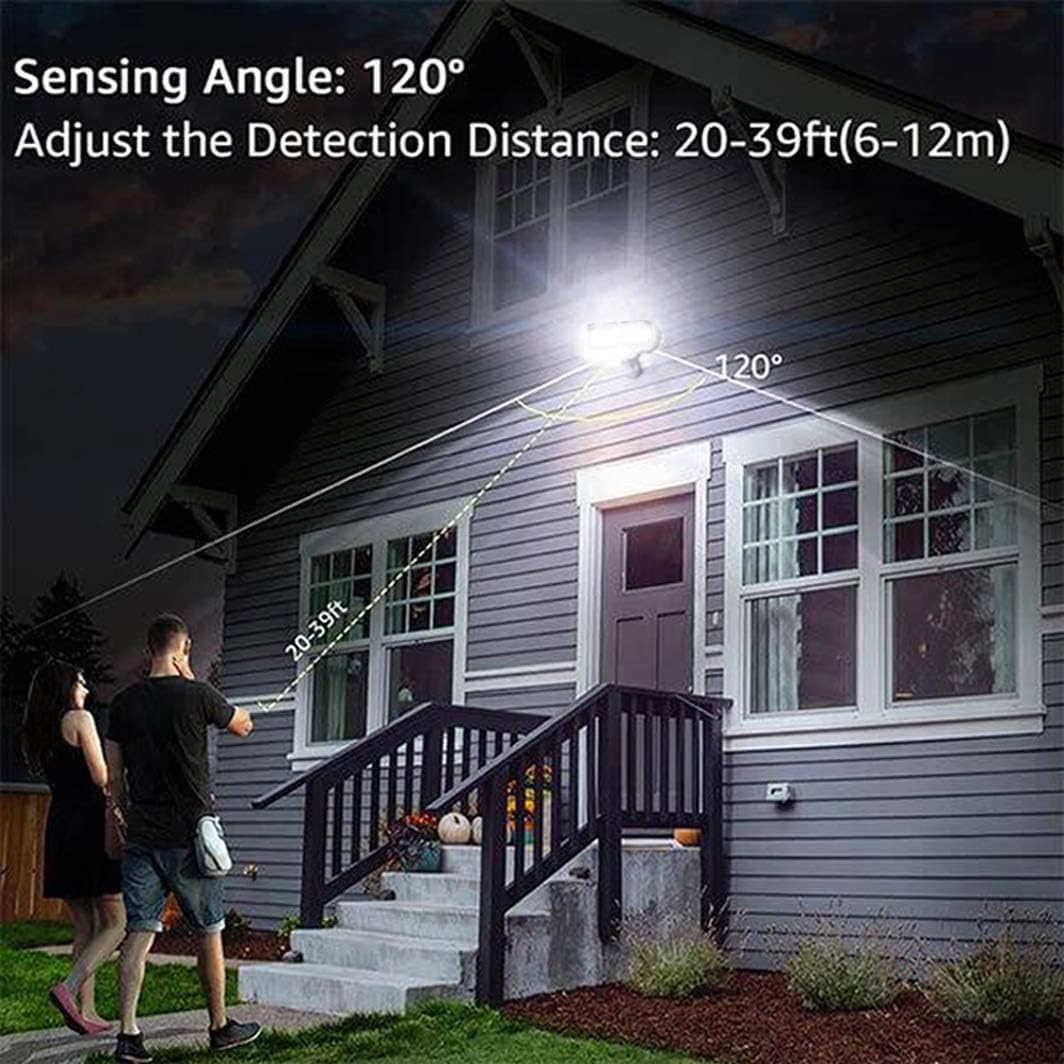
An illustration demonstrating the motion sensor's 120-degree sensing angle and adjustable detection distance of 20-39 feet (6-12 meters) from a mounting height of 6.5-12 feet.
6.2 tryby pracy
- Tryb TESTOWY: (Slide switch to 'TEST' on TIME dial) This mode is for testing after installation. When connected to AC power, the light will turn on for 5 seconds based on the time delay setting.
- AUTO Dim Light Mode: (Slide switch to 'AUTO') The security light turns on with dim light at dusk. When motion is detected, it switches to 100% brightness. After no motion is detected for the set time delay (5 seconds to 3 minutes), it returns to dim light. Automatically turns off at dawn.
- Motion On/Off Mode: (Slide switch to 'OFF') The security flood light only turns on at 100% brightness when motion is activated. It automatically turns off when no motion is detected for the set time delay. Automatically turns off at dawn.
- 6 Hours Mode: (Slide switch to '6H') The flood light turns on at 100% brightness and stays on for 6 hours. After 6 hours, it automatically switches to 'AUTO Dim Light Mode'. Automatically turns off at dawn.
- Dusk to Dawn Stay On Mode (PC Mode): (Slide switch to 'PC') The motion security light turns on with bright light (100% brightness) and stays on all night. It automatically turns off in the daytime.
7. Konserwacja
Regular maintenance ensures optimal performance and longevity of your EMANER LED Security Light.
- Czyszczenie: Okresowo czyść głowice lampy i soczewkę czujnika ruchu miękką, miękką szmatką.amp ściereczka. Nie należy używać środków czyszczących o właściwościach ściernych ani rozpuszczalników.
- Kontrola: Co roku należy sprawdzić okablowanie i mocowania pod kątem oznak zużycia, uszkodzeń lub luźnych połączeń.
- Brak części nadających się do samodzielnej naprawy przez użytkownika: The LED light source is non-removable and not user-serviceable. Do not attempt to open the light heads.
8. Rozwiązywanie Problemów
Jeśli masz problemy z oświetleniem zabezpieczającym, zapoznaj się z poniższymi typowymi problemami i rozwiązaniami:
| Problem | Możliwa przyczyna | Rozwiązanie |
|---|---|---|
| Światło nie włącza się w nocy. | 1. Zasilanie jest wyłączone. 2. Photocell sensor is detecting ambient light. 3. Problem z okablowaniem. | 1. Sprawdź wyłącznik/bezpiecznik. 2. Upewnij się, że czujnik nie jest zasłonięty ani wystawiony na działanie innych źródeł światła. 3. Verify all wiring connections are secure. |
| Światło pozostaje włączone w sposób ciągły. | 1. Mode set to 'PC' (Dusk to Dawn Stay On). 2. Constant motion detected. 3. Wiring error. | 1. Change mode to 'AUTO' or 'OFF'. 2. Adjust sensor sensitivity or angle to avoid constant triggers. 3. Sprawdź ponownie okablowanie. |
| Light flashes or cycles on/off rapidly. | 1. Intermittent power supply. 2. Sensor interference. 3. Faulty unit. | 1. Check power connections. 2. Ensure no objects are moving within the sensor's range. 3. Skontaktuj się z obsługą klienta, jeśli problemy nie ustąpią. |
| Czujnik ruchu nie wykrywa. | 1. Zbyt niska czułość. 2. Sensor obstructed or misaligned. 3. Temperature too high (reduces PIR effectiveness). | 1. Increase SENSITIVITY setting. 2. Clear obstructions and adjust sensor angle. 3. This is normal behavior in very hot weather. |
9. Informacje o gwarancji
The EMANER Model 7042-WH LED Security Light comes with a 2-letnia gwarancja producentaNiniejsza gwarancja obejmuje wady materiałowe i wykonawcze powstałe w wyniku normalnego użytkowania. Prosimy zachować dowód zakupu na potrzeby roszczeń gwarancyjnych.
10. Obsługa klienta
For technical assistance, warranty claims, or any questions regarding your EMANER product, please contact EMANER customer service. You can typically find contact information on the product packaging or through the retailer where the product was purchased.
Alternatively, you may visit the official EMANER brand store online or use the 'Ask a question' feature on the product's retail page.