1. Wprowadzenie
This manual provides detailed instructions for the setup, operation, and maintenance of your Zerone Digital Alarm Clock, Model Zeronek1gfg26oth-02. Please read this manual thoroughly before using the product to ensure proper function and longevity.
2. Informacje i środki ostrożności dotyczące bezpieczeństwa
- Use the clock in a dry environment. Avoid prolonged exposure to wet conditions, high temperatures, or areas with rapid temperature changes.
- Handle the clock with care to prevent damage.
- When using batteries, ensure they are high-quality AAA alkaline batteries. If the display dims or blinks, replace the batteries promptly. Prevent battery leakage by replacing old batteries.
- If the clock is not powered, verify that batteries are correctly inserted or the USB power source is connected.
- When using a USB power adapter, ensure it is a compatible DC 5V/500mA adapter.
3. Zawartość opakowania
Upon opening the package, please verify that all accessories are present:
- Digital Wooden Clock (1 pc)
- User's Manual (1 pc)
- Kabel ładujący USB (1 szt.)
4. Koniec produktuview
The Zerone Digital Alarm Clock features a modern cube design with an LED display that shows time and temperature. It includes multiple alarm settings and adjustable brightness.

Rysunek 4.1: Przód view of the Zerone Digital Alarm Clock displaying the time.

Rysunek 4.2: Key features indicated by icons: Clock, Alarm, Thermometer, and Sound Control.
4.1. Komponenty i przyciski
The clock features a minimalist design with control buttons located on the back panel.
- Przycisk SET: Służy do wprowadzania i potwierdzania ustawień.
- Przycisk W GÓRĘ: Used to increase values or navigate settings.
- Przycisk DÓŁ: Used to decrease values or navigate settings. Also controls sound control mode.
- Przycisk reset: A small recessed button to reset the clock to factory defaults.
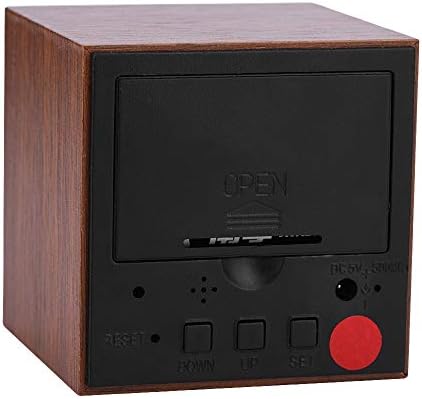
Rysunek 4.3: Tył view of the clock with the battery cover closed, showing the USB power input and control buttons.
5. Konfiguracja
5.1. Włączanie zegara
The clock can be powered by either 3 AAA batteries or a DC 5V/500mA USB power supply.
- Moc baterii: Open the battery compartment cover on the back of the clock. Insert 3 AAA alkaline batteries, ensuring correct polarity (+/-). Close the cover securely.
- Zasilanie USB: Connect the provided USB charging cable to the DC 5V/500mA port on the back of the clock and plug the other end into a compatible USB power adapter (not included) or a USB port.
Note: When powered by batteries, the sound control mode is recommended to conserve power. The display will not show continuously in this mode.
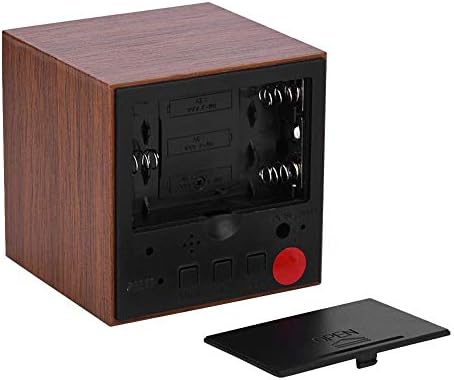
Rysunek 5.1: Tył view with the battery compartment open, showing slots for 3 AAA batteries.
6. Instrukcja obsługi
6.1. Tryby wyświetlania
The clock has two main display modes:
- DP-1: Displays Time, Temperature, Year, Month, and Date in a rotating sequence.
- DP-2: Displays Time continuously.
Aby przełączać się między DP-1 i DP-2, naciśnij USTAWIĆ naciśnij przycisk krótko.
6.2. Ustawianie czasu i daty
Aby wejść w tryb ustawień, naciśnij i przytrzymaj przycisk USTAWIĆ button for 3 seconds. The display will show the first setting item (YEAR) flashing.
- Podczas migania elementu użyj UP or W DÓŁ przyciski, aby dostosować wartość.
- Naciśnij USTAWIĆ button briefly to move to the next setting item.
- The setting sequence is: YEAR → MONTH → DATE → 12/24H Format → HOUR → MINUTE → ALARM 1 (AL1) → ALARM 2 (AL2) → ALARM 3 (AL3).
- After setting the last item (AL3), the clock will exit the setting mode automatically.
6.3. Ustawianie alarmów
The clock supports three independent alarms (AL1, AL2, AL3). Each alarm sounds for 1 minute.
- Enter the setting mode by pressing and holding the USTAWIĆ przycisk przez 3 sekundy.
- Naciskać USTAWIĆ repeatedly until you reach the AL1, AL2, or AL3 setting.
- When the alarm hour or minute is flashing, use the UP or W DÓŁ przyciski umożliwiające ustawienie żądanej godziny alarmu.
- Naciskać USTAWIĆ to confirm and move to the next alarm setting or exit.
6.4. Regulacja jasności
The clock offers three levels of brightness (L1, L2, L3), with L3 being the brightest and L1 the dimmest. Additionally, the display automatically reduces brightness by half between 18:00 (6 PM) and 07:00 (7 AM).
- Naciśnij i przytrzymaj UP button for 3 seconds to enter brightness adjustment mode. The current brightness level (e.g., "L3") will be displayed.
- Użyj UP or W DÓŁ buttons to cycle through the brightness levels (L1, L2, L3).
- Once the desired brightness is set, press and hold the UP button for 3 seconds again to exit brightness adjustment mode.
6.5. Activating Sound Control Mode
Sound control mode (power-saving mode) is recommended when the clock is powered by batteries. In this mode, the display turns off and activates when a sound is detected (e.g., a clap or tap).
To toggle sound control mode:
- Naciśnij W DÓŁ naciśnij przycisk krótko.
- "ON:SD" indicates sound control is active.
- "--:SD" indicates sound control is off, and the display will remain continuously on (if in DP-2 mode).
6.6. Switching Temperature Unit (Celsius/Fahrenheit)
The clock supports both Celsius (C) and Fahrenheit (F) temperature displays.
To switch the temperature unit:
- Naciśnij UP button briefly. The display will toggle between "--:C" (Celsius) and "--:F" (Fahrenheit).
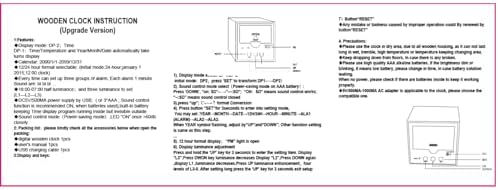
Rysunek 6.1: Reference image of the original instruction sheet.
7. Konserwacja
- Czyść zegar miękką, suchą ściereczką. Nie używaj środków czyszczących ani rozpuszczalników o działaniu ściernym.
- Avoid exposing the clock to water or excessive moisture, as this can damage the internal circuitry.
- Jeżeli zegar nie będzie używany przez dłuższy czas, należy wyjąć baterie, aby zapobiec ich wyciekowi.
8. Rozwiązywanie Problemów
| Problem | Możliwa przyczyna | Rozwiązanie |
|---|---|---|
| Display is dim or blinking. | Niski poziom naładowania baterii. | Replace AAA batteries or connect to USB power. |
| Display is off, no time shown. | Sound control mode is active and no sound detected; no power. | Tap the clock or make a sound to activate display. Check battery installation or USB power connection. Disable sound control mode by pressing W DÓŁ button until "--:SD" is shown. |
| Clock not responding to button presses. | Temporary software glitch or improper operation. | Use a thin object (like a paperclip) to press the recessed NASTAWIĆ button on the back of the clock. This will restore default settings. |
| Time or date is incorrect after power loss. | Batteries removed or depleted while USB power was disconnected. | Ustaw ponownie godzinę i datę, postępując zgodnie z instrukcjami podanymi w rozdziale 6.2. |
9. Specyfikacje
| Funkcja | Specyfikacja |
|---|---|
| Marka | Zerone |
| Numer modelu | Zeronek1gfg26oth-02 |
| Tworzywo | MDF, PVC |
| Kolor | Brązowy |
| Typ wyświetlacza | Cyfrowa dioda LED |
| Wymiary produktu | 6 x 6 x 6 cm (2.36"W x 2.36"H) |
| Waga przedmiotu | 3.87 uncji |
| Źródło zasilania | 3 x AAA Batteries (not included) OR DC 5V/500mA USB |
| Poziomy jasności | 3 (poziom 1, poziom 2, poziom 3) |
| Funkcja alarmu | Yes, 3 groups of alarms |
| Wyświetlacz temperatury | Yes (Celsius/Fahrenheit) |
| Format czasu | 12-hour or 24-hour mode |
| Cechy specjalne | Voice Control Mode, Automatic Half Luminance (18:00-07:00) |

Rysunek 9.1: Dimensions of the Zerone Digital Alarm Clock.
10. Gwarancja i wsparcie
Aby uzyskać informacje o gwarancji lub pomocy technicznej, zapoznaj się z opakowaniem produktu lub skontaktuj się ze sprzedawcą, u którego produkt został zakupiony. Zachowaj paragon jako dowód zakupu.