
1. Wprowadzenie
The PROEL MQ6 is a compact 6-channel mixer designed for various sound reinforcement applications. It offers a high input density, essential features, and superior audio quality in a durable, ultra-rugged case. This manual provides detailed instructions for the proper setup, operation, and maintenance of your MQ6 mixer.
2. Informacje dotyczące bezpieczeństwa
- Zasilanie: Używaj wyłącznie określonego zasilacza. Upewnij się, że napięcietage pasuje do lokalnego źródła zasilania.
- Wilgoć: Do not expose the unit to rain or moisture. Avoid placing liquids near the mixer.
- Wentylacja: Zapewnij odpowiednią wentylację. Nie blokuj otworów wentylacyjnych.
- Ciepło: Trzymaj urządzenie z dala od źródeł ciepła, takich jak grzejniki, kratki wentylacyjne, piece i inne urządzenia wytwarzające ciepło.
- Serwisowanie: Nie próbuj samodzielnie naprawiać tego produktu. Wszelkie czynności serwisowe należy powierzyć wykwalifikowanemu personelowi serwisowemu.
- Kable: Chroń przewody zasilające przed chodzeniem po nich i ich przygniataniem, zwłaszcza przy wtyczkach, gniazdkach i miejscach, w których wychodzą z urządzenia.
- Czyszczenie: Czyścić wyłącznie suchą szmatką.
3. Koniec produktuview
The PROEL MQ6 is a 6-channel compact mixer featuring 2 mono MIC/LINE inputs, 2 stereo LINE inputs, 3-band EQ on mono channels, 2-band EQ on stereo channels, and electronically balanced main outputs.

Rysunek 3.1: Góra view of the PROEL MQ6 Compact 6-Channel Mixer, showing all controls and inputs.

Rysunek 3.2: Kątowy view of the PROEL MQ6 mixer, highlighting the compact design and control layout.
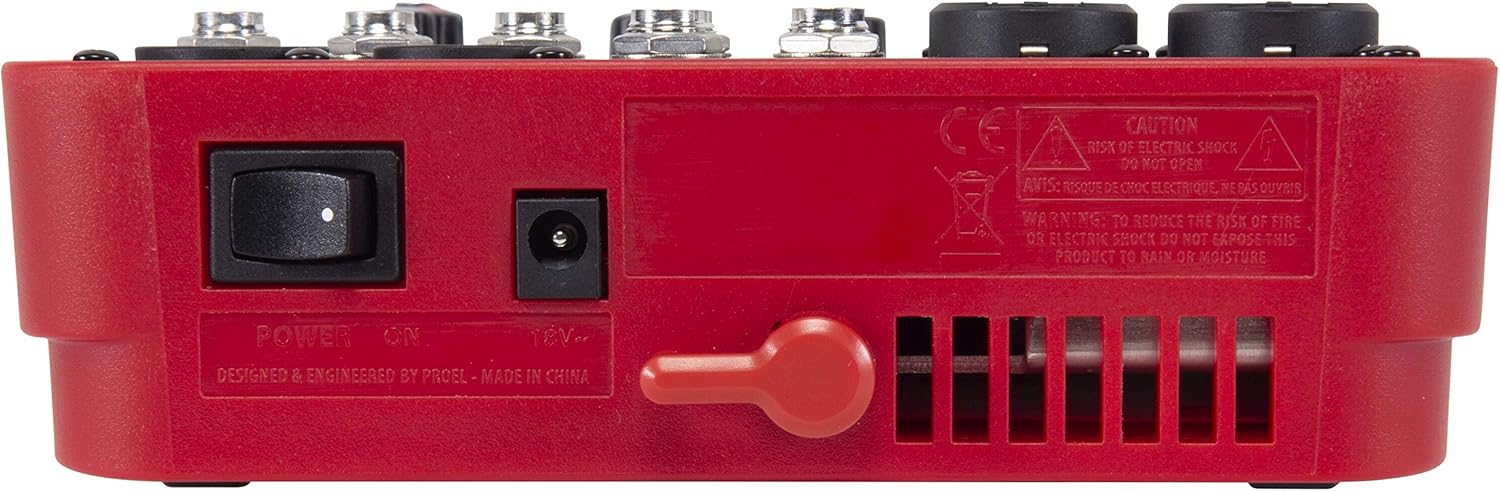
Rysunek 3.3: Tył view of the PROEL MQ6 mixer, showing the power switch and DC input.
Cechy produktu:
- 2 Mono MIC/LINE inputs with XLR/TRS combo jacks.
- 2 Stereo LINE inputs (3/4, 5/6) with TRS jacks.
- 3-Band EQ on mono channels for precise tone shaping.
- 2-Band EQ on stereo channels.
- Low-noise, high-headroom microphone preamps.
- Electronically balanced XLR MAIN MIX outputs.
- Phantom Power (+48V) for condenser microphones.
- Headphone output with dedicated level control.
PROEL MQ Series Overview Wideo
Ten film zapewnia ponadview of the PROEL MQ Series compact mixers. Please note that some features shown, such as digital effects, compressors, and USB connectivity, are available on other models within the MQ series (e.g., MQ6FX, MQ12USB, MQ16USB) and not on the MQ6 model specifically.
4. Konfiguracja
4.1 Rozpakowanie i kontrola
Carefully unpack the mixer and check for any signs of damage. Ensure all components listed in the packaging are present. If any items are missing or damaged, contact your dealer immediately.
4.2 Połączenie zasilania
- Upewnij się, że wyłącznik zasilania miksera jest w pozycji WYŁĄCZONY.
- Connect the provided power adapter to the DC input jack on the rear of the mixer.
- Podłącz zasilacz do odpowiedniego gniazdka sieciowego.
4.3 Połączenia wejściowe
The MQ6 features two types of input channels:
- Mono MIC/LINE Inputs (Channels 1-2): Use XLR cables for microphones or 1/4" TRS cables for line-level instruments (e.g., keyboards, guitars with preampS).
- Stereo LINE Inputs (Channels 3/4, 5/6): Use 1/4" TRS cables for stereo line-level sources. If connecting a mono source, use the L/MONO input.
4.4 Połączenia wyjściowe
- MAIN MIX Outputs: Podłącz główne głośniki lub zasilanie amplifier to the XLR MAIN MIX L and R outputs. These outputs are electronically balanced.
- TELEFONY Wyjście: Podłącz słuchawki do gniazda PHONES 1/4", aby monitorować urządzenie.
5. Instrukcja obsługi
5.1 Włączanie/wyłączanie
- Before powering on, ensure all channel GAIN and MIX level knobs are set to their minimum position.
- Turn on the mixer using the power switch on the rear panel.
- When powering off, first turn down all output levels, then switch off the mixer.
5.2 Channel Controls (Mono Channels 1-2)
- MIC/LINE Input: Combo jack for XLR microphones or 1/4" TRS line-level sources.
- LO CUT (75 Hz): Włącza filtr górnoprzepustowy przy częstotliwości 75 Hz w celu usunięcia niechcianych dudnień o niskiej częstotliwości.
- ZDOBYĆ: Adjusts the input sensitivity for the connected microphone or line source. Set this to achieve a strong signal without clipping (indicated by the PEAK LED).
- HI (12 kHz): Adjusts the high-frequency (treble) content of the channel.
- NISKI (80 Hz): Adjusts the low-frequency (bass) content of the channel.
- Dioda szczytowa: Zapala się, gdy sygnał wejściowy jest zbyt wysoki, wskazując na potencjalne przesterowanie. Jeśli ta dioda LED świeci się często, zmniejsz wzmocnienie.
- Pokrętło poziomu: Controls the channel's contribution to the main mix.
5.3 Channel Controls (Stereo Channels 3/4, 5/6)
- L/MONO, R LINE Inputs: 1/4" TRS jacks for stereo line-level sources. Use L/MONO for mono sources.
- HI (12 kHz): Adjusts the high-frequency (treble) content of the channel.
- NISKI (80 Hz): Adjusts the low-frequency (bass) content of the channel.
- Pokrętło poziomu: Controls the channel's contribution to the main mix.
5.4 Main Mix Section
- PHANTOM POWER ON/OFF: Activates +48V phantom power for condenser microphones connected to the XLR inputs. Ensure condenser microphones are connected before activating phantom power.
- Mierniki poziomu: Displays the output level of the main mix. Aim for levels around 0 dB to avoid clipping.
- MIX Level Knob: Steruje ogólną głośnością wyjściową głównego miksu.
- PHONES Level Knob: Reguluje głośność wyjścia słuchawkowego.
6. Konserwacja
- Czyszczenie: Use a soft, dry cloth to clean the mixer's surface. Do not use abrasive cleaners, solvents, or waxes.
- Składowanie: Jeśli mikser nie będzie używany przez dłuższy czas, należy przechowywać go w suchym i wolnym od kurzu miejscu.
- Pielęgnacja kabli: Regularly inspect all cables for damage. Replace frayed or damaged cables to prevent electrical hazards and ensure optimal performance.
- Wentylacja: Ensure the ventilation slots are clear of dust and debris to prevent overheating.
7. Rozwiązywanie Problemów
| Problem | Możliwa przyczyna | Rozwiązanie |
|---|---|---|
| Brak dźwięku |
|
|
| Zniekształcony dźwięk |
|
|
| No microphone signal |
|
|
| Buczenie lub hałas |
|
|
8. Specyfikacje
| Funkcja | Szczegół |
|---|---|
| Marka | PROEL |
| Model | MQ6 |
| Liczba kanałów | 6 |
| Wejścia audio | 2 x MIC/LINE (XLR/TRS Combo), 2 x Stereo LINE (TRS) |
| Technologia łączności | XLR, TRS |
| EQ (Mono Channels) | 3-Band (HI, LOW, LO CUT) |
| EQ (Stereo Channels) | 2-Band (HI, LOW) |
| Moc fantomowa | +48 V |
| Główne wyjścia | XLR (Electronically Balanced) |
| Wyjście słuchawkowe | 1/4" TRS |
9. Gwarancja
PROEL offers its customers a minimum of 24 (twenty-four) months warranty from the date of purchase for sound systems products. Please retain your proof of purchase for warranty claims. For detailed warranty terms and conditions, please refer to the official PROEL webodwiedź witrynę lub skontaktuj się z działem obsługi klienta.
10. Wsparcie
For technical assistance, product inquiries, or service requests, please visit the official PROEL website or contact your authorized PROEL dealer. You may also find additional resources and FAQs on their support pages.