
1. Wprowadzenie
This manual provides essential information for the safe and effective operation of your Skyking MECO-G R-2025THz Digital Auto-Ranging Clamp Meter. This True RMS meter is designed for measuring AC current up to 1000A, voltage, resistance, frequency, and temperature. Please read this manual thoroughly before use and retain it for future reference.
2. Informacje dotyczące bezpieczeństwa
To ensure safe operation and avoid damage to the meter, observe the following safety precautions:
- Always adhere to safety regulations as per GB4793-1 and IEC 61010-1. This meter is rated for CAT III 600V and CAT II 1000V.
- Nie należy przekraczać maksymalnych wartości wejściowych określonych dla każdej funkcji.
- Ensure test leads are properly connected to the correct input terminals before making any measurements.
- Inspect the meter, test leads, and accessories for any damage before each use. Do not use if damaged.
- Never attempt to measure current on circuits with voltage exceeding the meter's rating.
- Zachowaj szczególną ostrożność podczas pracy z obwodami elektrycznymi pod napięciem.
3. Koniec produktuview
The Skyking MECO-G R-2025THz is a compact and versatile digital clamp miernik. Kluczowe elementy obejmują:
- Obecny Clamp Szczęka: For non-contact AC current measurement. Features a 45mm jaw opening.
- Pokrętło funkcji obrotowych: Selects measurement functions (OFF, 1000A~, 600A~, 60A~, V, mV, Ω, Hz/Duty, Temp).
- Wyświetlacz LCD: 3 digits, 6000 counts, True RMS readings. Includes backlight for low-light conditions.
- Przyciski funkcyjne: Includes buttons for Hz/Duty, Range, and Select.
- Terminale wejściowe: Dedicated ports for 'V', 'COM', and 'Hz/°C°F Ω' test lead connections.
- Spust: Located on the side for opening the clamp szczęka.
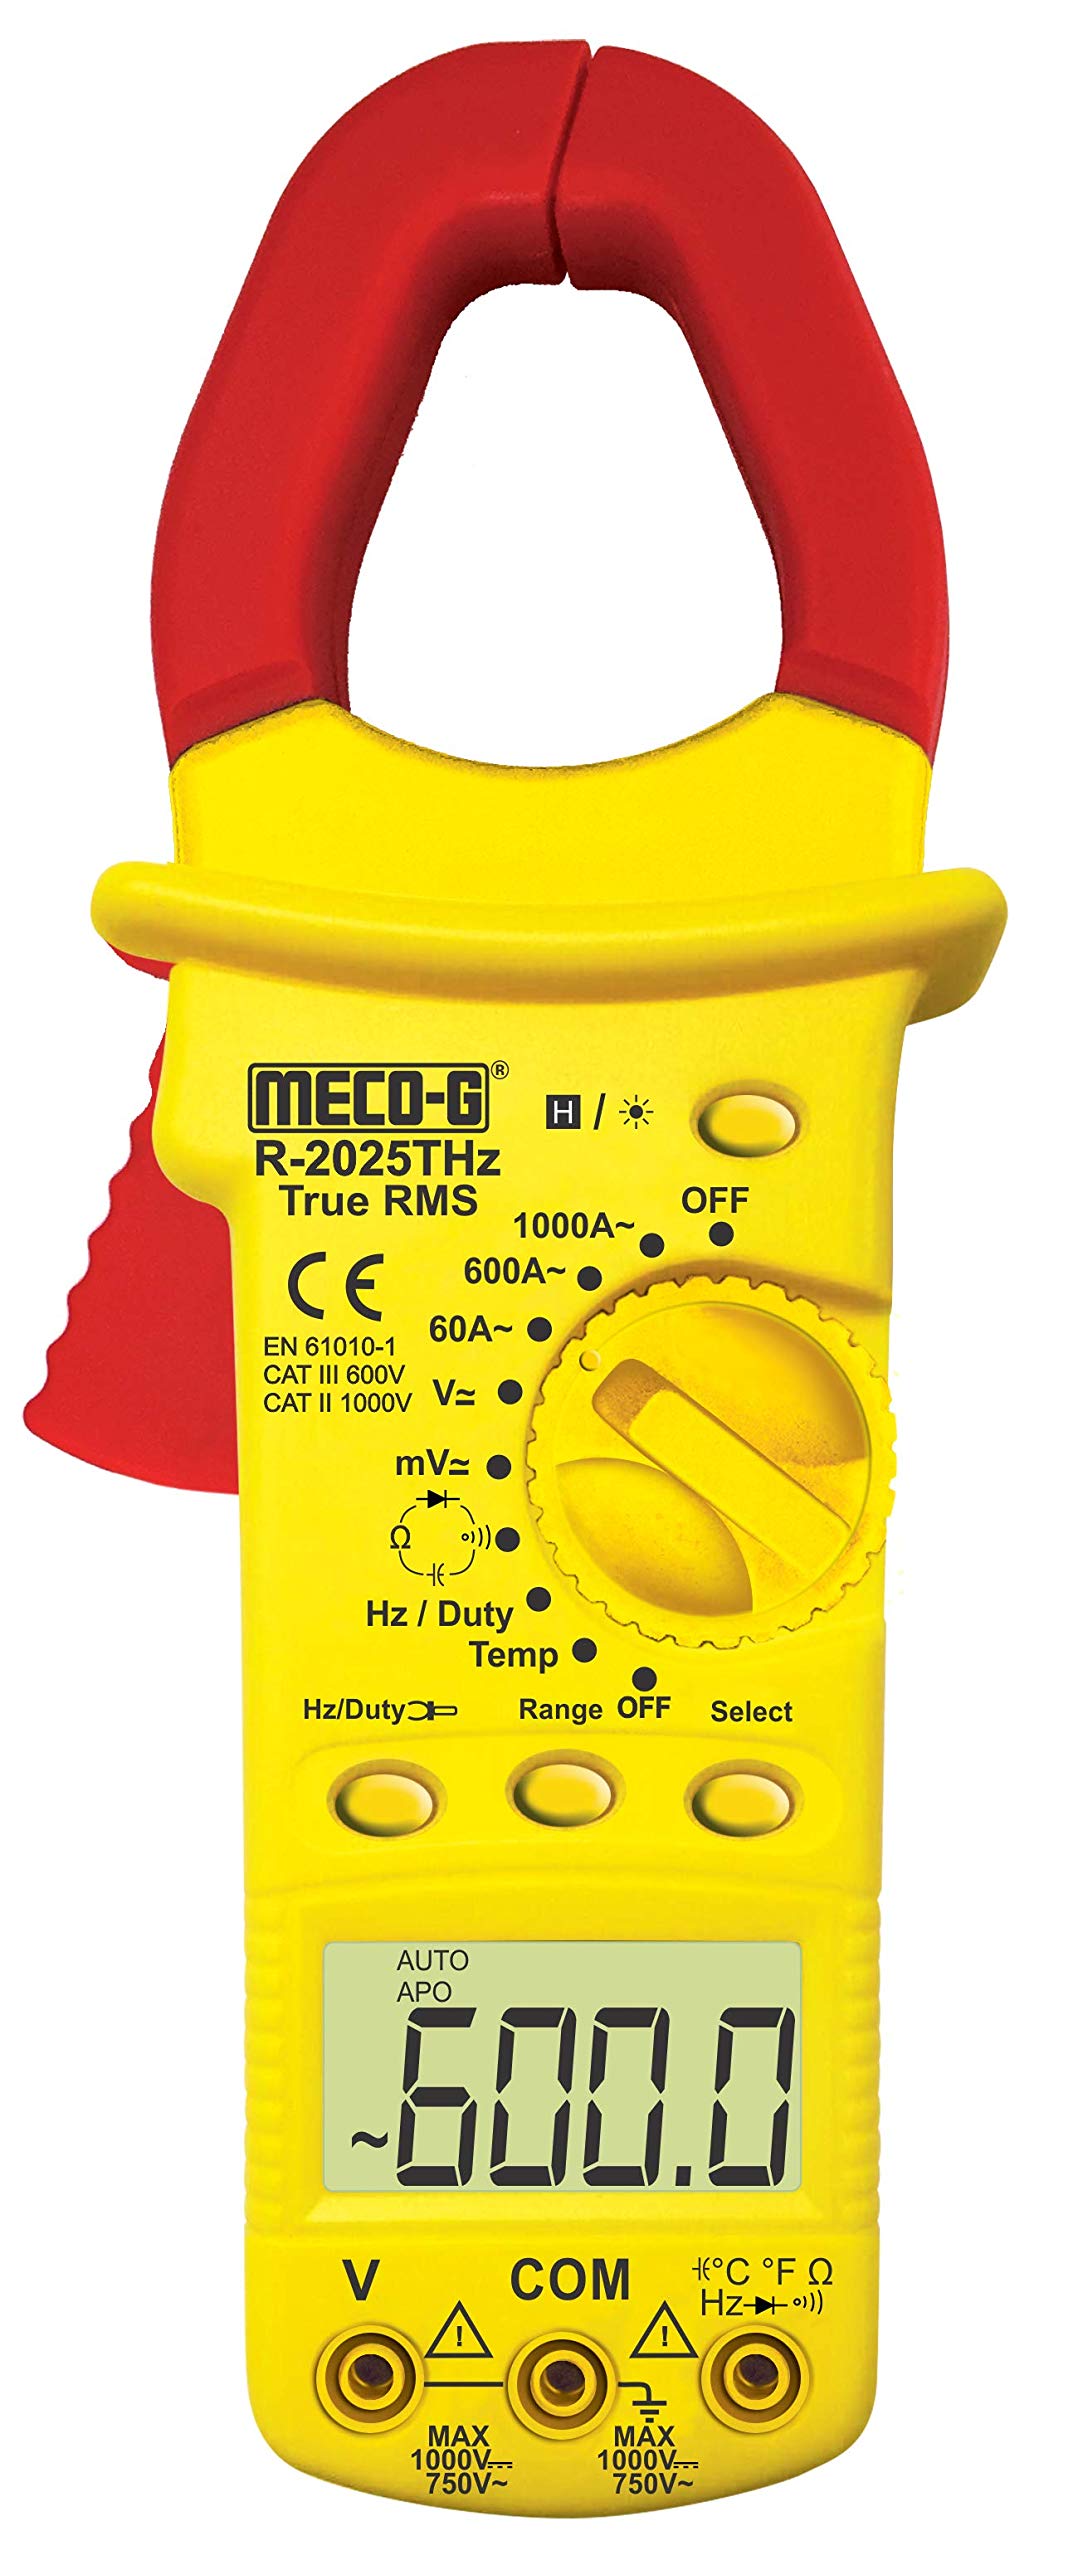
This image displays the main components of the clamp meter, including the current clamp, function selector dial, LCD display, and input jacks for test leads.
4. Konfiguracja
Przed użyciem clamp meter, perform the following setup steps:
4.1. Instalacja baterii
- Upewnij się, że miernik jest WYŁĄCZONY.
- Znajdź pokrywę komory baterii znajdującą się z tyłu miernika.
- Odkręć śrubę(y) mocującą(e) i zdejmij pokrywę.
- Insert the required batteries (not included) according to the polarity indicators inside the compartment.
- Załóż pokrywę baterii i zabezpiecz ją śrubą(ami).
4.2. Podłączanie przewodów pomiarowych
Dla voltage, resistance, frequency, and temperature measurements, connect the test leads as follows:
- Insert the red test lead into the 'V' or 'Hz/°C°F Ω' input terminal.
- Włóż czarny przewód pomiarowy do zacisku wejściowego „COM” (wspólnego).
5. Instrukcja obsługi
Aby skorzystać z różnych funkcji pomiarowych, wykonaj następujące kroki:
5.1. Włączanie/wyłączanie zasilania
Rotate the function dial from the 'OFF' position to the desired measurement function to turn the meter ON. Rotate back to 'OFF' to power down. The meter features an Auto Power-Off function after 15 minutes of inactivity.
5.2. AC Current Measurement (1000A, 600A, 60A)
- Rotate the function dial to the '1000A~', '600A~', or '60A~' position.
- Naciśnij spust, aby otworzyć clamp szczęka.
- Otocz tylko jeden przewodnik obwodu cęgamiamp szczęka. Upewnij się, że szczęka jest całkowicie zamknięta.
- Odczytaj wartość prądu przemiennego na wyświetlaczu LCD.
5.3. TomtagPomiar (V, mV)
- Podłącz przewody pomiarowe zgodnie z opisem w rozdziale 4.2.
- Rotate the function dial to the 'V' or 'mV' position.
- Dotknij sondami pomiarowymi wybranych punktów pomiarowych w obwodzie.
- Przeczytaj tomtage value on the LCD display. Use the 'Select' button to switch between AC and DC voltage jeśli dotyczy.
5.4. Pomiar rezystancji (Ω)
- Podłącz przewody pomiarowe zgodnie z opisem w rozdziale 4.2.
- Obróć pokrętło funkcji do pozycji „Ω”.
- Upewnij się, że obwód lub element poddawany testowi jest odłączony od napięcia.
- Touch the test probes across the component or circuit to measure resistance.
- Odczytaj wartość rezystancji na wyświetlaczu LCD.
5.5. Frequency / Duty Cycle Measurement (Hz/Duty)
- Podłącz przewody pomiarowe zgodnie z opisem w rozdziale 4.2.
- Rotate the function dial to the 'Hz/Duty' position.
- Touch the test probes to the desired test points.
- Press the 'Hz/Duty' button to toggle between frequency and duty cycle measurements.
- Odczytaj wartość na wyświetlaczu LCD.
5.6. Temperature Measurement (Temp)
- Connect the K-Type Thermocouple leads (included) to the 'V' and 'COM' input terminals, observing polarity.
- Rotate the function dial to the 'Temp' position.
- Umieść sondę termoparową w punkcie, w którym chcesz zmierzyć temperaturę.
- Read the temperature value on the LCD display. Use the 'Select' button to switch between Celsius (°C) and Fahrenheit (°F).
5.7. Funkcja zatrzymania danych
Press the 'Hold' button (if available, or 'Select' button may serve this function) to freeze the current reading on the display. Press it again to release the hold function.
5.8. Funkcja podświetlenia
Press the 'Back Light' button (if available, or 'Select' button may serve this function) to illuminate the LCD display for better visibility in dark environments. Press it again to turn off the backlight.
6. Konserwacja
Proper maintenance ensures the longevity and accuracy of your clamp metr:
- Czyszczenie: Wytrzyj licznik casing z reklamąamp ściereczka. Nie należy używać środków czyszczących o właściwościach ściernych ani rozpuszczalników.
- Wymiana baterii: When the low battery indicator appears on the display, replace the batteries promptly to ensure accurate readings. Refer to Section 4.1 for battery installation.
- Składowanie: If the meter is not used for an extended period, remove the batteries to prevent leakage. Store the meter in a dry environment, within the specified storage temperature range of -10°C to 50°C (14°F to 122°F).
7. Rozwiązywanie Problemów
Jeśli masz problemy z clamp miernika, zapoznaj się z poniższymi typowymi problemami i rozwiązaniami:
- Brak wyświetlacza: Check if the meter is turned ON. Verify battery installation and ensure batteries are not depleted. Replace batteries if necessary.
- Nieprawidłowe odczyty: Ensure test leads are correctly connected. Verify that the correct measurement function and range are selected. Check for any damage to the test leads or meter.
- Meter Turns Off Automatically: This is a normal function (Auto Power-Off) designed to conserve battery life. The meter will turn off after 15 minutes of inactivity. Rotate the function dial to turn it back on.
8. Specyfikacje
| Funkcja | Specyfikacja |
|---|---|
| Wyświetlacz | 3 Digits, 6000 Counts Trms |
| Automatyczny wyłącznik | 15 minut bezczynności |
| Temperatura i wilgotność robocza | 0°C ~ 40°C (32°F ~ 104°F) & ≤ 80% RH |
| Temperatura i wilgotność przechowywania | -10 ° C ~ 50 ° C (14 ° F ~ 122 ° F) |
| Przepisy bezpieczeństwa | GB4793-1, IEC 61010-1, CAT II 600V, CAT III 1000V |
| Wskaźnik niskiego poziomu naładowania baterii | Wyświetlana jest ikona baterii |
| Otwarcie szczęki | 45mm |
| Wymiary (dł. x szer. x wys.) | 140 x 70 x 35mm (Approx.) |
| Waga | 180gms. Approx (With Battery) |
| Tworzywo | Metal |
| Źródło zasilania | Zasilany bateryjnie (baterie nie są dołączone) |
| Numer modelu | R-2025THz |
9. Gwarancja i wsparcie
Aby uzyskać informacje o gwarancji lub pomocy technicznej, zapoznaj się z dokumentacją dołączoną do produktu lub skontaktuj się ze sprzedawcą. Zachowaj paragon jako dowód zakupu.


