Creality Ender-3 V2 NEO
Creality Ender 3 V2 Neo 3D Printer Instruction Manual
Model: Ender-3 V2 NEO
1. Wprowadzenie
This manual provides essential information for the safe and efficient operation of your Creality Ender 3 V2 Neo 3D Printer. Please read this manual thoroughly before operating the printer to ensure proper setup, usage, and maintenance. Retain this manual for future reference.

Rysunek 1.1: Koniecview of the Creality Ender 3 V2 Neo 3D Printer, showcasing jego projekt i jakoampwydruk.
2. Informacje dotyczące bezpieczeństwa
- Gorące powierzchnie: The print nozzle and heated bed reach high temperatures during operation. Avoid touching these components directly to prevent burns. Allow them to cool completely before handling.
- Ruchome części: The printer contains moving parts that can cause injury. Keep hands, hair, and loose clothing clear of the print head, build plate, and other moving components during operation.
- Bezpieczeństwo elektryczne: Ensure the printer is connected to a grounded power outlet. Do not operate the printer with damaged power cords or plugs. Disconnect power before performing any maintenance or assembly.
- Wentylacja: Operate the 3D printer in a well-ventilated area. Some filaments may emit fumes during printing.
- Dzieci i zwierzęta: Keep the printer out of reach of children and pets. Adult supervision is required if children are present during operation.
- Obsługa filamentu: Use only recommended filament types and diameters. Store filament in a dry environment to prevent moisture absorption.
3. Co znajduje się w pudełku
The Creality Ender 3 V2 Neo 3D Printer comes 95% pre-installed. The package typically includes the following components:
- Pre-assembled printer base and gantry
- PC Spring Steel Magnetic Build Plate
- Uchwyt szpuli z filamentem
- Kabel zasilający
- Sampwłókno
- Tool kit (wrenches, screwdrivers, pliers, spatula, nozzle cleaning needle)
- SD card and USB card reader
- Instrukcja obsługi
4. Przewodnik konfiguracji
The Ender 3 V2 Neo is designed for quick assembly, with 95% of the printer pre-installed. Follow these general steps to complete the setup:
- Attach the Gantry: Secure the pre-assembled gantry to the printer base using the provided screws. Ensure all connections are firm.
- Podłącz kable: Connect all necessary cables, including motor cables, endstop cables, and the hotend/bed heater cables, to their respective ports. Refer to the included wiring diagram for precise connections.
- Montaż uchwytu filamentu: Mount the filament spool holder onto the top of the gantry.
- Włączenie zasilania i wstępna kontrola: Connect the power cable and turn on the printer. The 4.3-inch color knob screen should illuminate.

Figure 4.1: Visual representation of the three-step assembly process for the 95% pre-installed printer.
5. Główne cechy
- CR-Touch Auto Bed Leveling: The printer is equipped with CR-Touch for automatic 16-point bed leveling. This system precisely measures the bed's surface and compensates for any deviations, simplifying the leveling process and improving first-layer adhesion.
- Full-Metal Bowden Extruder: Features a durable full-metal Bowden extruder, providing stronger extrusion force and improved filament feeding compared to plastic extruders. A rotary knob facilitates smooth filament loading and unloading.
- PC Spring Steel Magnetic Build Plate: The innovative print platform combines a PC coating, a spring steel sheet, and a magnetic sticker. The PC coating enhances filament adhesion, and finished models can be easily removed by bending the flexible print sheet.
- Silent Motherboard (32-bit 4.2.2 Version): Equipped with a self-developed silent motherboard, featuring stronger anti-interference capabilities, faster and more stable motion performance, and low decibel operation for a quieter printing environment.
- 4.3-inch Color Knob UI: The upgraded user interface includes a model preview function, allowing users to easily observe the printing shape and progress. It supports nine languages.
- Wznów funkcję drukowania: In the event of a power failure, the printer can resume printing from the last recorded position once power is restored, preventing print failures and material waste.
- Integrated Tool Drawer: A human-centered design feature, the printer includes a small drawer for convenient storage of tools and accessories.

Figure 5.1: The CR-Touch sensor performing automatic bed leveling, ensuring precision and stability.

Figure 5.2: Visual comparison highlighting the CR-Touch auto-leveling system and the full-metal Bowden extruder.

Rysunek 5.3: Eksplodowany view of the PC Spring Steel Magnetic Build Plate, showing its layered construction.

Figure 5.4: Visual comparison highlighting the PC Spring Steel Magnetic Plate and the silent motherboard's internal components.
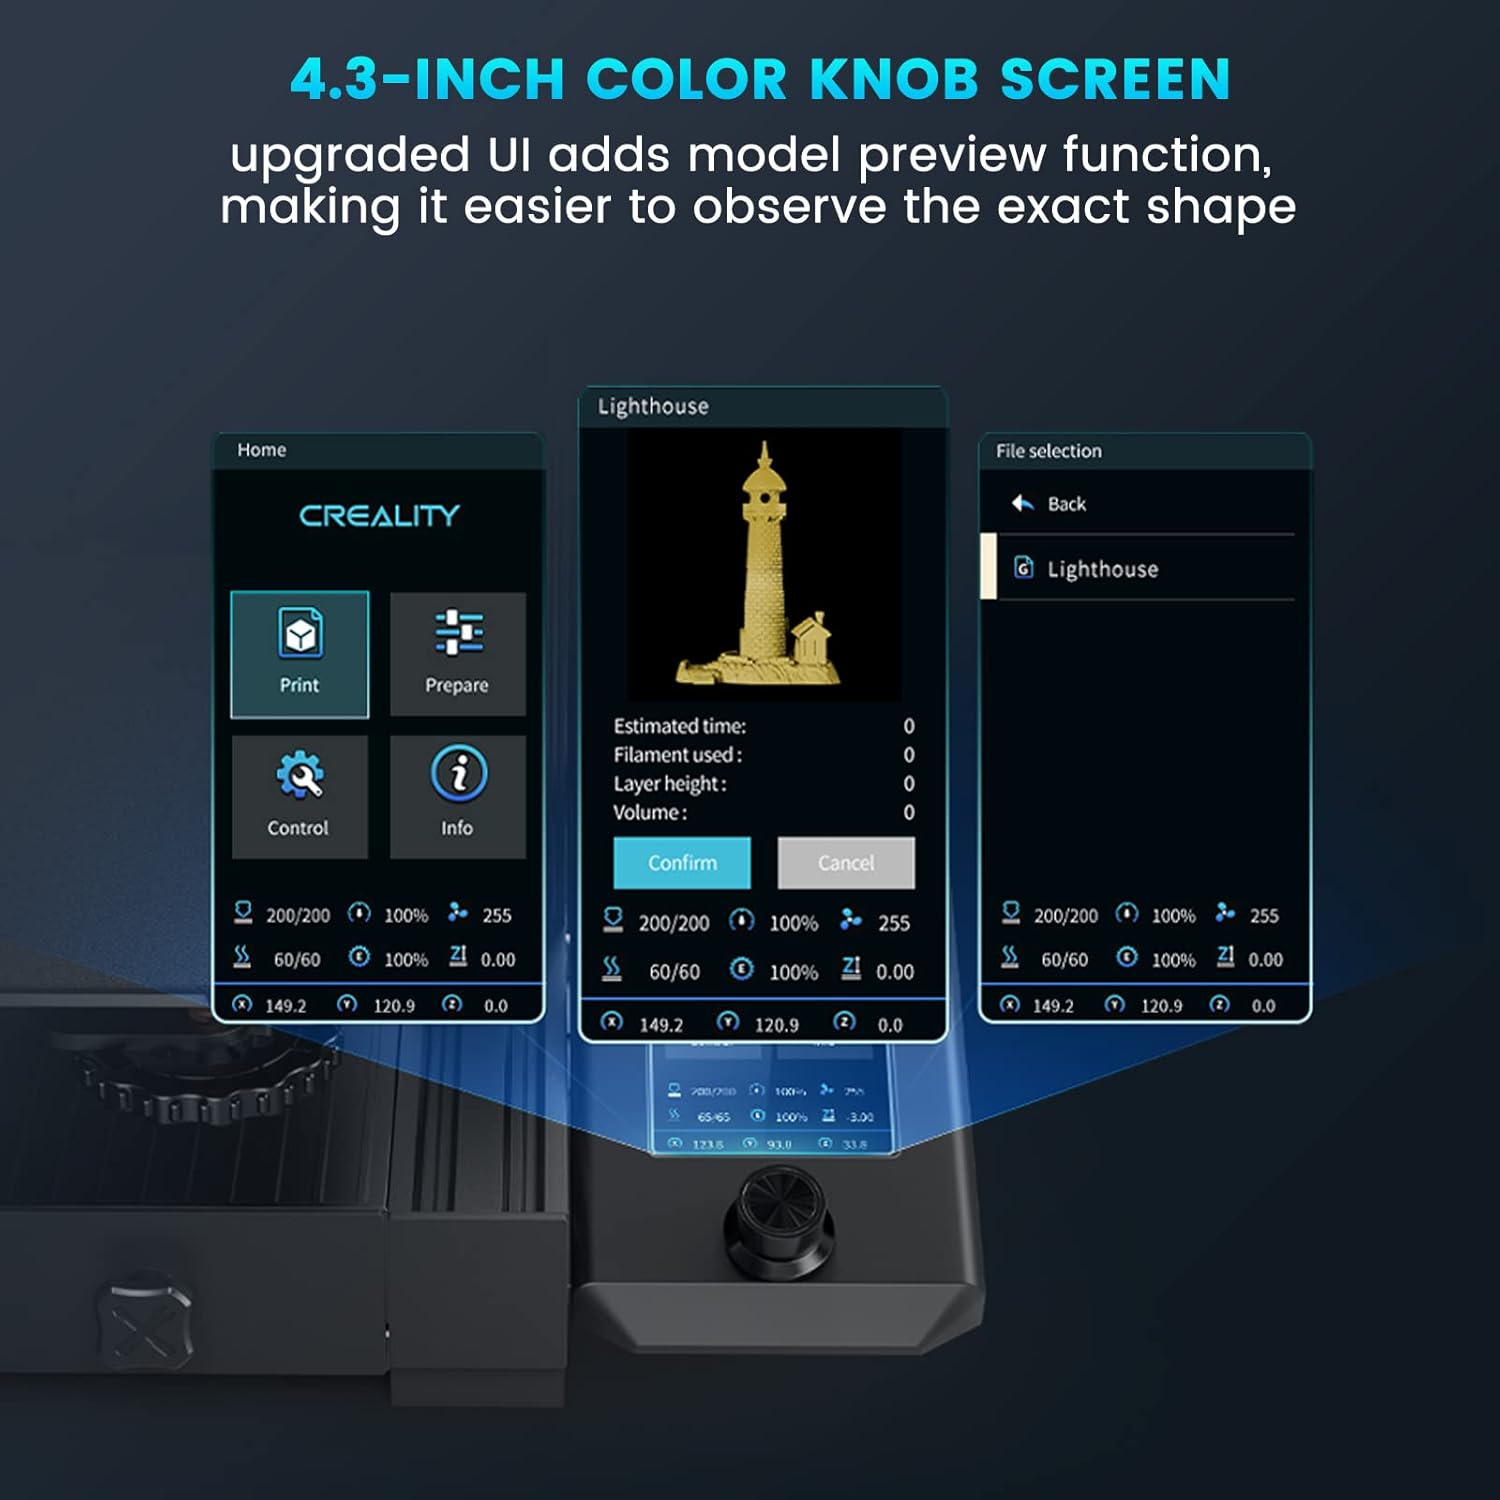
Figure 5.5: The 4.3-inch color knob screen displaying various UI elements, including a model preview.

Figure 5.6: Illustration of the resume printing function, showing a print continuing after a power interruption.

Figure 5.7: The integrated tool drawer for convenient storage of accessories.
6. Instrukcja obsługi
6.1. Ładowanie Filamentu
- Place the filament spool onto the spool holder.
- Feed the filament through the filament sensor (if present) and into the Bowden extruder.
- Press the extruder lever to open the mechanism and push the filament through the Bowden tube until it reaches the hotend.
- On the UI, navigate to 'Prepare' > 'Preheat PLA' (or appropriate filament type). Once the nozzle reaches temperature, manually push the filament further until molten plastic extrudes from the nozzle.
6.2. Bed Leveling (CR-Touch)
The CR-Touch system automates bed leveling. To initiate:
- Ensure the build plate is clean.
- On the UI, navigate to 'Level' or 'Auto Level'.
- The printer will automatically home and then probe multiple points on the build plate.
- Once complete, the printer will save the mesh data for print compensation.
6.3. Rozpoczęcie drukowania
- Prepare your 3D model using slicing software (e.g., Creality Slicer, Cura, Simplify3D) and save it as an .STL, .OBJ, or .AMF file.
- Przenieś pocięty kod G file na dostarczoną kartę SD.
- Włóż kartę SD do gniazda karty w drukarce.
- On the UI, navigate to 'Print' > 'SD Card' and select your desired G-code file.
- Confirm the print. The printer will preheat and begin printing.
6.4. Monitoring and Pausing Prints
- Monitor the first layer to ensure proper adhesion. Adjust Z-offset if necessary during the first layer.
- To pause a print, select 'Pause' from the UI. To resume, select 'Resume'.
- To stop a print, select 'Stop' from the UI. This will cancel the current print job.
7. Konserwacja
- Wyczyść płytę roboczą: After each print, allow the build plate to cool and remove the printed model. Clean the PC coating with isopropyl alcohol to ensure optimal adhesion for subsequent prints.
- Konserwacja dyszy: Regularly check the nozzle for clogs or wear. Use the provided needle to clear minor clogs. Replace the nozzle if it shows signs of significant wear or damage.
- Smarowanie ruchomych części: Periodically apply a small amount of lithium grease to the Z-axis lead screw and smooth rods to ensure smooth movement.
- Sprawdź napięcie paska: Ensure the X and Y-axis belts are properly tensioned. They should be taut but not overly tight. Adjust if necessary to prevent layer shifting or poor print quality.
- Aktualizacje oprogramowania układowego: Sprawdź oficjalne Creality website for the latest firmware updates for your model. Follow the provided instructions carefully when updating firmware.
8. Rozwiązywanie Problemów
| Problem | Możliwa przyczyna | Rozwiązanie |
|---|---|---|
| Filament not sticking to bed | Bed not level, bed too far from nozzle, dirty build plate, incorrect bed temperature. | Perform CR-Touch auto-leveling, adjust Z-offset, clean build plate with isopropyl alcohol, verify bed temperature settings. |
| Brak wytłaczania filamentu | Clogged nozzle, tangled filament, extruder gear slip, incorrect temperature. | Clear nozzle with cleaning needle, ensure filament is untangled, check extruder tension, verify nozzle temperature. |
| Słaba jakość wydruku (przesunięcie warstw, nitkowanie) | Loose belts, incorrect print speed, retraction settings, worn nozzle. | Check and tighten X/Y axis belts, adjust print speed in slicer, optimize retraction settings, replace nozzle. |
| Drukarka się nie włącza | Power cable disconnected, power supply switch off, faulty power supply. | Check all power connections, ensure power supply switch is on, contact support if issue persists. |
| Print stops mid-way (without power loss) | Corrupt SD card, faulty G-code, thermal runaway error. | Reformat SD card and re-slice model, check G-code for errors, ensure proper ventilation and temperature sensors are working. |
9. Specyfikacje

Figure 9.1: Detailed product parameters for the Ender 3 V2 Neo.
| Funkcja | Szczegół |
|---|---|
| Technologia modelowania | FDM (modelowanie osadzania stopionego materiału) |
| Objętość kompilacji | 220 × 220 × 250 mm (8.66 × 8.66 × 9.84 cala) |
| Prędkość drukowania | Maximum 120mm/s |
| Precyzja drukowania | ±0.1 mm |
| Wysokość warstwy | 0.05~0.35 mm |
| Średnica włókna | 1.75mm |
| Średnica dyszy | 0.4 mm (standard) |
| Temperatura dyszy | Do 260℃ |
| Temperatura stołu grzewczego | Do 100℃ |
| Typ wytłaczarki | Full-metal Bowden Extruder |
| Leveling Mode | CR Touch Auto-leveling |
| Wyświetlacz | 4.3" Color Knob Screen |
| Płyta główna | 32-bitowa cicha płyta główna |
| Wznów drukowanie | Tak |
| Obsługiwane włókno | PLA, PETG, ABS |
| Utrzymany File Format | STL, OBJ, AMF |
| Oprogramowanie do krojenia | Krajalnica Creality/Cura/Simplify3D |
| Metoda transmisji danych | Micro USB/TF Card |
| Masa netto | 7.8 kg (17.2 funtów) |
| Wymiary produktu | 438 × 424 × 472 mm (17.24 × 16.69 × 18.58 cala) |
| Pobór mocy (tryb włączony) | 350.0 watów |
10. Gwarancja i wsparcie
Aby uzyskać informacje dotyczące gwarancji, pomocy technicznej i zapytań serwisowych, zapoznaj się z oficjalną stroną Creality webOdwiedź stronę internetową lub skontaktuj się bezpośrednio z działem obsługi klienta. Zachowaj paragon jako dowód zakupu na wypadek reklamacji.
Oficjalny sklep Creality: Visit the Creality Store
Ask a question about this manual
Ask about setup, troubleshooting, compatibility, parts, safety, or missing instructions. Manuals+ will review the question and use this page’s manual context to help answer it.