1. Wprowadzenie
The Zerone Sport Action DV Camera is a compact and portable device designed for capturing high-definition video during various outdoor activities. Featuring 1080P and 720P recording options, a 120-degree wide-angle lens, and an IPX-4 waterproof aluminum alloy shell, this camera is built for durability and ease of use. It includes a built-in microphone for audio recording and provides vibration feedback for operational status.
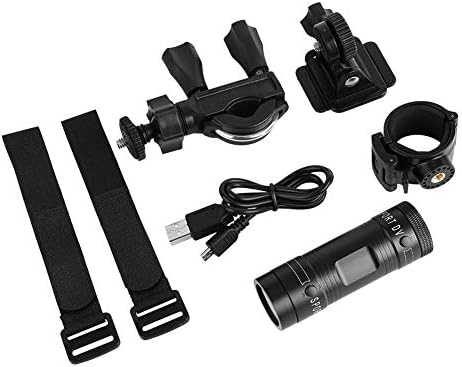
Image 1.1: The Zerone Sport Action DV Camera unit.
2. Informacje dotyczące bezpieczeństwa
- Nie wystawiaj aparatu na działanie ekstremalnych temperatur ani bezpośredniego światła słonecznego przez dłuższy czas.
- While the camera features an IPX-4 waterproof rating, it is designed to withstand splashes and light rain. Do not submerge or soak the camera in water.
- Trzymaj urządzenie z dala od silnych pól magnetycznych.
- Aby zapobiec uszkodzeniom, należy używać wyłącznie wskazanego kabla ładującego i zasilacza.
- Nie należy podejmować prób rozmontowania lub modyfikacji kamery, gdyż spowoduje to utratę gwarancji i może spowodować uszkodzenia.
- Przechowuj kamerę w suchym i chłodnym miejscu, gdy jej nie używasz.
3. Zawartość opakowania
Sprawdź przesyłkę, aby upewnić się, że znajdują się w niej wszystkie elementy:
- Zerone Sport Action DV Camera Unit
- Kabel ładujący USB
- Mounting Accessories (e.g., bike mount, helmet mount, strap mounts)
- Akumulator (może być zainstalowany fabrycznie)
- Instrukcja obsługi (ten dokument)
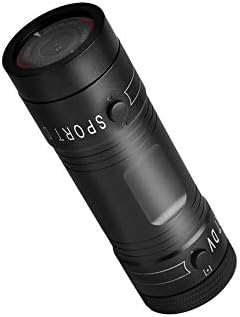
Image 3.1: Contents of the Zerone Sport Action DV Camera package, showing the camera, USB cable, and various mounting options.
4. Koniec kameryview
Zapoznaj się z podzespołami i elementami sterowania aparatu.
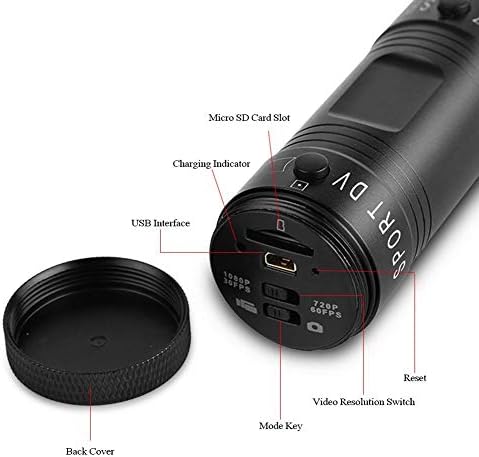
Rysunek 4.1: Szczegółowy view of the camera's rear end, highlighting the Micro SD card slot, USB interface, charging indicator, mode key, video resolution switch (1080P 30fps / 720P 60fps), and reset button.
- Gniazdo kart Micro SD: Insert your Micro SD card here. A card is required for operation.
- Wskaźnik ładowania: Displays charging status. A red light indicates charging; it turns off when fully charged.
- Interfejs USB: Do ładowania i podłączania do komputera.
- Klawisz trybu: Used to switch between recording modes (e.g., video, photo).
- Video Resolution Switch: Selects between 1080P 30fps and 720P 60fps recording resolutions.
- Przycisk resetowania: Służy do resetowania urządzenia, jeśli przestanie ono reagować.
- Power Button (Front): Located on the front side of the camera.
- Record/Stop Button (Back): Located on the back side of the camera.
5. Konfiguracja
5.1 Ładowanie akumulatora
- Connect the camera to a USB power source (e.g., computer, wall adapter) using the provided USB cable.
- Ten czerwone światło on the back of the camera will illuminate, indicating that it is charging.
- Po całkowitym naładowaniu czerwona lampka zgaśnie.
- Note: If the camera blinks red and blue when plugged in, it indicates that an SD card is not inserted. This is not a charging indicator.
5.2 Wkładanie karty Micro SD
A Micro SD card (not included) is required for recording video and photos. The camera supports Micro SD cards up to a certain capacity (check product packaging for maximum supported size, typically 32GB or 64GB for similar devices).
- Odkręć tylną pokrywę kamery.
- Locate the Micro SD card slot (refer to Image 4.1).
- Delikatnie włóż kartę Micro SD do gniazda, aż zatrzaśnie się na miejscu. Upewnij się, że karta jest prawidłowo ułożona.
- Replace the back cover, ensuring it is securely tightened to maintain water resistance.
5.3 Montaż kamery
The camera comes with various mounting accessories for different applications.
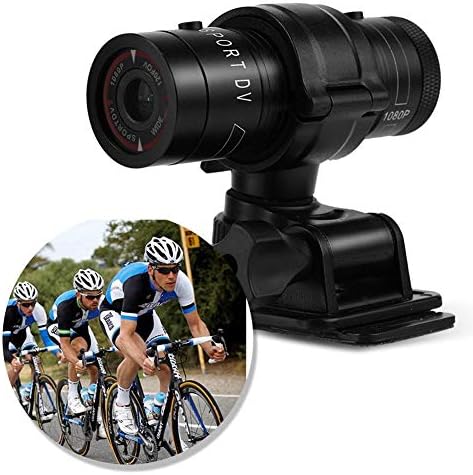
Image 5.1: The camera attached to a bicycle handlebar, demonstrating one of its mounting options.
- Uchwyt na rower: Użyj clamp mount to attach the camera securely to bicycle handlebars or other tubular structures.
- Mocowanie na hełmie: Utilize the adhesive or strap mounts to fix the camera to a helmet.
- Strap Mounts: For attaching to various gear or body parts.
Ensure all mounts are securely fastened before engaging in activities to prevent the camera from falling.
6. Obsługa aparatu
6.1 Włączanie/wyłączanie zasilania
- Aby włączyć, naciśnij i przytrzymaj Przycisk zasilania (front switch) until the camera vibrates.
- Aby wyłączyć, naciśnij i przytrzymaj Przycisk zasilania again until the camera vibrates once.
6.2 Selecting Video Resolution
Before recording, select your desired video resolution using the switch on the back of the camera (refer to Image 4.1).
- Przesuń przełącznik na "1080P 30fps" for Full HD video at 30 frames per second.
- Przesuń przełącznik na "720P 60fps" for HD video at 60 frames per second.
6.3 Nagrywanie wideo
- Upewnij się, że kamera jest włączona.
- Naciśnij Przycisk nagrywania/zatrzymania (back switch) to start recording. The camera will vibrate three times to indicate recording has started.
- Aby zatrzymać nagrywanie, naciśnij Przycisk nagrywania/zatrzymania again. The camera will vibrate once to indicate recording has stopped.
6.4 Podłączanie do komputera
Przenieść files or access recorded content:
- Sprawdź, czy kamera jest wyłączona.
- Podłącz aparat do komputera za pomocą dostarczonego kabla USB.
- The camera will be recognized as a removable storage device.
- You can then access and transfer your video files.
7. Konserwacja
- Czyszczenie: Do czyszczenia korpusu aparatu używaj miękkiej, suchej ściereczki. Do czyszczenia obiektywu użyj specjalnej ściereczki i płynu do czyszczenia obiektywów. Unikaj materiałów ściernych.
- Składowanie: When not in use for extended periods, store the camera in a cool, dry place. Ensure the battery is partially charged (around 50%) to prolong its lifespan.
- Wodoodporność: Regularly check that the back cover is securely tightened to maintain the IPX-4 water resistance. Avoid exposing the USB port or SD card slot to moisture when the cover is open.
- Pielęgnacja baterii: Avoid fully discharging the battery frequently. Recharge it when the low battery indicator appears.
8. Rozwiązywanie Problemów
| Problem | Możliwa przyczyna | Rozwiązanie |
|---|---|---|
| Kamera się nie włącza. | Bateria jest rozładowana. | Naładuj kamerę całkowicie. |
| Camera blinks red and blue, then turns off. | No Micro SD card inserted or card is faulty. | Insert a functional Micro SD card. Ensure it is properly seated. |
| Nie można nagrywać wideo. | Brak karty Micro SD, karta jest pełna lub wystąpił błąd karty. | Insert a Micro SD card, delete old files lub sformatuj kartę (spowoduje to usunięcie wszystkich danych). |
| Słaba jakość wideo. | Lens is dirty; low light conditions; incorrect resolution setting. | Clean the lens. Ensure adequate lighting. Select 1080P resolution for higher detail. |
| Kamera nie reaguje. | Błąd oprogramowania. | Użyj cienkiego przedmiotu (np. spinacza do papieru), aby nacisnąć Przycisk resetowania (refer to Image 4.1). |
9. Specyfikacje
| Funkcja | Szczegół |
|---|---|
| Marka | Zerone |
| Numer modelu | Zeronefg3h149y2s |
| Rozdzielczość przechwytywania wideo | 1080p (30 kl./s), 720p (60 kl./s) |
| Kąt obiektywu | 120-degree A+ grade wide-angle |
| Stopień wodoodporności | IPX-4 (splash-proof) |
| Materiał skorupy | Stop aluminium |
| Technologia czujnika fotograficznego | CMOS |
| Maksymalna apertura | 1.8 milimetrów |
| Typ pamięci flash | Micro SD (card not included) |
| Format przechwytywania wideo | Plik AVI |
| Obsługiwany format audio | AAC, MP3, PCM, FLAC, or Dolby Digital/AC-3 |
| Technologia łączności | USB |
| Waga przedmiotu | 10.8 uncji (około 306 gramów) |
| Wymiary produktu | 11.81 x 6.3 x 5.91 cala (ok. 30 x 16 x 15 cm) |
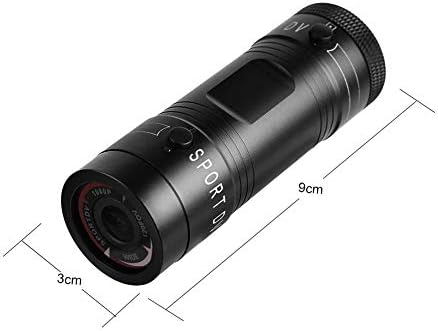
Image 9.1: Physical dimensions of the camera, showing a length of 9cm and a diameter of 3cm.
10. Gwarancja i wsparcie
Aby uzyskać informacje dotyczące gwarancji i wsparcia technicznego, zapoznaj się z dokumentacją dołączoną do produktu lub skontaktuj się bezpośrednio ze sprzedawcą/producentem. Zachowaj dowód zakupu na wypadek roszczeń gwarancyjnych.
Manufacturer: Zerone
For further assistance, you may visit the Zerone Store on Amazon: Zerone Store