1. Wprowadzenie
1.1 Produkt powyżejview
The Necchi EX100 is a versatile sewing machine designed for various projects, including quilting, garment construction, and home decor. It features a user-friendly interface for direct stitch selection and enhanced visibility with wide-angle LED lighting. An included extension table provides ample workspace for larger projects.
Główne cechy:
- 100 Built-in Stitches, including 6 Buttonholes
- Szpulka z pełnym obrotowym chwytakiem ładowana od góry
- Easy Convenience Buttons: Start/Stop, Reverse, Locking Stitch, Needle Up/Down, Automatic Thread Cutter
- Maximum Stitch Width: 7mm
- Included 16" x 11" Extension Table and Optic Magnifier

Figure 1.1: The Necchi EX100 Sewing Machine with its extension table attached, showcasing jego konstrukcji i podstawowych komponentów.
2. Konfiguracja
2.1 Rozpakowanie
Carefully remove the sewing machine and all accessories from the packaging. Retain the original packaging for future storage or transport. Ensure all components listed in the packing list are present.
2.2 Połączenie zasilania
Connect the AC adapter to the machine's power input jack, then plug the adapter into a standard electrical outlet. Ensure the power switch is in the 'OFF' position before connecting.
2.3 Mocowanie stołu rozkładanego
To attach the extension table, slide its mounting tabs into the corresponding slots on the free arm of the sewing machine until it clicks securely into place. This provides a larger, flat work surface.

Figure 2.1: The Necchi EX100 with the extension table properly installed, expanding the work area.
2.4 Nawijanie szpulki
- Nawiń szpulkę nici na trzpień szpulki.
- Przeprowadź nić przez górny prowadnik nici i wokół tarczy naprężającej szpulkę.
- Załóż pustą szpulkę na wrzeciono nawijacza szpulki.
- Owiń nić wokół szpulki kilka razy zgodnie z ruchem wskazówek zegara.
- Przesuń wrzeciono nawijacza szpulki dolnej w prawo.
- Press the Start/Stop button to begin winding. The machine will stop automatically when the bobbin is full.
- Odetnij nić i przesuń wrzeciono nawijacza szpulki w lewo.
2.5 Nawlekanie maszyny
- Podnieś stopkę i igłę do najwyższej pozycji.
- Nawiń szpulkę nici na trzpień szpulki.
- Postępuj zgodnie z numerowaną ścieżką nawlekania wskazaną na maszynie, upewniając się, że nić przechodzi przez wszystkie prowadnice i dźwignię podnoszącą.
- Use the automatic needle threader for easy needle threading, or thread manually from front to back.
- Włóż nawiniętą szpulkę do bębenka pod płytkę ściegową i upewnij się, że nić jest prawidłowo podawana.

Rysunek 2.2: Szczegółowy view of the Necchi EX100's control panel and the upper threading path, highlighting key operational areas.
3. Instrukcja obsługi
3.1 Podstawowe sterowanie
- Przycisk Start/Stop: Initiates and halts sewing without the foot controller.
- Przycisk cofania: Sews in reverse to secure stitches at the beginning and end of seams.
- Locking Stitch Button: Creates a neat, secure locking stitch at the end of a seam.
- Przycisk podnoszenia/opuszczania igły: Positions the needle either fully up or fully down, useful for pivoting fabric.
- Automatyczny obcinacz nici: Trims both upper and bobbin threads with a single press.

Figure 3.1: Close-up of the Necchi EX100's convenience buttons, including Start/Stop, Reverse, Locking Stitch, Needle Up/Down, and Automatic Thread Cutter.
3.2 Wybór ściegu
The EX100 offers 100 built-in stitches, including 6 types of buttonholes. Use the direct stitch selection interface on the machine's front panel to choose your desired stitch. Refer to the stitch chart for visual guidance.
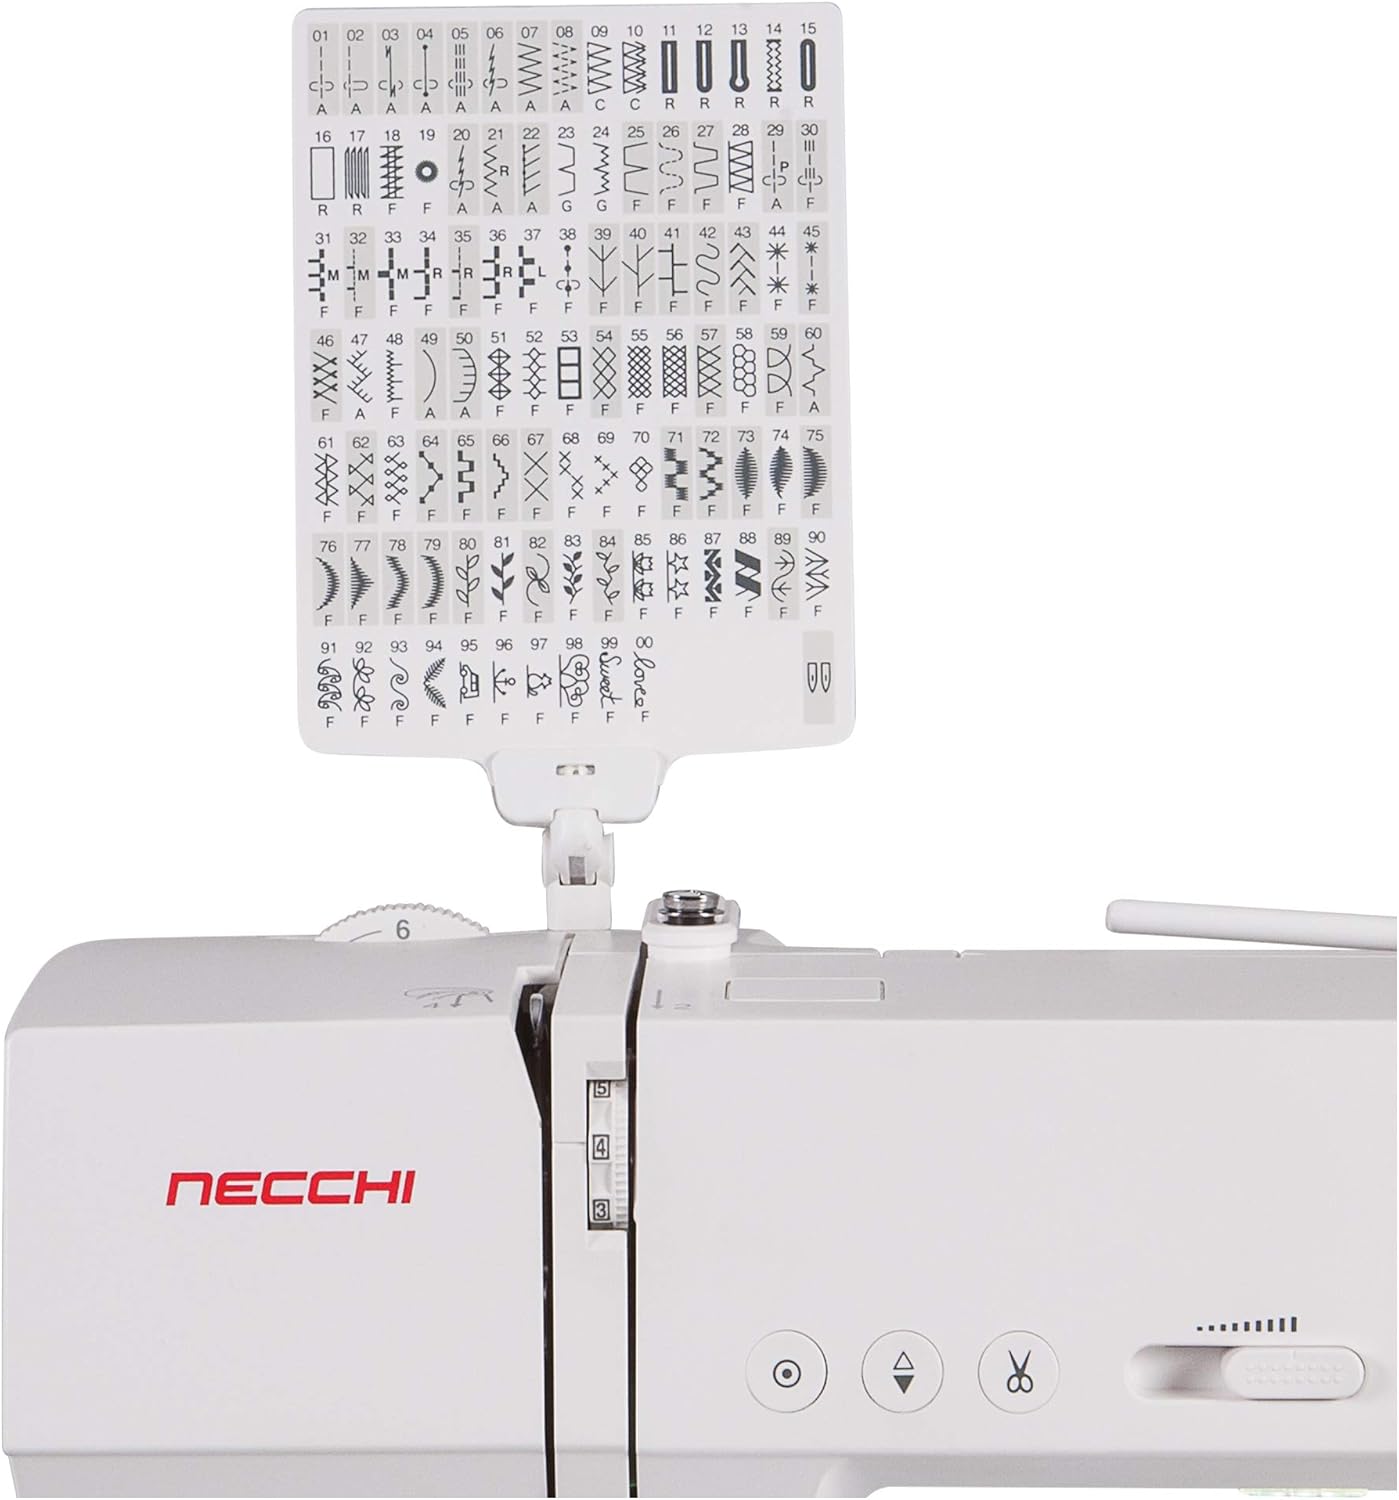
Figure 3.2: The comprehensive stitch chart for the Necchi EX100, displaying all 100 built-in stitch patterns and their corresponding numbers.
3.3 Regulacja ustawień ściegu
The machine allows adjustment of stitch length and width. The maximum stitch width is 7mm. Consult the display panel and your manual for specific instructions on modifying these settings for different stitch types and fabric requirements.
3.4 Using the Optic Magnifier
The included optic magnifier can be attached to the machine to provide enhanced visibility for intricate sewing tasks or for users with vision challenges. Position it directly over the needle area for optimal viewing.
4. Konserwacja
4.1 Czyszczenie
Regularly clean the bobbin area, feed dogs, and needle plate to remove lint and thread buildup. Use a small brush and avoid compressed air, which can push debris further into the machine. Ensure the machine is unplugged before cleaning.
4.2 Wymiana igły
Change the needle frequently, especially after 8-10 hours of sewing or if it becomes bent or dull. Use the correct needle type and size for your fabric. Loosen the needle clamp screw, remove the old needle, insert the new needle with the flat side facing the back, and tighten the screw securely.
5. Rozwiązywanie Problemów
This section addresses common issues you might encounter during operation. For more complex problems, refer to the full service manual or contact customer support.
| Problem | Możliwa przyczyna | Rozwiązanie |
|---|---|---|
| Pominięte ściegi | Niewłaściwa igła, wygięta igła, nieprawidłowe nawlekanie. | Replace needle with correct type/size, re-thread machine, ensure needle is fully inserted. |
| Zrywanie wątku | Improper threading, incorrect tension, damaged needle, poor quality thread. | Re-thread machine, adjust tension, replace needle, use good quality thread. |
| Nierówne ściegi | Incorrect tension, wrong needle for fabric, lint in bobbin case. | Adjust tension, change needle, clean bobbin case. |
| Maszyna nie uruchamia się | Power cord not connected, power switch off, bobbin winder engaged. | Check power connections, turn power switch on, disengage bobbin winder. |
6. Specyfikacje
| Funkcja | Szczegół |
|---|---|
| Marka | Necchi |
| Numer modelu | EX100 |
| Kolor | Biały |
| Tworzywo | Metal, Plastik |
| Waga przedmiotu | 23.79 funtów |
| Źródło zasilania | Zasilacz sieciowy |
| Wbudowane ściegi | 100 (including 6 buttonholes) |
| Maksymalna szerokość ściegu | 7mm |
| Stół rozkładany | Included (16" x 11") |
| Cechy specjalne | Optic Magnifier, Automatic Thread Cutter, Needle Up/Down, Start/Stop Button |
7. Gwarancja i wsparcie
7.1 Informacje o gwarancji
The Necchi EX100 Sewing Machine comes with the following warranty:
- 1 year labor
- 25 year housing/casting
- 5 year electronics
Proszę zachować dowód zakupu na potrzeby roszczeń gwarancyjnych.
7.2 Obsługa klienta
For technical assistance, troubleshooting beyond this manual, or warranty service, please contact Necchi customer support. Refer to the contact information provided with your product packaging or visit the official Necchi webstrona zawierająca aktualne szczegóły pomocy technicznej.