1. Ważne informacje dotyczące bezpieczeństwa
Please read this instruction manual carefully before using the appliance and save it for future reference. Incorrect use may result in electric shock, fire, or serious injury.
- To urządzenie jest przeznaczone wyłącznie do użytku domowego. Nie używać na zewnątrz ani na mokrych powierzchniach.
- Nie pozwalaj dzieciom obsługiwać odkurzacza. W przypadku korzystania z niego w pobliżu dzieci wymagany jest ścisły nadzór.
- Nie należy zbierać łatwopalnych lub wybuchowych cieczy, takich jak benzyna, ani używać urządzenia w miejscach, w których mogą one występować.
- Nie zbieraj palących się lub dymiących przedmiotów, np. papierosów, zapałek lub gorącego popiołu.
- Nie używać bez założonego pojemnika na kurz i/lub filtrów.
- Turn off the appliance before connecting or disconnecting the motorized brush, crevice tool, or square brush.
- Do ładowania należy używać wyłącznie ładowarki dostarczonej przez producenta.
- Nie obsługuj ładowarki ani urządzenia mokrymi rękami.
2. Koniec produktuview
The Princess 339490 Rapido Cordless Stick Vacuum Cleaner is designed for efficient cleaning of various surfaces. It features a powerful motor, a removable battery, and multiple attachments for versatile use.
Zawartość zestawu:
- Princess Rapido Cordless Vacuum Unit
- Stacja ładowania montowana na ścianie
- Narzędzie do szczelin
- Pędzel kwadratowy
- Akumulator litowo-jonowy
- Main Brush Head (Motorized)
- lampowy
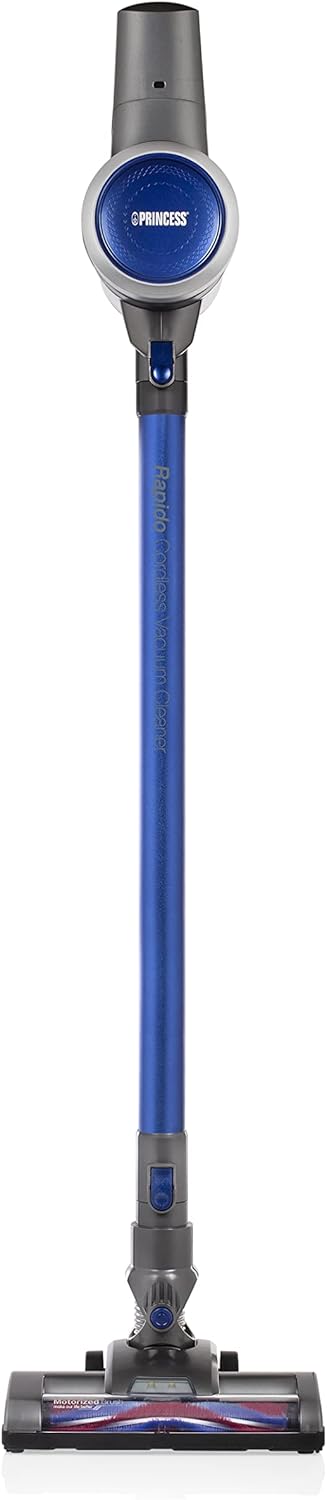
Rycina 2.1: Przód view of the Princess 339490 Rapido Cordless Stick Vacuum Cleaner.

Rysunek 2.2: Kątowy view of the Princess 339490 Rapido Cordless Stick Vacuum Cleaner, showing its sleek design.

Figure 2.3: Close-up of the motorized brush head, designed for effective cleaning on various floor types.

Figure 2.4: The vacuum unit configured as a handheld cleaner with the crevice tool attached, ideal for tight spaces.
3. Konfiguracja
3.1 Montaż
- Attach the Vacuum Tube: Insert the vacuum tube into the main vacuum unit until it clicks securely into place.
- Zamontuj głowicę szczotki głównej: Connect the motorized brush head to the other end of the vacuum tube, ensuring it locks firmly.
- Zainstaluj baterię: Slide the Li-ion battery pack into the designated slot on the main vacuum unit until it clicks. Ensure it is fully seated.

Figure 3.1: Proper insertion of the Li-ion battery pack into the main vacuum unit.
3.2 Ładowanie
Before first use, fully charge the battery for approximately 4 hours.
- Montaż stacji ładującej: Secure the wall-mounted charging station in a convenient location near a power outlet.
- Place the Vacuum: Hang the assembled vacuum cleaner on the charging station. Ensure the charging contacts align.
- Podłącz do zasilania: Plug the charging station into a standard electrical outlet.
- Ładowanie monitora: The charging indicator light on the vacuum unit will illuminate during charging. It will change color or turn off when fully charged.
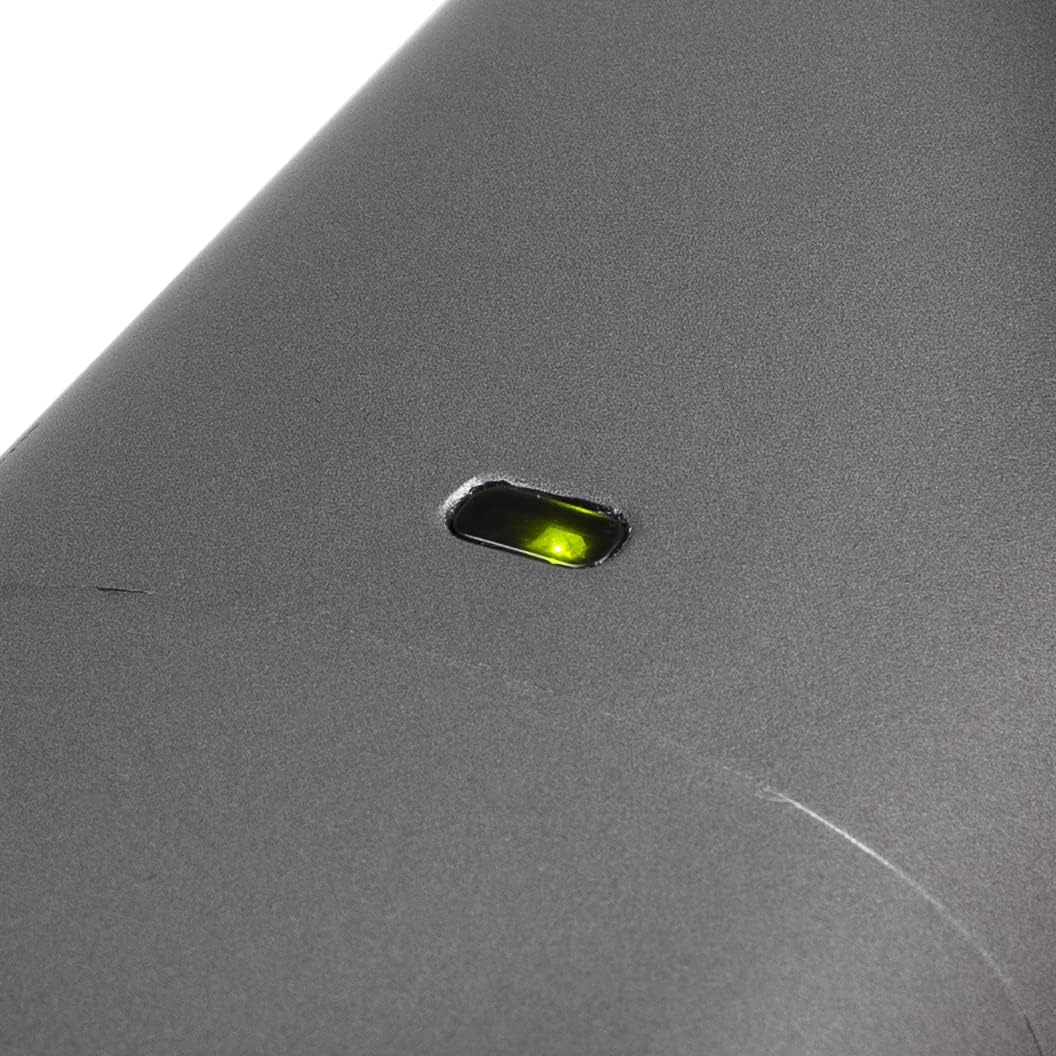
Figure 3.2: The charging indicator light, which shows the charging status of the battery.
4. Instrukcja obsługi
4.1 Włączanie/wyłączanie
To turn the vacuum cleaner on, press the power button located on the handle. Press it again to turn off the appliance.

Figure 4.1: The handle and trigger mechanism for operating the vacuum cleaner.
4.2 Używanie jako odkurzacza ręcznego
With the vacuum tube and main brush head attached, the appliance functions as a stick vacuum, suitable for floors and carpets. The luxury brush head is designed to transition smoothly between hard floors and carpets without needing to change attachments.
4.3 Używanie jako odkurzacza ręcznego
To convert to a handheld vacuum, detach the vacuum tube and main brush head from the main unit. You can then attach the crevice tool or square brush directly to the main vacuum unit for cleaning stairs, upholstery, or car interiors.
Figure 4.2: The main unit used as a handheld vacuum with the crevice tool for detailed cleaning.
4.4 Czas pracy baterii
The fully charged Li-ion battery provides approximately 32 minutes of continuous operation, allowing you to clean an entire floor without interruption.
5. Konserwacja
Regularna konserwacja zapewnia optymalną wydajność i wydłuża żywotność odkurzacza.
5.1 Opróżnianie pojemnika na śmieci
The dustbin should be emptied regularly, especially when the MAX line is reached.
- Upewnij się, że odkurzacz jest wyłączony.
- Hold the main unit over a waste bin.
- Naciśnij przycisk zwalniający pojemnik na kurz, aby otworzyć dolną klapę i opróżnić zawartość.
- Zamknij klapkę dokładnie, aż usłyszysz kliknięcie.

Figure 5.1: The transparent dustbin showing the HEPA filter inside, indicating the MAX fill line.
5.2 Czyszczenie filtra HEPA
The removable HEPA filter should be cleaned periodically to maintain suction power.
- Wyłącz odkurzacz i wyjmij pojemnik na kurz.
- Ostrożnie wyjmij filtr HEPA ze kosza na śmieci.
- Delikatnie postukaj filtrem o kosz na śmieci, aby usunąć luźny kurz.
- W razie potrzeby opłucz filtr pod bieżącą zimną wodą. Przed ponownym włożeniem upewnij się, że jest całkowicie suchy.
- Reassemble the filter and dustbin, then attach to the main unit.
5.3 Czyszczenie wałka szczotkowego
Okresowo sprawdzaj, czy w obrotowej szczotce silnikowej nie ma splątanych włosów lub zanieczyszczeń.
- Ensure the vacuum cleaner is turned off and disconnected from the charging station.
- Detach the main brush head from the vacuum tube.
- Locate the release mechanism for the brush roll (refer to diagrams in the full manual if needed).
- Zdejmij szczotkę obrotową i ostrożnie usuń wszelkie splątane włosy lub włókna za pomocą nożyczek.
- Włóż ponownie szczotkę obrotową i zabezpiecz ją na miejscu.
6. Rozwiązywanie Problemów
If you encounter issues with your Princess 339490 Rapido, refer to the following common problems and solutions:
| Problem | Możliwa przyczyna | Rozwiązanie |
|---|---|---|
| Odkurzacz się nie włącza | Akumulator nie jest naładowany lub nie został prawidłowo zainstalowany. | Ensure battery is fully charged and correctly inserted. Check charging station connection. |
| Niska moc ssania | Dustbin full, filter clogged, or blockage in the tube/brush head. | Empty dustbin. Clean HEPA filter. Check for and remove any blockages in the tube or brush head. |
| Szczotka rolkowa się nie obraca | Hair or debris tangled in the brush roll, or brush head not properly attached. | Clean the brush roll of any obstructions. Ensure the brush head is securely attached to the tube. |
| Krótki czas pracy baterii | Akumulator nie jest w pełni naładowany lub jego zużycie jest znaczne. | Ensure battery is fully charged (4 hours). If runtime remains significantly reduced, the battery may need replacement. |
7. Specyfikacje
- Numer modelu: 01.339490.01.001
- Moc: 130 watów
- Tomtage: 22.2 wolty
- Typ baterii: Litowo-jonowy
- Czas pracy baterii: Do 32 minut
- Czas ładowania: Około 4 godzin
- Pojemność na kurz: 0.8 litrów
- Typ filtra: HEPA, Cartridge
- Poziom hałasu: 70 decybeli
- Wymiary (dł. x szer. x wys.): Wymiary 109 x 22 x 23 cm
- Waga: 2.6 kilogramów
- Cechy szczególne: Cordless, Bagless, Handheld conversion, Motorized brush head
8. Gwarancja i wsparcie
8.1 Informacje o gwarancji
The Princess 339490 Rapido Cordless Stick Vacuum Cleaner comes with a 24-miesięczna gwarancja producenta from the date of purchase. This warranty covers defects in materials and workmanship under normal household use. It does not cover damage resulting from misuse, neglect, accident, alteration, or improper maintenance.
Proszę zachować dowód zakupu na potrzeby roszczeń gwarancyjnych.
8.2 Obsługa klienta
For technical assistance, warranty claims, or to order replacement parts, please contact Princess customer support:
- Webstrona: www.princesshome.eu/en-gb/service
- E-mail: support@princesshome.eu
- Telefon: Refer to your regional Princess webstrona z lokalnymi numerami kontaktowymi.