
KitVision KVOBS72
KitVision Observer 720p Dash Cam User Manual
Model: KVOBS72
Wstęp
The KitVision Observer 720p Dash Cam is designed to record your journeys, providing a reliable record of events on the road. This device features automatic recording upon vehicle ignition, loop recording to manage storage efficiently, and a built-in G-sensor for collision detection. It also includes motion detection and parking mode functionalities for enhanced surveillance. Footage może być ponownieviewed on the integrated 2.45-inch LCD screen.
Cechy produktu
- Automatyczne nagrywanie: Starts recording automatically when the vehicle is powered on.
- Nagrywanie w pętli: Ciągłe nagrywanie, nadpisując najstarsze odblokowane footage to ensure memory card space is utilized efficiently.
- Czujnik G: Wykrywa nagłe uderzenia lub kolizje i automatycznie blokuje bieżący obraz wideo.tage aby zapobiec jego nadpisaniu.
- Detekcja ruchu: Records when motion is detected in front of the camera, useful for monitoring while parked.
- Tryb parkowania: Provides surveillance when the vehicle is parked.
- Wideo HD 720p: Records video at 720p resolution and 30 frames per second.
- Obiektyw szerokokątny 140 stopni: Przechwytuje szeroki view drogi.
- 2.45-calowy ekran LCD: Allows for immediate playback and menu navigation.
- Technologia WDR (szeroki zakres dynamiki): Enhances video quality in varying light conditions, improving night and day recording.
- 5-Megapixel Photo Mode: Captures still images for detailed documentation.
Zawartość opakowania
Proszę zaznaczyć pole dotyczące następujących elementów:
- KitVision Observer 720p Dash Cam
- Mocowanie przyssawki
- Ładowarka samochodowa
- Kabel USB
- Instrukcja obsługi
- Memory card (may be sold separately)

Image: KitVision Observer 720p Dash Cam and its retail packaging.
Przewodnik po konfiguracji
1. Instalacja
Attach the suction cup mount to a clean, dry area on your windshield, ideally behind the rearview lustro, aby nie zasłaniać view. Ensure the camera lens has a clear line of sight to the road ahead. Secure the mount by pressing the suction cup firmly against the glass and engaging the locking mechanism.
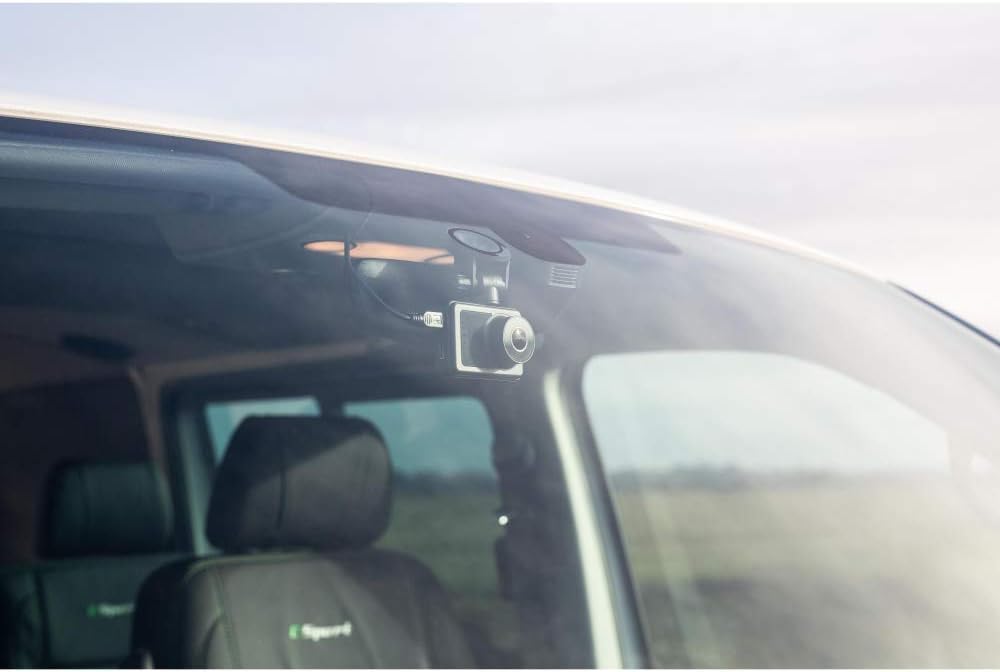
Image: Dash Cam installed on a car windshield, showing optimal placement.
2. Wkładanie karty Micro SD
Locate the Micro SD card slot on the side of the dash cam. Insert a compatible Micro SD card (up to 32GB, Class 10 or higher recommended) into the slot until it clicks into place. Ensure the card is inserted correctly to prevent damage.

Obraz: Tył view of the dash cam, highlighting the screen and control buttons. The Micro SD card slot is typically on the side.
3. Włączanie
Connect the car charger to the dash cam's power input port and plug the other end into your vehicle's 12V power outlet (cigarette lighter socket). The dash cam will typically power on automatically when your vehicle starts and begin recording.

Obraz: Bok view of the dash cam, illustrating the USB and HDMI ports for power and connectivity.
Instrukcja obsługi
1. Podstawowe nagrywanie
Once powered on, the dash cam will automatically start recording. A recording indicator (e.g., a flashing red dot or icon) will appear on the screen. To manually stop/start recording, press the designated record button (refer to your device's button layout).
2. Nagrywanie w pętli
Kamera samochodowa nagrywa wideo w pętli (np. 1-, 3- lub 5-minutowe segmenty). Po zapełnieniu karty pamięci, najstarszy odblokowany film jest zapisywany. fileNagrania zostaną nadpisane nowymi. Zapewnia to ciągłość nagrywania bez konieczności ręcznej ingerencji.
3. Czujnik G (nagrywanie awaryjne)
The built-in G-sensor detects sudden acceleration, braking, or collisions. When triggered, it automatically locks the current video segment, preventing it from being overwritten by loop recording. These locked files are typically stored in a separate folder on the SD card.
4. Detekcja ruchu
When enabled in the settings, motion detection allows the dash cam to start recording automatically if it detects movement in its field of view while the vehicle is parked. This feature requires continuous power or a sufficiently charged internal battery.
5. Tryb parkowania
Parking mode, when activated, provides surveillance when your vehicle is parked. It often works in conjunction with the G-sensor or motion detection to record incidents while the car is stationary. Ensure your dash cam has a power source (e.g., hardwired kit) for extended parking mode use.
6. Odtwarzanie
Aby ponownieview nagrano footage, stop recording (if active) and enter playback mode via the menu options. Use the navigation buttons to browse through files and select a video to watch on the 2.45-inch LCD screen. You can also remove the Micro SD card and view filena komputerze.

Obraz: Przód view of the dash cam, showing the screen displaying live road footage.
Konserwacja
1. Czyszczenie
Wipe the camera lens and screen periodically with a soft, lint-free cloth. Do not use abrasive cleaners or solvents, as these can damage the surfaces. Ensure the suction cup mount is clean for optimal adhesion.
2. Przechowywanie
If storing the dash cam for an extended period, remove the Micro SD card and store the device in a cool, dry place away from direct sunlight and extreme temperatures. Fully charge the internal battery before storage to maintain its lifespan.
Rozwiązywanie problemów
| Problem | Możliwe rozwiązanie |
|---|---|
| Kamera samochodowa nie włącza się. | Check the car charger connection to both the dash cam and the vehicle's power outlet. Ensure the vehicle's power outlet is functioning. The internal battery may be depleted; charge it for a few hours. |
| Nagrywanie zostaje nieoczekiwanie przerwane. | The Micro SD card may be full. Ensure loop recording is enabled. The card may be faulty or too slow; try formatting the card or using a new Class 10 (or higher) Micro SD card. |
| Wideotage jest niewyraźne lub niejasne. | Clean the camera lens. Ensure the protective film has been removed from the lens. Check if the camera is securely mounted and not vibrating. |
| Suction cup mount does not stick. | Clean both the windshield and the suction cup thoroughly. Ensure the surface is dry. Apply slight moisture to the suction cup before pressing firmly and engaging the lock. Warm the suction cup slightly if in cold conditions. |
| Czujnik G jest zbyt czuły/niewystarczająco czuły. | Dostosuj ustawienia czułości czujnika G w menu kamery samochodowej. |
| Data i godzina są nieprawidłowe. | Set the correct date and time in the dash cam's system settings. |
Dane techniczne
- Marka: KitVision
- Nazwa modelu: KVOBS72
- Rozdzielczość przechwytywania wideo: 720p (1280x720)
- Szybkość klatek: 30 klatek na sekundę
- Format wideo: MP4
- Rozdzielczość zdjęcia: 5 megapiksela
- Pole View: 140 stopnia
- Rozmiar ekranu: 2.45 cali
- Typ wyświetlacza: LCD
- Składowanie: Supports Micro SD cards up to 32GB (Class 10 recommended)
- Cechy szczególne: Motion Detection, Night Vision, G-Sensor, WDR
- Typ montażu: Mocowanie przyssawki
- Źródło zasilania: Car Charger (12V), Internal Lithium-Ion Battery
- Kolor: Czarny
- Waga przedmiotu: 56 gramów
Informacje o gwarancji
This product is covered by a standard manufacturer's warranty. Please refer to the warranty card included in your package or visit the official KitVision webSzczegółowe warunki gwarancji i roszczeń można znaleźć na stronie internetowej.
Obsługa klienta
For technical assistance, troubleshooting, or further inquiries, please contact KitVision customer support. Contact details can typically be found on the product packaging, the official KitVision webmiejscu lub karcie gwarancyjnej.
Ask a question about this manual
Ask about setup, troubleshooting, compatibility, parts, safety, or missing instructions. Manuals+ will review the question and use this page’s manual context to help answer it.