
1. Wprowadzenie
Thank you for choosing the himaly Mini Exercise Bike US-X1368. This portable pedal exerciser is designed for both arm and leg workouts, offering a convenient way to maintain fitness at home or in the office. It features adjustable resistance and an LCD display to track your progress. Please read this manual thoroughly before use to ensure proper assembly, operation, and maintenance.
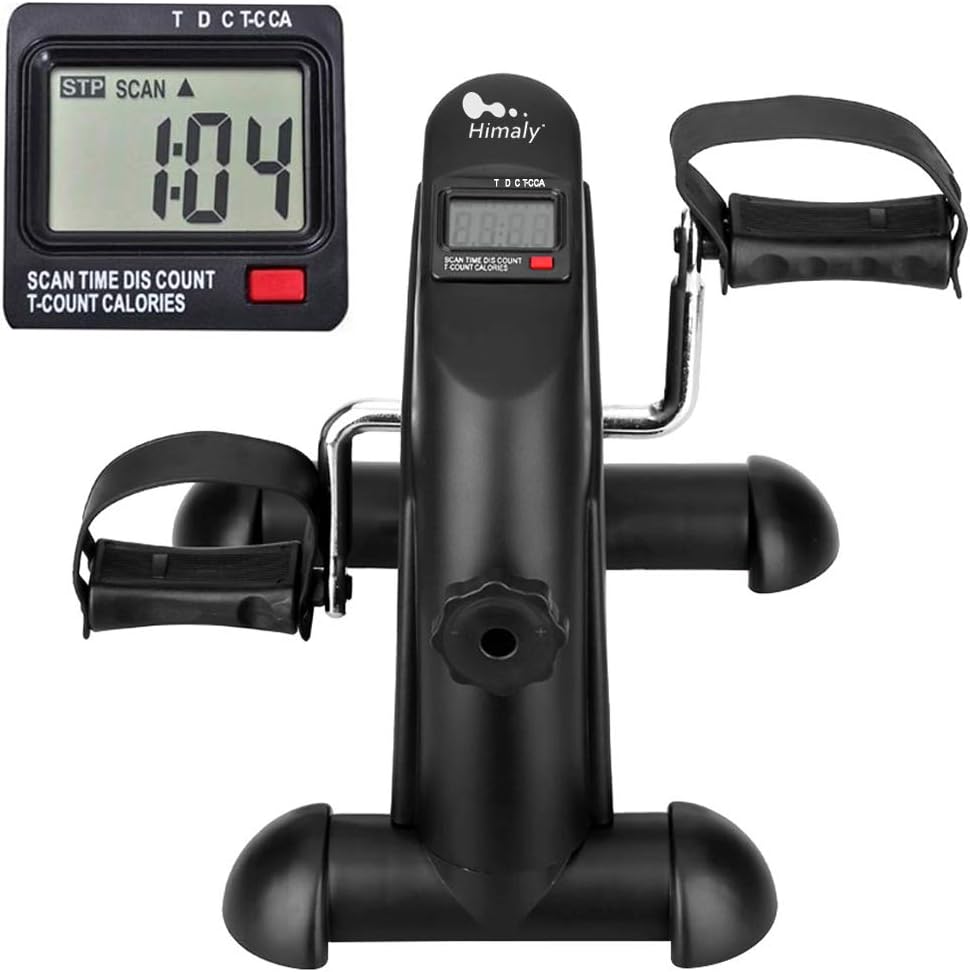
Rysunek 1.1: Nadview of the himaly Mini Exercise Bike US-X1368, showing the main unit, pedals, and integrated LCD monitor.
2. Informacje dotyczące bezpieczeństwa
- Przed rozpoczęciem jakiegokolwiek programu ćwiczeń skonsultuj się z lekarzem.
- Podczas użytkowania trzymaj dzieci i zwierzęta z dala od urządzenia.
- Place the exerciser on a stable, flat surface. Use the provided anti-slip mat to prevent movement during exercise.
- Przed każdym użyciem należy upewnić się, że wszystkie części są solidnie zmontowane.
- Nie stawaj na pedałach. Urządzenie jest przeznaczone wyłącznie do użytku w pozycji siedzącej.
- Natychmiast przerwij ćwiczenia, jeśli poczujesz ból, zawroty głowy lub dyskomfort.
- Nie należy podejmować prób modyfikacji sprzętu.
3. Zawartość opakowania
Sprawdź, czy w opakowaniu znajdują się wszystkie komponenty:
- 1 x himaly Mini Exercise Bike Main Unit
- 2 x Pedals (left and right)
- 1 x mata antypoślizgowa
- 1 x Securing Strap
- 1 x Instrukcja obsługi (ten dokument)
- Necessary assembly tools (usually an Allen wrench and spanner)
4. Montaż i konfiguracja
The himaly Mini Exercise Bike is designed for easy assembly. Follow these steps:
- Rozpakuj wszystkie elementy i umieść je na czystej, płaskiej powierzchni.
- Attach the front and rear stabilizers to the main unit using the provided bolts and tools. Ensure they are firmly secured.
- Identify the left (L) and right (R) pedals. The pedals are typically threaded differently. Screw the left pedal counter-clockwise and the right pedal clockwise into their respective crank arms. Tighten them securely with a spanner.
- Insert the battery into the LCD monitor if not pre-installed.
- Place the anti-slip mat under the exerciser to prevent it from sliding during use.
- For enhanced stability, especially on smooth floors, use the provided securing strap. Pass the strap under the base of the exerciser, loop it around the base, and buckle it up to secure the unit to a chair leg or other stable object.

Rysunek 4.1: Instructions for using the securing strap to stabilize the mini exercise bike.
5. Instrukcja obsługi
5.1. Regulacja oporu
The himaly Mini Exercise Bike features adjustable resistance to customize your workout intensity. Locate the resistance knob on the front of the main unit. Turn the knob clockwise to increase resistance, making pedaling harder, and counter-clockwise to decrease resistance, making pedaling easier. Adjust the resistance to a level that provides a challenging yet comfortable workout.

Rysunek 5.1: The adjustable resistance knob for controlling workout intensity.
5.2. Funkcje wyświetlacza LCD
Zintegrowany monitor LCD śledzi dane dotyczące treningu. Wyświetla następujące wskaźniki:
- CZAS: Czas trwania aktualnej sesji ćwiczeń.
- LICZYĆ: Total number of pedal rotations during the current session.
- KALORIE: Szacunkowa liczba kalorii spalonych podczas bieżącej sesji.
- DYSTANS: Estimated distance covered (in meters) during the current session.
- LICZBA T: Total accumulated count of pedal rotations across all sessions (resettable).
Press the red button on the LCD monitor to cycle through the display modes. The 'SCAN' feature will automatically display each metric in sequence for a few seconds. To reset the current session data, press and hold the red button for a few seconds.

Rysunek 5.2: The LCD display showing different workout metrics.
6. Zalecenia dotyczące użytkowania
6.1. Leg Exercise (Under Desk Use)
Place the mini exercise bike on the floor in front of your chair. Ensure you have adequate space for your legs to pedal comfortably. For under-desk use, a minimum clearance of 13 inches from your knee to the underside of the table is recommended to avoid hitting your knees. Use the anti-slip mat and securing strap for stability.

Rysunek 6.1: Example of using the mini exercise bike for leg exercise under a desk.

Rysunek 6.2: Recommended height clearance for under-desk operation.
6.2. Ćwiczenie ramion
Place the mini exercise bike on a stable table or desk. Sit comfortably in front of it and grasp the pedals with your hands. Adjust the resistance to a suitable level and begin rotating the pedals with your arms. This provides an effective upper body workout.

Rysunek 6.3: Using the mini exercise bike for arm exercise.
7. Konserwacja
- Czyszczenie: Wyczyść ćwiczącego za pomocą reklamyamp Ściereczkę po każdym użyciu. Nie używaj środków czyszczących o działaniu ściernym ani rozpuszczalników.
- Składowanie: Przechowywać urządzenie w chłodnym, suchym miejscu, z dala od bezpośredniego światła słonecznego i ekstremalnych temperatur.
- Kontrola: Periodically check all bolts and connections to ensure they are tight. Tighten if necessary.
- Wymiana baterii: If the LCD display becomes dim or unresponsive, replace the battery (typically a AAA battery).
8. Rozwiązywanie Problemów
| Problem | Możliwa przyczyna | Rozwiązanie |
|---|---|---|
| Exerciser slides during use | Not on a stable surface; anti-slip mat not used; insufficient securing. | Ensure unit is on a flat, stable surface. Use the anti-slip mat. Utilize the securing strap to anchor the unit to a chair or table leg. |
| Wyświetlacz LCD jest pusty lub przyciemniony | Bateria jest rozładowana lub nieprawidłowo zainstalowana. | Wymień baterię. Upewnij się, że jest włożona z zachowaniem prawidłowej polaryzacji. |
| Pedały są luźne lub chwiejne | Pedals not tightened sufficiently during assembly. | Re-tighten the pedals using a spanner. Ensure correct threading (left pedal counter-clockwise, right pedal clockwise). |
| Nietypowy dźwięk podczas pracy | Luźne elementy; tarcie wewnętrzne. | Sprawdź i dokręć wszystkie widoczne śruby i połączenia. Jeśli hałas nadal występuje, przerwij użytkowanie i skontaktuj się z obsługą klienta. |
9. Specyfikacje

Rysunek 9.1: Product dimensions for the himaly Mini Exercise Bike.
- Model: US-X1368
- Marka: Himalaje
- Tworzywo: Plastik, stal stopowa
- Wymiary produktu (dł. x szer. x wys.): 40.6 cm x 35.1 cm x 32 cm (15.98 cala x 13.8 cala x 12.6 cala)
- Waga przedmiotu: 3.45 kg (7.6 funta)
- Maksymalna waga użytkownika: 150 kilogramów
- Typ wyświetlacza: LCD
- Rodzaj sterowania: Pokrętło
- Liczba poziomów oporu: 8
- Tryb działania: Podręcznik
- Układ napędowy: Pasek
- Cechy szczególne: Przenośny
10. Gwarancja i wsparcie
The himaly Mini Exercise Bike US-X1368 comes with a standard manufacturer's warranty. For specific warranty details, claims, or technical support, please refer to the warranty card included with your product or contact himaly customer service through the retailer where the product was purchased. Please have your model number (US-X1368) and purchase date available when contacting support.