Wstęp
This manual provides detailed instructions for the installation, setup, and operation of your JVC KD-X260BT Digital Media Receiver. This unit is designed to provide high-quality audio playback and hands-free communication in your vehicle, featuring Bluetooth connectivity, USB input, and a 13-band equalizer. Please note, this unit does not play CDs. Read this manual thoroughly before use to ensure proper operation and to prevent damage.

Obraz: Przód view of the JVC KD-X260BT Digital Media Receiver, showing the display and control buttons.
Informacje dotyczące bezpieczeństwa
- Do not operate the unit in a way that distracts you from driving. Always keep your attention on the road.
- Ensure proper wiring connections to prevent short circuits or damage to the vehicle's electrical system.
- Unikaj wystawiania urządzenia na działanie wilgoci i ekstremalnych temperatur.
- Nie próbuj demontować ani modyfikować urządzenia. Wszelkie prace serwisowe zlecaj wykwalifikowanemu personelowi.
- Use only accessories specified by JVC.
Zawartość opakowania
Sprawdź, czy w opakowaniu znajdują się wszystkie elementy:
- Cyfrowy odbiornik multimedialny JVC KD-X260BT
- Wiązka przewodów
- Zewnętrzny mikrofon przewodowy
- Sprzęt montażowy
- Instrukcja obsługi (ten dokument)
Instalacja
Professional installation is recommended for this product. Incorrect installation can lead to damage to the unit or vehicle. The KD-X260BT features a short body design, which facilitates easier installation in various vehicle dashboards.
Połączenia elektryczne:
- Connect the wiring harness according to your vehicle's wiring diagram.
- Aby zapobiec zwarciom, należy upewnić się, że wszystkie połączenia są solidne i zaizolowane.
- Connect the external microphone to the designated input for hands-free calling. Position the microphone in a location that provides clear voice pickup.
- Podłącz kabel antenowy.
- Jeśli używasz zewnętrznego amplifiers, connect the 2.5V preamp outputs (rear/subwoofer selectable).
Montowanie:
- Zamontuj tuleję montażową w otworze deski rozdzielczej.
- Wsuń odbiornik do tulei montażowej, aż zatrzaśnie się na miejscu.
- Załóż pierścień ozdobny.
Organizować coś
Pierwsze włączenie:
After installation, turn on your vehicle's ignition. The unit should power on. Follow any on-screen prompts for initial setup, such as language selection.
Parowanie Bluetooth:
The KD-X260BT supports Bluetooth 3.0+EDR and allows for two phones to be connected full-time. This enables receiving calls from either phone with a push of a key.
- On the receiver, navigate to the Bluetooth menu.
- Wybierz „Parowanie” lub „Wyszukiwanie urządzeń”.
- Włącz Bluetooth na swoim smartfonie i wyszukaj dostępne urządzenia.
- Select "KD-X260BT" from the list on your phone.
- Jeśli zostaniesz o to poproszony, potwierdź kod parowania na obu urządzeniach.
- Once paired, the unit will display a confirmation.
The unit supports Bluetooth profiles HFP (Hands-Free Profile 1.6 for wideband speech), HSP (Headset Profile), PBAP (Dostęp do książki telefonicznej Profile), A2DP (zaawansowana dystrybucja audio Profile) i AVRCP (Audio/Video Remote Control Profile 1.5).
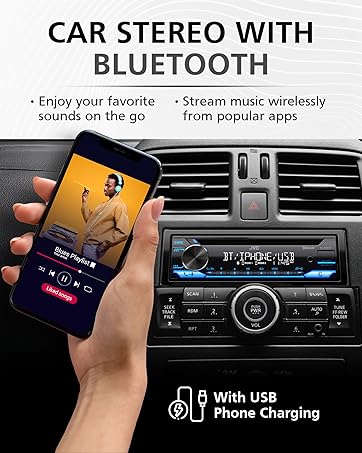
Image: JVC KD-X260BT display indicating Bluetooth connection, with a smartphone showing music playback, illustrating wireless audio streaming.
Aplikacja JVC Remote:
Download the "JVC Remote" app (available for iOS and Android) to control the receiver's source directly from your smartphone using simple finger gestures.
Instrukcja obsługi
Podstawowe sterowanie:
- Przycisk zasilania: Naciśnij, aby włączyć/wyłączyć urządzenie.
- Pokrętło głośności: Rotate to adjust the volume level. Press to access menu options.
- Przycisk źródła: Press to cycle through available audio sources (Tuner, USB, Bluetooth Audio, AUX).
- Przycisk wyświetlacza: Changes display information (e.g., clock, track title).
Tuner radiowy:
- Press the Source button to select "Tuner" (AM/FM).
- Użyj przycisków wyszukiwania, aby znaleźć stacje radiowe.
- Press and hold a preset button (1-6) to store a station.
Odtwarzanie z USB:
Connect a USB device to the front USB port. The unit supports MP3/WMA/WAV/FLAC playback. The USB port also provides high current 1.5A charging for smartphones.
- Insert the USB device. The unit will automatically switch to USB source and begin playback.
- Use the track buttons to skip tracks.
- Use the folder buttons to navigate through folders.
- MP3ID3 Tag Display (title/artist/album) is supported.
- Android music playback (AOA 2.0) is supported for Android phones (version 4.1 or later).
Przesyłanie strumieniowe dźwięku przez Bluetooth:
Once a Bluetooth device is paired, select "Bluetooth Audio" as the source to stream music wirelessly. Use the receiver's controls or the paired device to manage playback (play, pause, skip, search via AVRCP 1.5).
Rozmowy bez użycia rąk:
When a call comes in on a paired phone, the unit will display the caller ID. Press the call button to answer, and the end call button to hang up. The external microphone ensures clear communication.
Audio Settings (Equalizer):
The unit features a 13-Band Graphic Equalizer with 10 preset EQ settings and 1 user-customizable setting. Access the audio menu to adjust:
- Korektor: Select from preset curves or customize your own.
- Wzmocnienie basów: Enhances low frequencies.
- Głośność: Compensates for perceived loss of bass and treble at low volumes.
- Balans/Fader: Adjusts sound distribution between left/right and front/rear speakers.
- Sterowanie subwooferem: Adjust subwoofer output level and frequency if connected.
Internet Radio/Digital Radio Control:
Control Pandora, iHeartRadio, and Spotify directly from the receiver when connected to a compatible Android device via Bluetooth.
Zdalne sterowanie z kierownicy:
Factory steering wheel control functions can be retained with a third-party adapter (sold separately).
Konserwacja
- Czyszczenie urządzenia: Do przecierania panelu przedniego należy używać miękkiej, suchej ściereczki. Nie należy używać środków czyszczących o właściwościach ściernych ani rozpuszczalników.
- Port USB: Utrzymuj port USB w czystości, bez kurzu i zanieczyszczeń.
- Aktualizacje oprogramowania układowego: Check the JVC website periodically for any available firmware updates for improved performance and features.
Rozwiązywanie problemów
| Problem | Rozwiązanie |
|---|---|
| Brak zasilania | Check vehicle's fuse. Ensure wiring harness is correctly connected. |
| Brak dźwięku | Check speaker connections. Verify volume level. Ensure correct source is selected. |
| Bluetooth nie łączy się | Ensure Bluetooth is enabled on both devices. Delete previous pairing and re-pair. Move devices closer. |
| Urządzenie USB nie zostało rozpoznane | Ensure USB device is formatted correctly (FAT16/32). Check for compatible file typy. Wypróbuj inne urządzenie USB. |
| Słaby odbiór radia | Check antenna connection. Ensure antenna is fully extended (if applicable). |
Specyfikacje
| Funkcja | Szczegół |
|---|---|
| Numer modelu | KD-X260BT |
| Moc wyjściowa (szczytowa) | 50 W x 4 kanały |
| Moc wyjściowa (RMS) | 22 W x 4 kanały |
| Wyświetlacz | VA LCD Display, Spanish Text Display |
| Wejście USB | Front USB, 1.5A Charging, MP3/WMA/WAV/FLAC Playback, Android AOA 2.0 |
| Wejście pomocnicze | 3.5mm Front Audio Auxiliary Input |
| Wersja Bluetooth | 3.0+EDR Certified |
| BluetoothProfiles | HFP 1.6, HSP, PBAP, A2DP, AVRCP 1.5 |
| Wyrównywacz | 13-Band Graphic Equalizer (10 Preset x 1 User) |
| Przedamp Wyjścia | 1 Set of 2.5V (Rear/Subwoofer Selectable) |
| Sterowanie radiem internetowym | Pandora, Spotify, iHeartRadio (for Android) |
| Wymiary (produkt) | 4 x 9 x 8 cala |
| Waga przedmiotu | 1.79 funta |
Gwarancja i wsparcie
This JVC KD-X260BT Digital Media Receiver comes with a 1-Year Manufacturer's Warranty. For warranty claims, technical support, or service inquiries, please contact JVC customer support or visit the official JVC webZachowaj dowód zakupu w celu potwierdzenia gwarancji.
Obsługa klienta JVC: Refer to the contact information provided with your product packaging or on the official JVC webstrona.