Wstęp
Dziękujemy za zakupasing the CAMRY CR 1153 Digital Radio. This manual provides important information regarding the safe operation, setup, and maintenance of your device. Please read these instructions thoroughly before use and retain them for future reference.
The CAMRY CR 1153 is a modern digital radio featuring a classic design with a wooden finish. It includes an alarm clock, thermometer, and calendar functions, making it a versatile addition to any room. It can be powered by mains electricity or batteries for portable use.
Ważne instrukcje bezpieczeństwa
- Przed przystąpieniem do obsługi urządzenia przeczytaj wszystkie instrukcje.
- Trzymaj urządzenie z dala od wody i wilgoci.
- Do not expose to direct sunlight, heat sources, or extreme temperatures.
- Zapewnij odpowiednią wentylację, nie blokuj otworów wentylacyjnych.
- Należy używać wyłącznie wskazanego zasilacza lub baterii.
- Nie próbuj samodzielnie demontować ani naprawiać urządzenia. Wszelkie czynności serwisowe zlecaj wykwalifikowanemu personelowi.
- Clean the device with a soft, dry cloth. Avoid abrasive cleaners.
- Baterie należy utylizować zgodnie z lokalnymi przepisami.
Produkt ponadview
Familiarize yourself with the components of your CAMRY CR 1153 Digital Radio.
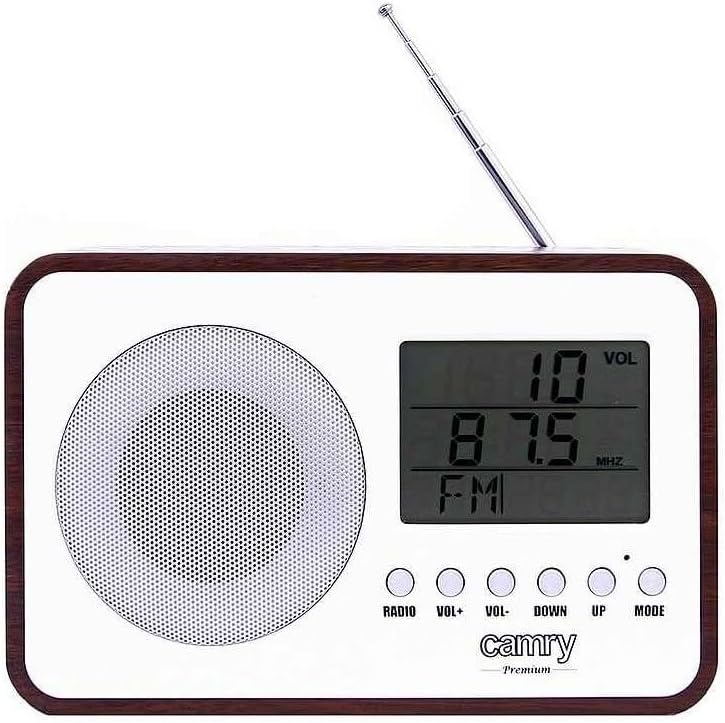
Rycina 1: Przód View. This image shows the front of the CAMRY CR 1153 Digital Radio, featuring a large LCD display, a circular speaker grille on the left, and five control buttons below the display. The buttons are labeled RADIO, VOL+, VOL-, DOWN, UP, and MODE. A telescopic antenna is visible at the top right.

Figure 2: Display Close-up. Szczegółowy view of the radio's LCD screen, showing "VOL" at the top right, "89.8 MHz" as the current frequency, and "FM" indicating the band. The control buttons are partially visible below the screen.

Rysunek 3: Tył View. This image displays the back of the radio, including the telescopic antenna on the left, a ventilation grille, and an open battery compartment designed for two AA (LR06) batteries. A label with model information (CR 1153, Input: DC 3V, 1A, Battery: 2x AA (LR06), Power: 0.4W) is also visible.

Rysunek 4: Wymiary. The radio is shown with its approximate measurements: 19 cm in width, 11 cm in height, and 7 cm in depth. The telescopic antenna is extended.
Przyciski sterujące:
- RADIO: Toggles between radio mode and other functions (e.g., clock/alarm).
- GŁOŚNOŚĆ+ / GŁOŚNOŚĆ-: Dostosowuje poziom głośności.
- DOWN / UP: Used for tuning radio frequencies, setting time, or navigating menu options.
- Sposób użycia: Selects different operating modes or confirms settings.
Organizować coś
Zasilanie urządzenia:
The CAMRY CR 1153 can be powered by either mains electricity or batteries.
- Zasilanie sieciowe: Connect the provided power adapter to the DC 3V input port on the back of the radio and then plug it into a standard wall outlet.
- Moc baterii:
- Otwórz pokrywę komory baterii z tyłu radia (patrz rysunek 3).
- Insert two AA (LR06) batteries, ensuring correct polarity (+/-).
- Dokładnie zamknij pokrywę komory baterii.
Note: Batteries are not included. Remove batteries if the device will not be used for an extended period.
Initial Setup (Time and Date):
Upon first power-on or after battery replacement, you may need to set the time and date.
- Naciśnij TRYB button repeatedly until the time setting appears on the display.
- Użyj UP I W DÓŁ Przyciski do ustawienia godziny. Naciśnij TRYB aby potwierdzić.
- Użyj UP I W DÓŁ przyciski do ustawienia minut. Naciśnij TRYB aby potwierdzić.
- Follow similar steps to set the year, month, and day.
Instrukcja obsługi
Radio Operation (FM):
- Rozłóż antenę teleskopową, aby uzyskać optymalny odbiór.
- Naciśnij RADIO Naciśnij przycisk, aby przełączyć się na tryb radia FM. Na wyświetlaczu pojawi się częstotliwość.
- Użyj UP I W DÓŁ buttons to manually tune to your desired FM frequency.
- Aby automatycznie wyszukać stacje, naciśnij i przytrzymaj UP or W DÓŁ button for a few seconds. The radio will stop at the next strong signal.
- Dostosuj głośność za pomocą Objętość + I TOM- pikolak.
Funkcja budzika:
The radio features an alarm that can wake you with a standard alarm tone or your preferred radio station.
- Naciśnij TRYB button repeatedly until the alarm setting appears (e.g., "ALARM SET").
- Używać UP I W DÓŁ aby ustawić godzinę alarmu, naciśnij TRYB.
- Używać UP I W DÓŁ to set the alarm minute, then press TRYB.
- Wybierz źródło alarmu (brzęczyk lub radio FM) za pomocą UP/W DÓŁ, następnie naciśnij TRYB. If FM Radio is selected, ensure a station is tuned.
- To activate/deactivate the alarm, navigate to the alarm display and use the UP/W DÓŁ button to toggle it On/Off. An alarm icon will appear on the display when active.
Thermometer and Calendar:
The radio automatically displays the current temperature and date. These functions are typically visible in the default clock display mode or can be cycled through using the TRYB przycisk.
Funkcja automatycznego wyłączania:
The radio includes an automatic shut-off timer. By default, it is set to 10 minutes. This can be adjusted up to 1.5 hours (90 minutes).
- Podczas odtwarzania radia naciśnij przycisk TRYB button until the "SLEEP" or "AUTO OFF" setting appears.
- Użyj UP I W DÓŁ buttons to adjust the desired shut-off time (e.g., 10, 20, 30, 60, 90 minutes, or OFF).
- Radio wyłączy się automatycznie po upływie wybranego czasu.
Konserwacja
- Czyszczenie: Wipe the radio's surface with a soft, slightly damp cloth. The special protective coating helps resist grease and water splashes, making it easy to clean. Do not use harsh chemicals or abrasive materials.
- Wymiana baterii: Replace batteries when the display dims or the radio's performance degrades. Always replace both batteries simultaneously with new ones of the same type (AA LR06).
- Składowanie: Jeśli radio jest przechowywane przez dłuższy czas, wyjmij baterie, aby zapobiec wyciekowi. Przechowuj w chłodnym i suchym miejscu.
Rozwiązywanie problemów
| Problem | Możliwa przyczyna | Rozwiązanie |
|---|---|---|
| Radio się nie włącza. | No power supply; batteries depleted or incorrectly inserted; power adapter not connected. | Check power adapter connection. Replace batteries or ensure correct polarity. |
| Słaby odbiór radia. | Antenna not extended; weak signal area; interference from other electronics. | Fully extend the telescopic antenna. Reposition the radio. Move away from other electronic devices. |
| Alarm nie włącza się. | Alarm not activated; volume too low; incorrect alarm time set. | Ensure alarm is set to ON. Increase volume. Verify alarm time. |
| Wyświetlacz jest ciemny lub pusty. | Niski poziom naładowania baterii. | Replace batteries or connect to mains power. |
Specyfikacje
- Model: CR 1153
- Marka: CAMRY
- Zasilanie: DC 3V, 1A (Mains adapter) or 2 x AA (LR06) batteries
- Pobór mocy: 0.4 W
- Zespoły radiowe: FM
- Cechy szczególne: Digital FM Radio, Alarm Clock, Thermometer, Calendar, Automatic Shut-off, Portable
- Łączność: Auxiliary (for compatible devices like headphones, MP3 players)
- Wymiary (w przybliżeniu): 19 cm (szerokość) x 11 cm (wysokość) x 7 cm (głębokość)
- Producent: Adler Itd
- Kraj pochodzenia: Francja
Gwarancja i wsparcie
For warranty information and technical support, please refer to the warranty card included with your product or contact your local CAMRY distributor. Keep your proof of purchase for any warranty claims.


