
TC Electronic DITTO JAM X2 LOOPER
Instrukcja obsługi pedału pętli TC Electronic Ditto JAM X2
Model: DITTO JAM X2 LOOPER
Marka: TC Electronic
Wstęp
Welcome to the user manual for the TC Electronic Ditto JAM X2 Looper Pedal. This intuitive looper pedal is designed for musicians seeking intelligent loop synchronization that responds to their band's rhythm. It features innovative BeatSense technology, allowing for automatic adjustment of loop tracks to your beat, and offers both Record-then-Play and Record-then-Overdub functionalities with unlimited overdubs and undo/redo capabilities. This manual provides essential information for setting up, operating, maintaining, and troubleshooting your Ditto JAM X2 Looper.
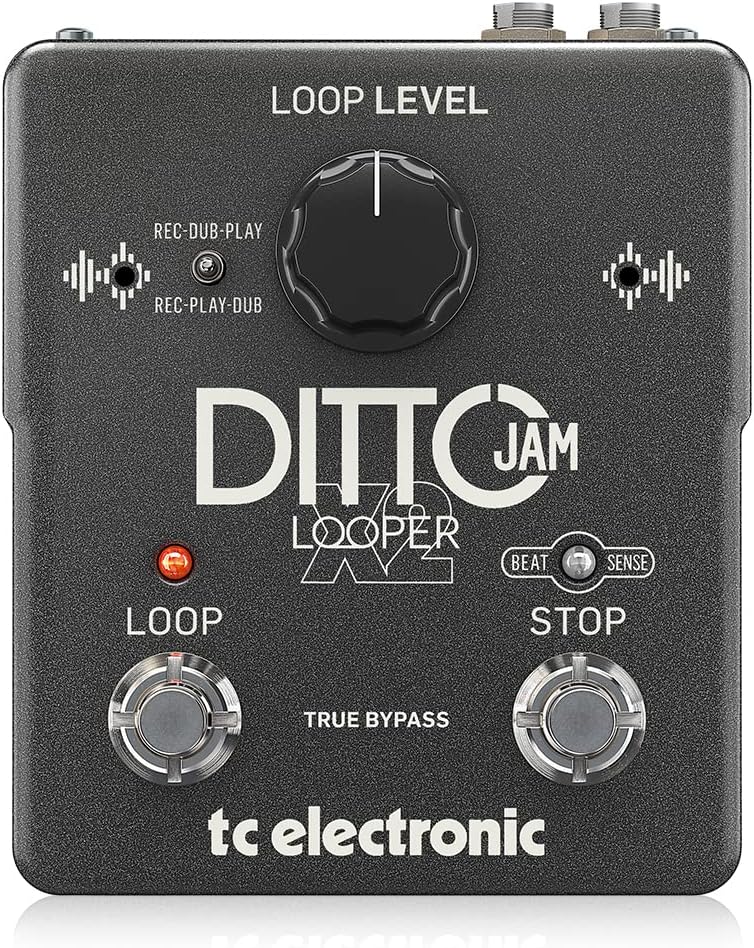
Obraz: Przód view of the TC Electronic Ditto JAM X2 Looper Pedal, showcasing the 'LOOP LEVEL' knob, 'REC-DUB-PLAY' and 'REC-PLAY-DUB' switches, 'LOOP' and 'STOP' footswitches, and 'BEAT SENSE' indicator.
Główne cechy
- Intuitive looper pedal with intelligent loop synchronization that responds to your band.
- Innovative responsive BeatSense technology automatically adjusts loop tracks to your beat.
- Choose between Record-then-Play or Record-then-Overdub functionalities.
- Unlimited overdubs and undo/redo for total creative freedom.
- Dual built-in mics accurately track band tempo by focusing only on rhythmic elements.

Obraz: Zbliżenie view of the "BEAT SENSE" indicator on the pedal, highlighting its function.

Image: An external microphone, likely used for the BeatSense technology, clipped onto a drum kit component.
Organizować coś
Zasilacz
The Ditto JAM X2 Looper requires a 9V power supply. Ensure you use a compatible power adapter (not included) to power the unit.
Znajomości
- Podłącz swój instrument (np. gitarę) do WEJŚCIE gniazdo za pomocą standardowego kabla instrumentalnego 1/4-calowego.
- Połącz WYJŚCIE Jack do twojego amplifier lub następny pedał w torze sygnałowym przy użyciu standardowego kabla instrumentalnego 1/4-calowego.
- An MIKROFON ZEWNĘTRZNY input is available for connecting an external microphone to enhance BeatSense accuracy, particularly in complex rhythmic environments.

Obraz: Tył view of the Ditto JAM X2 pedal, clearly showing the INPUT, OUTPUT, EXT MIC jacks, and the power input.
Instrukcja obsługi
Podstawowe pętle
- Nagranie: Naciśnij PĘTLA footswitch once to start recording your loop. The LED will illuminate red.
- Playback/Overdub: Naciśnij PĘTLA footswitch again to stop recording and begin playback. If you press it again during playback, you will start overdubbing.
- Zatrzymać: Naciśnij ZATRZYMYWAĆ SIĘ footswitch once to stop playback.
- Cofnij/Ponów: Naciśnij i przytrzymaj ZATRZYMYWAĆ SIĘ footswitch to undo the last overdub. Press and hold again to redo it.
- Wyczyść pętlę: Naciśnij i przytrzymaj PĘTLA footswitch to clear the current loop.
Loop Level Control
Ten POZIOM PĘTLI knob adjusts the overall volume of your recorded loop. Turn clockwise to increase volume, counter-clockwise to decrease.
Record Modes (REC-DUB-PLAY / REC-PLAY-DUB)
The Ditto JAM X2 offers two recording modes, selectable via the small toggle switch:
- REC-DUB-PLAY: In this mode, the first press of the LOOP footswitch records, the second press starts overdubbing, and a third press initiates playback without further overdubbing.
- REC-PLAY-DUB: In this mode, the first press records, the second press starts playback, and a third press initiates overdubbing.

Obraz: szczegółowy view of the toggle switch for selecting between REC-DUB-PLAY and REC-PLAY-DUB modes.
BeatSense Technology
The innovative BeatSense technology uses dual built-in microphones to listen to your band's rhythmic elements (like drums) and automatically synchronize your loops to the detected tempo. This ensures your loops stay perfectly in time with the rest of the band.

Image: A musician's feet operating the Ditto JAM X2 pedal on a stage floor, demonstrating its use in a live setting.
Konserwacja
- Utrzymuj pedał w czystości, bez kurzu i zanieczyszczeń. Do czyszczenia używaj miękkiej, suchej ściereczki.
- Unikaj wystawiania pedału na działanie ekstremalnych temperatur, wilgoci lub bezpośredniego światła słonecznego.
- Do not attempt to open the unit or perform repairs yourself, as this will void the warranty. Refer to qualified service personnel for any issues.
- Ensure proper ventilation around the pedal during use.

Image: The bottom label of the Ditto JAM X2 pedal, displaying compliance information, manufacturer details, and power requirements.
Rozwiązywanie problemów
Brak wyjścia dźwięku
- Sprawdź wszystkie połączenia kablowe (wejściowe, wyjściowe, zasilające).
- Ensure the pedal is receiving power.
- Verify the LOOP LEVEL knob is not set to minimum.
- Przetestuj z różnymi kablami i amplifier/instrument to isolate the issue.
Loop Not Synchronizing
- Ensure the BeatSense microphones are not obstructed.
- Verify the external microphone (if used) is properly connected and functioning.
- The BeatSense technology works best with clear, consistent rhythmic input (e.g., drums). Complex or irregular rhythms may affect synchronization accuracy.
- Ensure the pedal is placed in an optimal position to pick up rhythmic sounds from the band.
Footswitches Not Responding
- Sprawdź zasilanie.
- Jeśli problem będzie się powtarzał, skontaktuj się z obsługą klienta.
Specyfikacje
| Funkcja | Specyfikacja |
|---|---|
| Model | DITTO JAM X2 LOOP |
| Marka | TC Electronic |
| Waga przedmiotu | 1.26 funta (570 gramów) |
| Wymiary produktu | 4.45 x 5.31 x 2.13 cala (5.31" dł. x 4.45" szer. x 2.13" wys.) |
| Kolor | Czarny |
| Źródło zasilania | Zasilanie bateryjne (9 V) |
| Interfejs sprzętowy | Dźwięk 1/4 cala |
| Format sygnału | Analog |
Gwarancja i wsparcie
For warranty information and technical support, please refer to the official TC Electronic webOdwiedź stronę internetową lub skontaktuj się bezpośrednio z działem obsługi klienta. Zachowaj dowód zakupu na wypadek reklamacji.
Zasoby internetowe: Odwiedź Sklep elektroniczny TC na Amazon Aby uzyskać dodatkowe informacje i zasoby dotyczące produktu.
Ask a question about this manual
Ask about setup, troubleshooting, compatibility, parts, safety, or missing instructions. Manuals+ will review the question and use this page’s manual context to help answer it.