1. Wprowadzenie
The Sena SF1 Bluetooth Communication System is designed to provide essential communication features for motorcycle riders. This system facilitates 2-way intercom communication with a passenger, allowing for clear conversations up to 100 meters (110 yards) in open terrain. It also enables seamless connectivity with your mobile device for streaming music, managing phone calls, and receiving turn-by-turn GPS directions. Key features include VOX Phone commands, Audio Overlay, Quick Charging, and microphone mute options, enhancing your riding experience with convenience and safety.
2. Zawartość opakowania
The Sena SF1 package includes the following components:
- Sena SF1 Main Unit
- Hełm Clamp Zestaw
- Głośniki
- Przewodowy mikrofon na wysięgniku
- Mikrofon przewodowy
- USB Power & Data Cable (USB-C type)
- Podkładki na rzepy do głośników
- Velcro Pad for Wired Boom Microphone
- Velcro Pad for Wired Microphone
- Podkładki pod głośniki (grube)
- Klucz imbusowy
Note: The specific component "Sena 843-01297" refers to the main unit or a specific part number within the kit.
3. Koniec produktuview
The Sena SF1 unit features a sleek, low-profile design with intuitive controls for easy operation while riding.

Rysunek 3.1: Góra View of Sena SF1 Main Unit. This image displays the top of the Sena SF1 communication system, highlighting the central control button and the plus (+) and minus (-) buttons for volume and navigation. A blue indicator light is visible at the top center.

Rysunek 3.2: Kątowy View of Sena SF1 Main Unit. An angled perspective of the SF1 unit, showing its compact form factor and the arrangement of its primary control buttons. The blue indicator light is also visible.
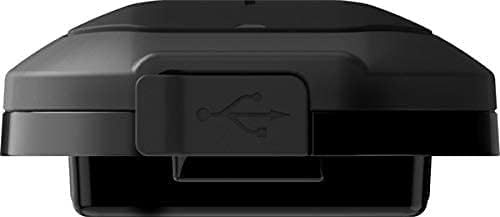
Figure 3.3: Sena SF1 USB Charging Port. This image focuses on the USB charging port, typically located on the side or bottom of the unit, protected by a rubber flap to ensure water resistance.

Figure 3.4: Sena SF1 Side View with Helmet Clamp. Na bok view of the SF1 unit attached to a helmet clamp, illustrating how the unit integrates with the helmet and the connection points for speakers and microphone cables.
3.1 Elementy sterujące i wskaźniki
- Środkowy przycisk: Multi-functional button for power, pairing, and call management.
- (+) Przycisk: Increases volume, navigates forward through menus or tracks.
- (-) Przycisk: Decreases volume, navigates backward through menus or tracks.
- Wskaźnik LED: Displays device status (power, charging, Bluetooth connection).
4. Instalacja
Proper installation ensures optimal performance and comfort. The SF1 is designed to fit on almost any helmet.
4.1 Montaż jednostki głównej
- Choose a suitable location on the left side of your helmet for the clamp jednostka.
- Loosen the screws on the helmet clamp and slide it between the outer shell and the inner padding of the helmet. Tighten the screws securely.
- Alternatively, use the adhesive mount if the clamp unit is not suitable for your helmet type. Ensure the surface is clean and dry before applying.
- Slide the SF1 main unit onto the mounted clamp aż zatrzaśnie się na swoim miejscu.
4.2 Instalowanie głośników i mikrofonu
- Attach the speakers to the Velcro pads inside the helmet's ear pockets. Use the thick speaker pads if needed for better fit and audio quality.
- Connect the speaker cables to the main unit.
- For full-face helmets, attach the wired microphone to the inside of the chin bar using the Velcro pad. Position it close to your mouth.
- For open-face or modular helmets, attach the wired boom microphone to the inside of the helmet, ensuring it is positioned correctly for clear voice pickup.
- Route all cables neatly under the helmet padding to avoid interference and ensure comfort.
5. Konfiguracja
5.1 Włączanie/wyłączanie
- Włączanie: Naciśnij i przytrzymaj Środkowy przycisk i (+) Przycisk na 1 sekundę.
- Wyłączone: Naciśnij i przytrzymaj Środkowy przycisk i (+) Przycisk na 5 sekundy.
5.2 Parowanie Bluetooth z telefonem komórkowym
- With the SF1 powered off, press and hold the Środkowy przycisk przez 5 sekund, aż dioda LED zacznie migać naprzemiennie na czerwono i niebiesko, wskazując tryb parowania.
- W telefonie komórkowym włącz Bluetooth i wyszukaj urządzenia.
- Select "Sena SF1" from the list of detected devices.
- If prompted, enter PIN "0000". The LED will turn blue when pairing is successful.
5.3 Intercom Pairing (2-Way)
- Upewnij się, że oba urządzenia SF1 są włączone.
- On one unit, press and hold the Środkowy przycisk przez 5 sekundy, aż dioda LED zacznie migać na czerwono.
- On the second unit, press and hold the Środkowy przycisk przez 5 sekundy, aż dioda LED zacznie migać na czerwono.
- The units will automatically pair and connect. The LED on both units will turn blue.
5.4 Aplikacja Sena Utility
For advanced configuration and firmware updates, download the Sena Utility App from your smartphone's app store. The app allows you to customize settings, manage speed dial presets, and access a quick guide.
6. Instrukcja obsługi
6.1 Regulacja głośności
- Zwiększ głośność: Kliknij (+) Przycisk.
- Zmniejsz głośność: Kliknij (-) Przycisk.
6.2 Funkcje muzyczne
- Odtwórz/wstrzymaj muzykę: Naciśnij Środkowy przycisk na 1 sekundę.
- Następny utwór: Naciśnij (+) Przycisk na 1 sekundę.
- Poprzedni utwór: Naciśnij (-) Przycisk na 1 sekundę.
6.3 Funkcje połączeń telefonicznych
- Odbierz połączenie: Kliknij Środkowy przycisk.
- Zakończ połączenie: Naciśnij Środkowy przycisk na 2 sekundy.
- Odrzuć połączenie: Naciśnij Środkowy przycisk for 2 seconds when a call is incoming.
- Voice Dial (VOX Phone): Naciśnij Środkowy przycisk na 3 sekundy.
- Wyciszenie mikrofonu: Naciśnij (+) Przycisk I (-) Przycisk simultaneously for 1 second during a call.
6.4 Komunikacja interkomowa
- Rozpoczęcie/zakończenie domofonu: Kliknij Środkowy przycisk.
- Audio Overlay: The SF1 supports Audio Overlay, allowing you to listen to music or GPS instructions while engaged in intercom conversation. The audio levels will adjust automatically.
6.5 Nawigacja GPS
Once paired with your smartphone, turn-by-turn GPS directions from your navigation app will be transmitted directly to your SF1 speakers. Audio Overlay ensures that navigation prompts are heard even during other audio activities.
7. Konserwacja
7.1 Ładowanie akumulatora
- Connect the SF1 to a USB power source using the provided USB Power & Data Cable.
- Podczas ładowania dioda LED będzie świecić na czerwono, a po pełnym naładowaniu na niebiesko.
- Pełne naładowanie trwa zazwyczaj około 1.5 godziny.
- The SF1 offers a talk time of up to 13 godziny na pełnym naładowaniu.
- The Quick Charging feature allows for faster charging when time is limited.
7.2 Czyszczenie i przechowywanie
- Przetrzyj urządzenie miękką, damp płótno. Nie używaj ostrych środków chemicznych ani rozpuszczalników.
- Aby zachować wodoodporność, należy upewnić się, że osłona portu USB jest szczelnie zamknięta.
- Store the SF1 in a cool, dry place when not in use.
8. Rozwiązywanie Problemów
8.1 Przywracanie ustawień fabrycznych
If the SF1 is not functioning correctly, a factory reset may resolve the issue. To perform a factory reset, press and hold the Środkowy przycisk for 12 seconds until the LED flashes red rapidly. Then, tap the Środkowy przycisk to confirm. The unit will power off and reset to default settings.
8.2 Typowe problemy
- Brak zasilania: Upewnij się, że akumulator jest naładowany. Podłącz ładowarkę i sprawdź wskaźnik LED.
- Brak dźwięku: Check speaker connections. Ensure volume is not at minimum. Re-pair with your device.
- Odłączenie interkomu: Ensure both units are within range (100 meters in open terrain) and re-initiate intercom connection.
- Problemy z parowaniem Bluetooth: Ensure the SF1 is in pairing mode (red and blue flashing LED) and your phone's Bluetooth is enabled. Try restarting both devices.
9. Specyfikacje
| Funkcja | Szczegół |
|---|---|
| Nazwa modelu | SF1 |
| Wersja Bluetooth | 4.1 |
| Zasięg Bluetooth | Up to 100 meters (110 yards) in open terrain |
| Awiofon | 2-drożny |
| Czas rozmowy | Do 13 godzin |
| Czas ładowania | 1.5 godziny |
| Kontrola hałasu | Advanced Noise Cancellation |
| Odporność na wodę | Wodoodporny |
| Waga | 3.52 uncji (0.1 kilograma) |
| Wymiary (dł. x szer. x wys.) | 3.94 x 1.57 x 2.36 cala |
| Tworzywo | Plastikowy |
| Metoda kontroli | Dotykać |
| Typ baterii | Litowo-polimerowy (w zestawie) |
| Kompatybilne urządzenia | Electronic devices with Bluetooth capabilities |
10. Gwarancja i wsparcie
10.1 Informacje o gwarancji
Sena products are covered by a limited warranty against manufacturing defects. The EU Spare Part Availability Duration is 2 years. For specific warranty terms and conditions, please refer to the official Sena webOdwiedź witrynę lub skontaktuj się z obsługą klienta. Zachowaj dowód zakupu na wypadek roszczeń gwarancyjnych.
10.2 Obsługa klienta
For technical assistance, troubleshooting, or general inquiries, please visit the official Sena website for support resources, FAQs, and contact information. You can also utilize the Sena Utility App for quick access to support and product information.