1. Ważne instrukcje bezpieczeństwa
Read all safety warnings and instructions before operating this hedge trimmer. Failure to follow the warnings and instructions may result in electric shock, fire, and/or serious injury. Save all warnings and instructions for future reference.
Bezpieczeństwo ogólne
- Stosuj ochronę oczu: Always wear safety glasses or goggles with side shields that comply with applicable standards.
- Trzymaj ręce z daleka: Never touch the blades while the tool is operating. Keep all body parts away from the blade.
- Pewny chwyt: Always hold the hedge trimmer firmly with both hands when operating.
- Obszar roboczy: Utrzymuj miejsce pracy w czystości i dobrym oświetleniu. Zagracone lub ciemne obszary sprzyjają wypadkom.
- Unikaj niebezpiecznych środowisk: Nie używaj elektronarzędzi wamp lub wilgotnych miejscach lub wystawiać je na deszcz.
- Przełącznik bezpieczeństwa: The electric hedge trimmer requires pressing both the start button and the trigger switch simultaneously to operate, ensuring intentional activation.
- Osłona dłoni: The hedge trimmer is equipped with a hand guard to prevent hands from slipping onto the blade during operation.
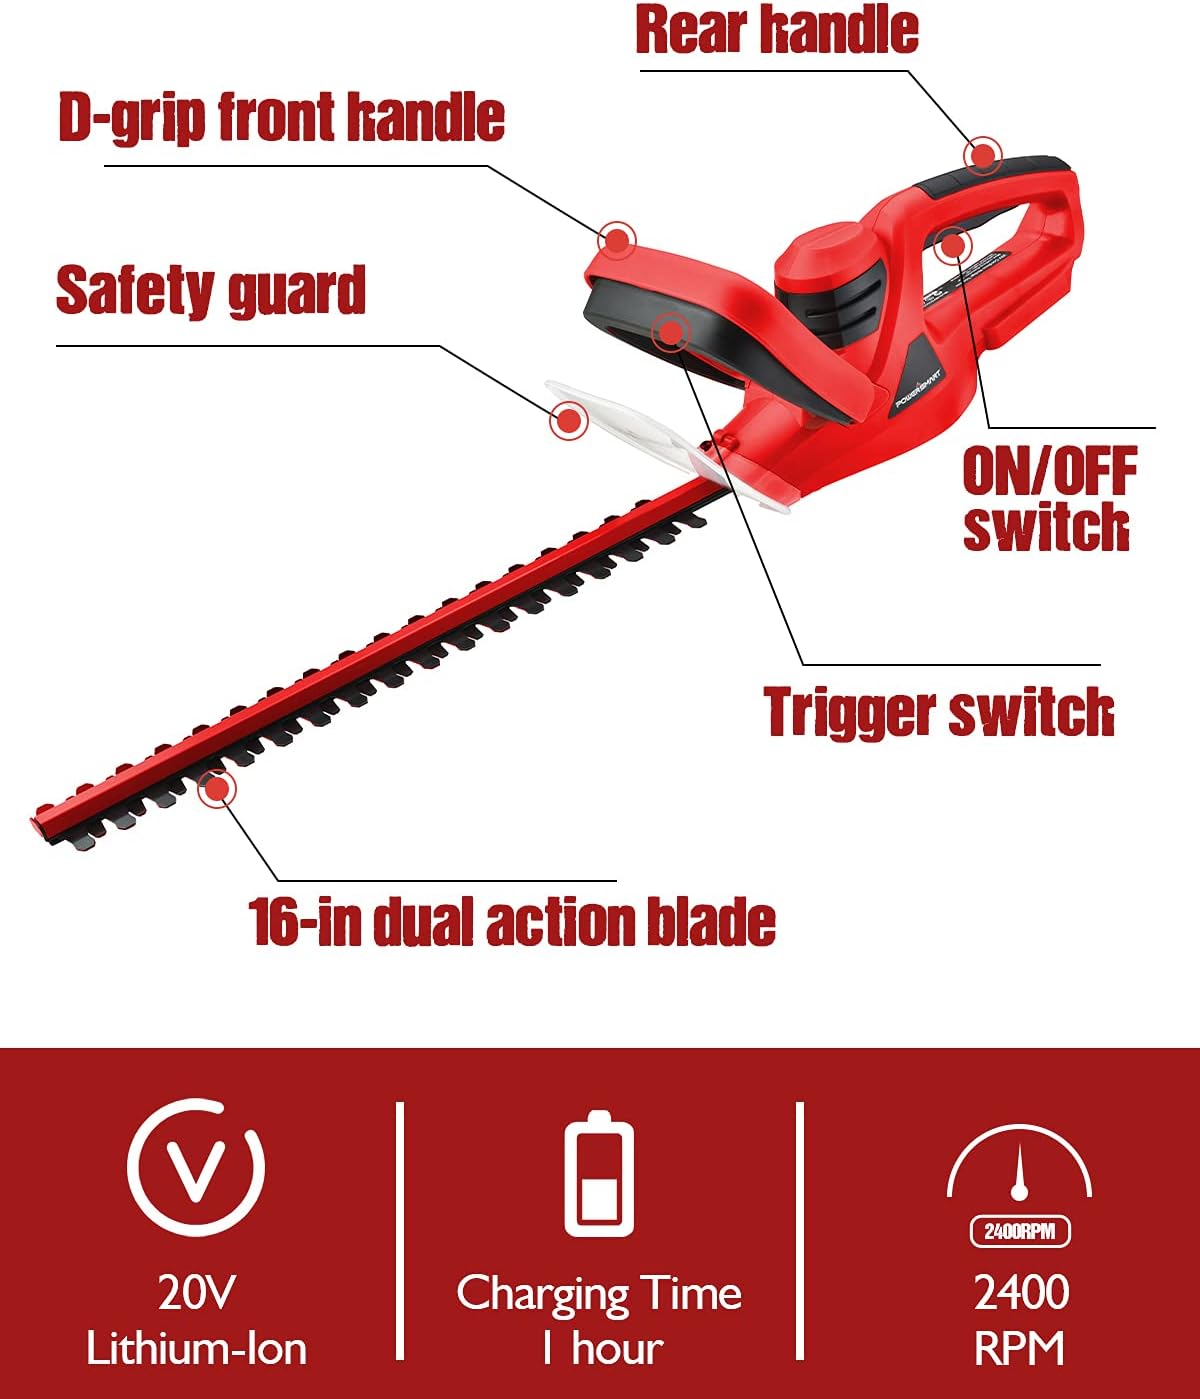
Image: User demonstrating the safety switch and hand guard on the PowerSmart hedge trimmer. The image highlights the two-button activation system and the protective hand guard.
2. Koniec produktuview
Familiarize yourself with the components of your PowerSmart Cordless Hedge Trimmer before use.

Image: Diagram illustrating the key components of the PowerSmart hedge trimmer, including the D-grip front handle, rear handle, ON/OFF switch, trigger switch, safety guard, and the 16-inch dual-action blade.
Kluczowe komponenty:
- Ostrze dwustronne 16-calowe: Designed for efficient cutting and reduced vibration.
- D-Grip Front Handle: Provides multiple gripping positions for comfort and control.
- Tylny uchwyt: Main gripping area for operation.
- Przełącznik włącz / wyłącz: Kontroluje zasilanie urządzenia.
- Przełącznik spustowy: Activates the blade when pressed with the ON/OFF switch.
- Straż Bezpieczeństwa: Protects the user's hands from the blade.
- Akumulator litowo-jonowy 20 V: Zapewnia zasilanie bezprzewodowe.
- Ładowarka akumulatora: Do ładowania akumulatora 20V.
3. Instalacja i montaż
Ładowanie akumulatora
- Przed pierwszym użyciem upewnij się, że bateria jest w pełni naładowana.
- Podłącz ładowarkę do standardowego gniazdka elektrycznego.
- Włóż akumulator do ładowarki. Kontrolka ładowania pokaże stan ładowania.
- Pełne naładowanie trwa zazwyczaj około 1 godziny.
- Remove the battery once fully charged to prevent overcharging.
Instalacja baterii
- Align the charged battery with the battery port on the hedge trimmer.
- Wsuń baterię do portu, aż zatrzaśnie się pewnie na swoim miejscu.
- Aby wyjąć baterię, naciśnij przycisk zwalniający i wysuń baterię.
Handle Assembly (if required)
Some units may require the D-grip handle to be attached. Use appropriate screws and a screwdriver to securely fasten the handle to the main body of the trimmer. Ensure all screws are tightened before operation.
4. Instrukcja obsługi
Uruchamianie i zatrzymywanie trymera
- Sprawdź, czy akumulator jest zainstalowany i całkowicie naładowany.
- Grip the trimmer firmly with both hands, one on the D-grip front handle and one on the rear handle.
- To start, simultaneously press the ON/OFF switch and the trigger switch.
- To stop, release either the ON/OFF switch or the trigger switch.
Techniki przycinania
The 16-inch dual-action blade and 2400 RPM no-load speed allow for efficient trimming of hedges and bushes. The trimmer can cut branches up to 5/8 inch in diameter.
- Przycinanie poziome: Hold the trimmer level and sweep it across the top of the hedge in smooth, even strokes.
- Przycinanie pionowe: Hold the trimmer vertically and sweep it along the sides of the hedge, moving from bottom to top or top to bottom.
- Wydajność cięcia: The blade is designed to cut branches up to 5/8 inch (approximately 1.6 cm) in diameter. Do not force the trimmer through thicker branches.

Image: A user operating the PowerSmart 16-inch cordless hedge trimmer to trim a hedge, demonstrating its use in a garden setting.
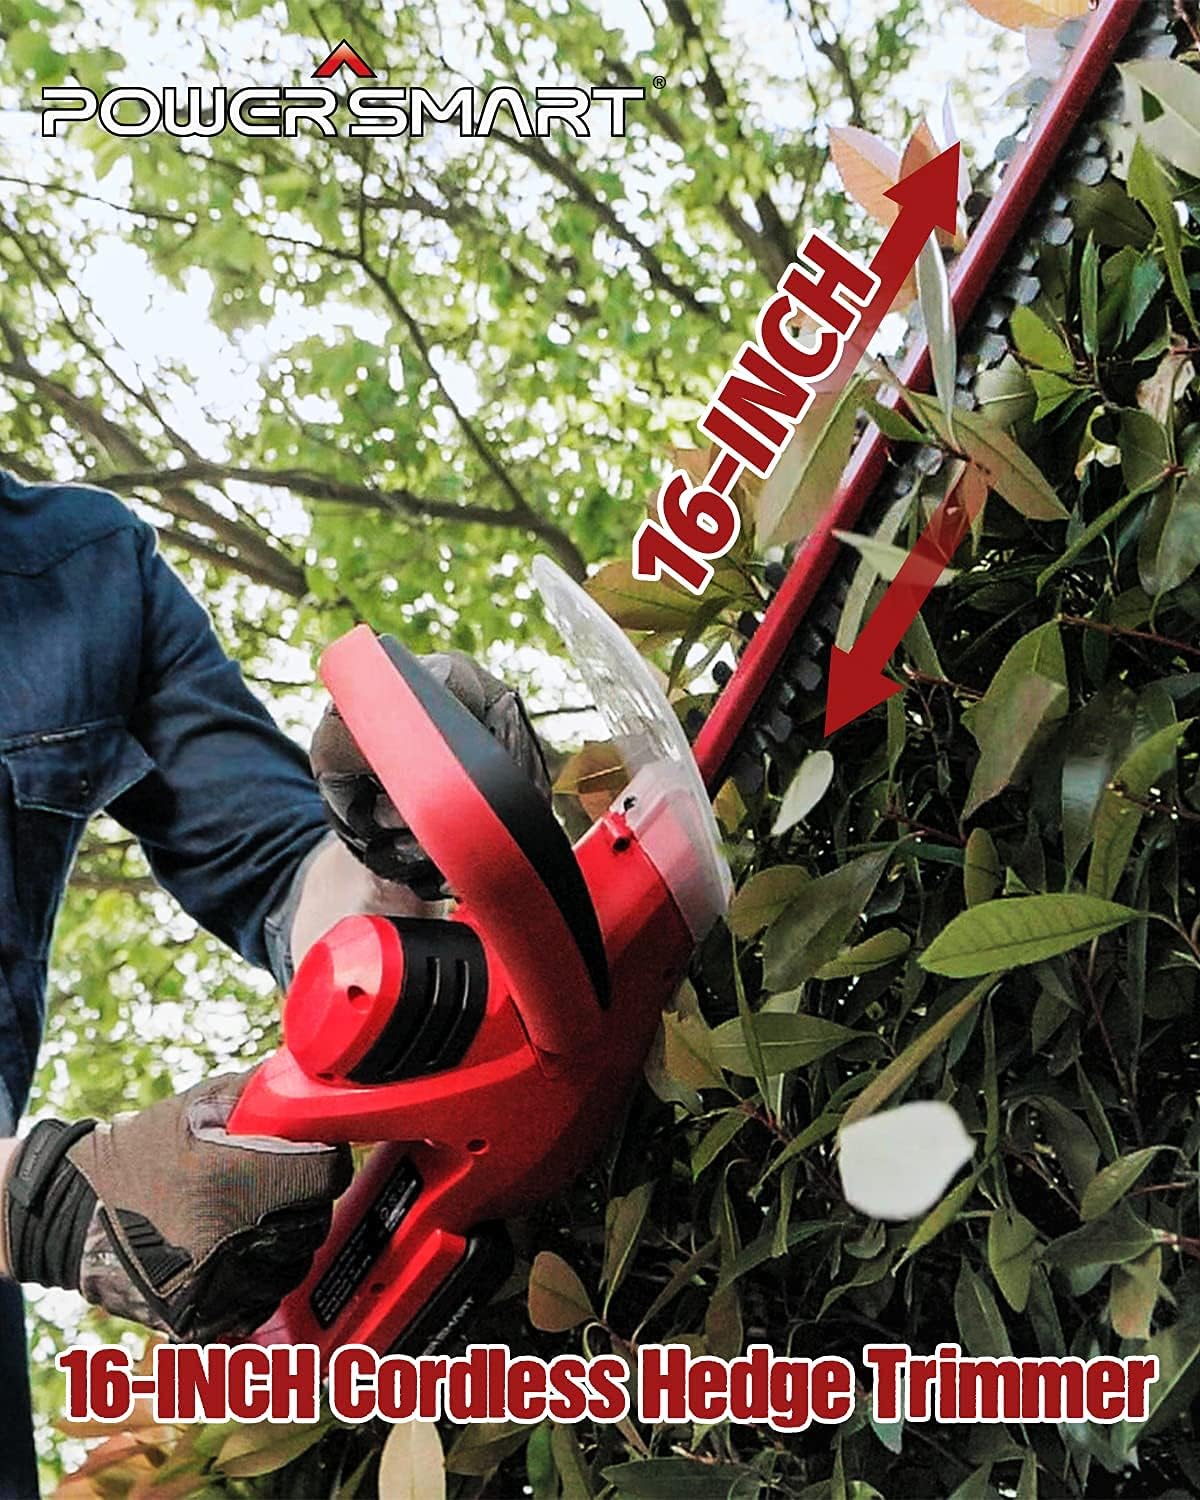
Image: A user holding the PowerSmart hedge trimmer, highlighting the ergonomic D-grip front handle which provides a comfortable gripping area for various cutting orientations.

Obraz: Zbliżenie view of the hedge trimmer blade demonstrating its cutting capacity, indicating it can cut branches up to 5/8 inch in diameter.
Filmy instruktażowe
Video: This video demonstrates the PowerSmart 20V Cordless Hedge Trimmer in action, showcasing its features and ease of use for trimming hedges.
Video: A short video highlighting the key operational aspects and benefits of the PowerSmart Cordless Hedge Trimmer.
5. Konserwacja
Pielęgnacja ostrzy
- Czyszczenie: After each use, ensure the trimmer is off and the battery is removed. Clean the blades with a stiff brush to remove debris, sap, and leaves.
- Smarowanie: Periodically apply a light machine oil or blade lubricant to the blades to reduce friction and prevent rust.
- Ostrzenie: If the blades become dull, they can be sharpened by a qualified service technician.
Pielęgnacja baterii i ładowarki
- Przechowuj baterie w chłodnym i suchym miejscu, z dala od bezpośredniego światła słonecznego i ekstremalnych temperatur.
- Nie przechowuj baterii w stanie rozładowanym przez dłuższy czas.
- Utrzymuj ładowarkę w czystości i dbaj, aby nie było w niej żadnych zanieczyszczeń.
Składowanie
- Przechowuj maszynkę do podcinania żywopłotów w suchym i bezpiecznym miejscu, poza zasięgiem dzieci.
- Przed odłożeniem narzędzia należy zawsze wyjąć akumulator.
- Use the blade cover (if included) to protect the blades during storage.
6. Rozwiązywanie Problemów
| Problem | Możliwa przyczyna | Rozwiązanie |
|---|---|---|
| Trymer nie uruchamia się | Battery not charged or improperly installed. Safety switches not engaged. | Ensure battery is fully charged and correctly inserted. Press both the ON/OFF switch and trigger simultaneously. |
| Zmniejszona wydajność cięcia | Tępe lub brudne ostrza. Próba cięcia zbyt grubych gałęzi. | Clean and lubricate blades. Sharpen blades if necessary. Only cut branches within the specified 5/8 inch diameter. |
| Nadmierne wibracje | Damaged or bent blade. Loose components. | Inspect blades for damage; replace if necessary. Check all fasteners for tightness. |
| Bateria się nie ładuje | Ładowarka nie jest podłączona. Uszkodzony akumulator lub ładowarka. | Verify charger is securely plugged into a working outlet. Contact customer support if battery or charger is suspected to be faulty. |
7. Specyfikacje
| Funkcja | Specyfikacja |
|---|---|
| Marka | PowerSmart |
| Numer modelu | PS76105A |
| Źródło zasilania | Zasilany bateryjnie |
| Tomtage | 20 Volts (18 Volts nominal) |
| Długość ostrza | 16 cali |
| Szerokość cięcia | 16 cali |
| Cutting Diameter (Max) | 5/8 cala |
| Prędkość (bez obciążenia) | 2400 obr./min. |
| Waga przedmiotu | 8 funtów |
| Materiał ostrza | Stal stopowa |
8. Gwarancja i wsparcie
Informacje o gwarancji
This PowerSmart product qualifies for a 2-roczna ograniczona gwarancjaNiniejsza gwarancja obejmuje wady materiałowe i wykonawcze powstałe w wyniku normalnego użytkowania.
Obsługa klienta
For any issues, questions, or to claim warranty service, please contact PowerSmart customer support. Our service team is dedicated to providing premium assistance.
PowerSmart maintains a network of certified repair centers and provides full replacement parts through its headquarters. Please refer to your product packaging or the official PowerSmart webna tej stronie znajdziesz najbardziej aktualne dane kontaktowe.