
1. Wprowadzenie
The EPEVER VS6048AU is a 60A common positive Pulse Width Modulation (PWM) solar charge controller designed for 12V, 24V, 36V, and 48V solar panel power systems. It incorporates advanced digital techniques to ensure efficient and reliable battery charging and load management. This controller is suitable for various applications, including solar home systems, traffic signals, solar street lights, and solar garden lamps.
Główne cechy:
- 3-StagInteligentne ładowanie PWM: Bulk, Boost/Equalize, Float.
- Supports three battery charging options: Sealed, Gel, and Flooded.
- Integrated LCD display for dynamic monitoring of operating data and working conditions.
- Dual USB output ports (Max. 5VDC/2.4A) for charging electronic devices.
- Łatwe w obsłudze ustawienia przycisków zapewniają wygodną i komfortową obsługę.
- Multiple load control modes for versatile application.
- Funkcja statystyki energii.
- Funkcja kompensacji temperatury akumulatora.
- Extensive electronic protections for system safety.

Image 1.1: The EPEVER VS6048AU Solar Charge Controller shown in various application settings, including home power supply, street lighting, monitoring, and green energy solutions.
2. Informacje dotyczące bezpieczeństwa
Przed instalacją i uruchomieniem należy uważnie przeczytać wszystkie instrukcje i ostrzeżenia. Nieprzestrzeganie tych instrukcji może spowodować porażenie prądem, pożar lub poważne obrażenia.
- Ensure all wiring is correctly polarized and securely connected to prevent damage to the controller and other components.
- Przed instalacją lub regulacją kontrolera należy zawsze odłączyć panel słoneczny i zasilanie akumulatora.
- Install the controller in a well-ventilated area, away from flammable gases, moisture, and direct sunlight.
- Należy stosować odpowiednie wyłączniki automatyczne lub bezpieczniki dla obwodów panelu słonecznego, akumulatora i obciążenia.
- Nie rozmontowuj ani nie próbuj samodzielnie naprawiać kontrolera. W celu uzyskania pomocy skontaktuj się z wykwalifikowanym personelem.
- Wear appropriate personal protective equipment, including eye protection, when working with batteries.
- Keep children away from the solar power system components.
Zabezpieczenia elektroniczne: The VS6048AU controller includes comprehensive electronic protections:
- Zabezpieczenie przed odwrotną polaryzacją PV
- Bateria ponad wolttagochrona elektroniczna
- Zabezpieczenie przed nadmiernym rozładowaniem akumulatora
- Zabezpieczenie przed odwrotną polaryzacją akumulatora
- Zabezpieczenie akumulatora przed przegrzaniem
- Zabezpieczenie przed przeciążeniem
- Obciążenie zabezpieczenie przed zwarciem
- Zabezpieczenie sterownika przed przegrzaniem

Image 2.1: Visual representation of the electronic protections integrated into the controller and a basic solar power system connection diagram.
3. Koniec produktuview
Familiarize yourself with the components and interface of your EPEVER VS6048AU solar charge controller.

Obraz 3.1: Przód view of the EPEVER VS6048AU controller with key components labeled.
- Wyświetlacz LCD: Pokazuje stan systemu, parametry i kody błędów.
- Przycisk MENU: Used to navigate through different display interfaces and enter/exit setting modes.
- Przycisk SET: Used to confirm selections, modify parameters, and clear data.
- USB Output Ports (5VDC/2.4A): Do ładowania zewnętrznych urządzeń elektronicznych.
- Temp. Sensor Port (RTS Port): Connects to the optional remote temperature sensor for accurate battery temperature compensation.
- Zaciski fotowoltaiczne: Podłącz się do zestawu paneli słonecznych.
- Zaciski akumulatora: Podłącz do banku baterii.
- Terminale obciążeniowe: Podłącz do obciążeń prądu stałego.
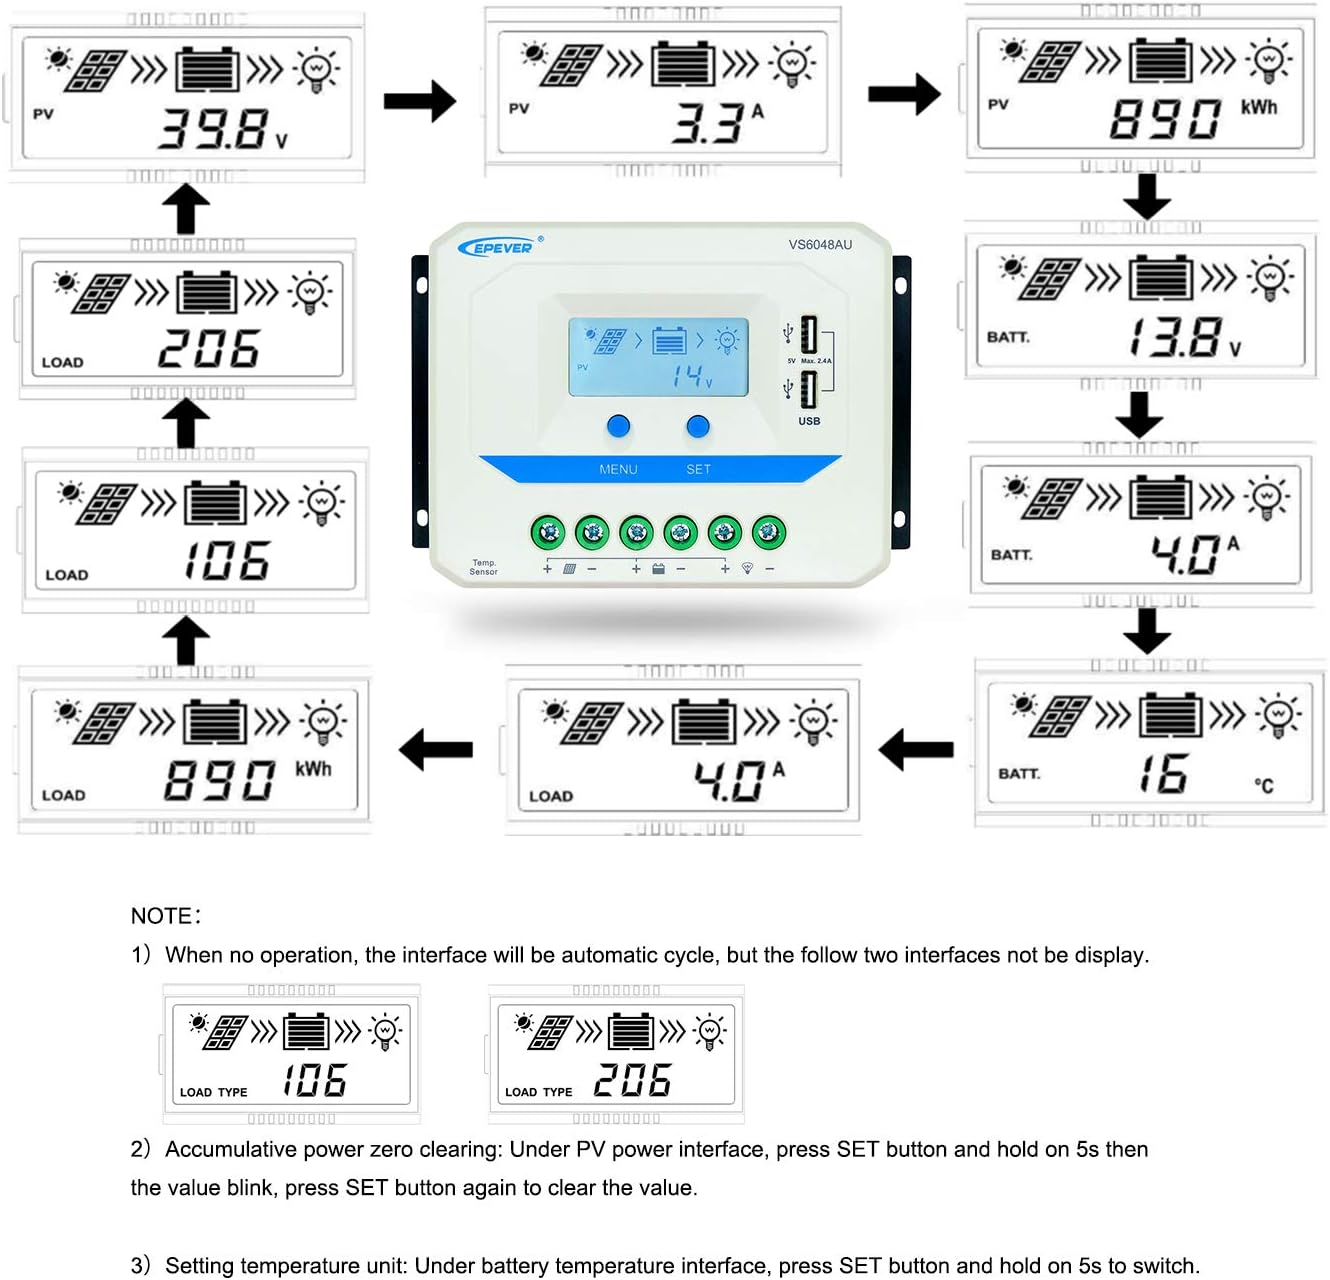
Image 3.2: Dimensions of the EPEVER VS6048AU Solar Charge Controller (approximately 21.4 cm x 12.87 cm x 7.22 cm).
LCD Display Status Description
The LCD display provides visual feedback on the system's operational status. Refer to the table below for icon meanings:

Image 3.3: Detailed description of the icons displayed on the VS6048AU LCD screen.
4. Konfiguracja i instalacja
Aby prawidłowo zainstalować regulator ładowania słonecznego, wykonaj poniższe kroki. Przed wykonaniem jakichkolwiek podłączeń upewnij się, że wszystkie źródła zasilania są odłączone.
Sekwencja okablowania:
- Podłącz akumulator: Connect the battery to the controller's battery terminals. Ensure correct polarity (positive to positive, negative to negative). The controller will detect the battery voltage.
- Podłącz obciążenie: Podłącz obciążenie DC do zacisków obciążenia kontrolera. Upewnij się, że polaryzacja jest prawidłowa.
- Podłącz panel słoneczny: Connect the solar panel array to the controller's PV terminals. Ensure correct polarity.
Ważny: Zawsze podłączaj najpierw akumulator, następnie panel słoneczny, a na końcu obciążenie. Odłączaj w odwrotnej kolejności: obciążenie, następnie panel słoneczny, a na końcu akumulator.
Instrukcja wideo instalacji:
Video 4.1: An official EPEVER video demonstrating the connection process for the solar charge controller, including battery and load connections. This visual guide can assist with proper installation.
5. Instrukcja obsługi
The EPEVER VS6048AU controller features an intuitive LCD display and button interface for monitoring and configuration.
LCD Display Navigation:
When no operation is performed, the LCD interface will automatically cycle through various display screens, showing real-time data such as PV voltage, current, battery voltage i status obciążenia.
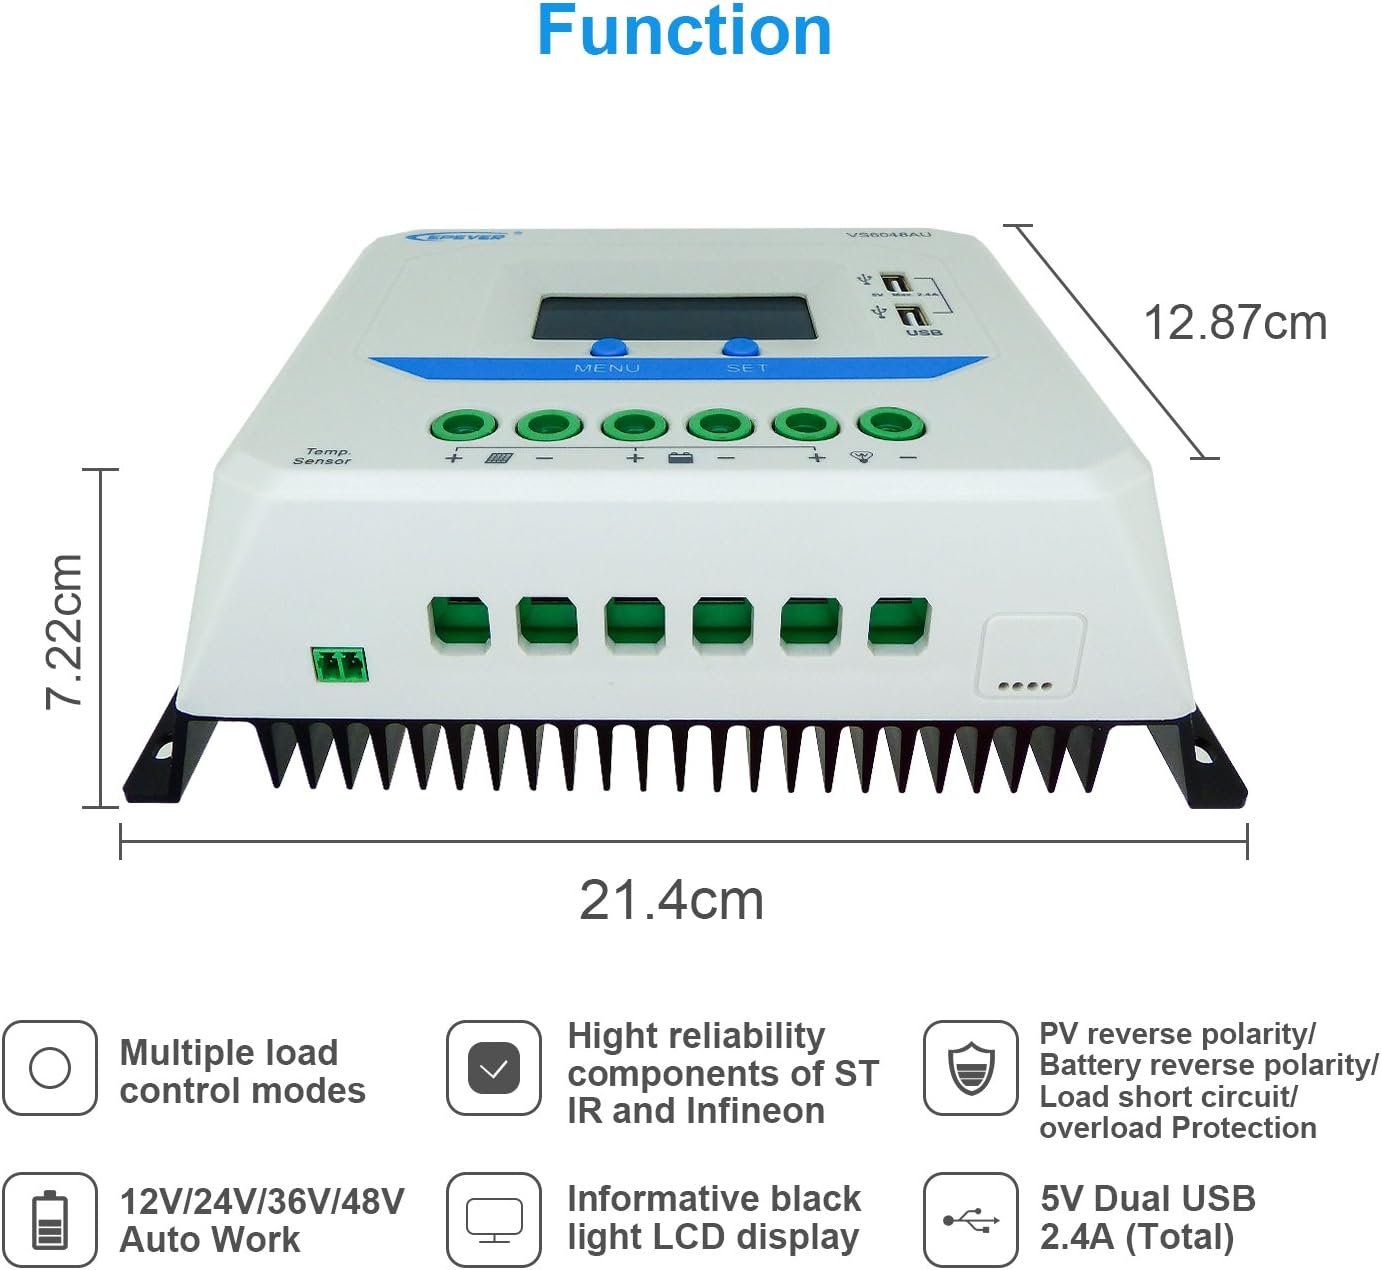
Image 5.1: Illustration of the automatic cycling interfaces on the VS6048AU LCD display.
- Naciśnij MENU button to manually cycle through the display interfaces.
- Naciśnij i przytrzymaj MENU button to enter or exit the parameter setting mode.
- In parameter setting mode, use the USTAWIĆ button to adjust values or confirm selections.
Operacje specjalne:
- Accumulative Power Clearing: Under the PV power interface, press and hold the USTAWIĆ button for 5 seconds until the value blinks, then press USTAWIĆ again to clear the accumulative power value.
- Ustawianie jednostki temperatury: Under the battery temperature interface, press and hold the USTAWIĆ button for 5 seconds to switch between Celsius (°C) and Fahrenheit (°F).
Tryby ładowania:
Kontroler wykorzystuje 3-sekundowytage intelligent PWM charging algorithm:
- Ładowanie zbiorcze: Akumulator jest ładowany maksymalnym prądem, aż do momentu jego całkowitego rozładowania.tage osiąga objętość Boosttage.
- Boost/Equalize Charging: The battery is charged at a constant voltage. An Equalize charge is typically performed once a month to balance battery cells.
- Ładowanie płynne: Pojemność bateriitage is maintained at the Float voltage, and the charging current is reduced to a trickle to keep the battery fully charged.
The controller supports charging for Sealed, Gel, and Flooded battery types. Ensure the correct battery type is selected in the settings for optimal charging performance.
Wyjście USB:
The dual USB ports provide a maximum output of 5VDC/2.4A for charging compatible electronic devices.
6. Konserwacja
Regular maintenance ensures the longevity and optimal performance of your EPEVER VS6048AU solar charge controller.
- Czystość: Utrzymuj kontroler w czystości, bez kurzu i zanieczyszczeń. Do czyszczenia używaj suchej ściereczki.
- Znajomości: Okresowo sprawdzaj wszystkie połączenia przewodów pod kątem szczelności i korozji. Luźne połączenia mogą spowodować przegrzanie i uszkodzenie.
- Wentylacja: Aby zapobiec przegrzaniu się kontrolera, należy upewnić się, że miejsce instalacji ma odpowiednią wentylację.
- Kontrola: Inspect the controller and wiring for any signs of damage, such as frayed cables or cracked casing. Replace damaged components immediately.
- Stan baterii: Monitoruj pojemność bateriitage and performance regularly. Ensure the battery type setting in the controller matches your battery.
7. Rozwiązywanie Problemów
W tej sekcji omówiono typowe problemy, jakie mogą wystąpić podczas korzystania z regulatora ładowania słonecznego.
| Problem | Możliwa przyczyna | Rozwiązanie |
|---|---|---|
| Brak obrazu na LCD | Akumulator nie jest podłączony lub jego głośność jest niskatage; odwrotna polaryzacja. | Sprawdź połączenia i biegunowość akumulatora. Upewnij się, że napięcie akumulatora jest prawidłowe.tage jest powyżej 9V. |
| Bateria się nie ładuje | PV panels not connected; PV reverse polarity; insufficient sunlight; PV open circuit voltage za niskie. | Check PV connections and polarity. Ensure adequate sunlight. Verify PV open circuit voltage mieści się w specyfikacji. |
| Ładowanie nie działa | Load disconnected; load short circuit; load overload; battery low voltage odłączyć. | Check load connections. Remove short circuit. Reduce load. Recharge battery. |
| Przegrzanie sterownika | Poor ventilation; excessive ambient temperature; prolonged high current operation. | Ensure proper ventilation. Relocate controller to a cooler environment. Reduce load if possible. |
| Wyjście USB nie działa | Device not compatible; controller fault. | Try another USB device. If issue persists, contact support. |
8. Specyfikacje
Detailed technical specifications for the EPEVER VS6048AU Solar Charge Controller.

Image 8.1: Comprehensive technical specifications table for the EPEVER VS-AU series, including the VS6048AU model.
| Parametr | Wartość (VS6048AU) |
|---|---|
| Model | VS6048AU |
| Nominalna objętość systemutage | 12V/24V/36V/48V Auto Work |
| Pojemność bateriitage Zakres | 9V ~ 64V |
| Prąd znamionowy ładowania/rozładowania | 60A |
| Maks. Obwód otwarty PV Objętośćtage | 96 V |
| Typ baterii | Zapieczętowane (domyślne) / Żelowe / Zalane |
| Zwiększenie objętości ładowaniatage | Sealed: 14.4V, Gel: 14.2V, Flooded: 14.6V |
| Objętość ładowania wyrównawczegotage | Sealed: 14.6V, Gel: No, Flooded: 14.8V |
| Objętość ładowania pływakowegotage | Uszczelnione/żelowe/zalane: 13.8 V |
| Niska objętośćtage Połącz ponownie Voltage | Uszczelnione/żelowe/zalane: 12.6 V |
| Niska objętośćtage Rozłącz Voltage | Uszczelnione/żelowe/zalane: 11.1 V |
| Samo-konsumpcja | ≤10 mA (12 V), ≤18 mA (24 V) |
| Kompensacja temperatury | -3mV/°C/2V (77°F) |
| Grunt | Wspólny pozytyw |
| Wyjście USB | 5VDC/2.4A (łącznie) |
| Wymiary całkowite | 214x128.7x72.2 mm |
| Terminale | 3AWG (25mm²) |
| Masa netto | 1.02 kilogramów |
| Załącznik | IP30 |
| Temperatura środowiska pracy | -25°C ~ +55°C |
| Zakres wilgotności | ≤95% (brak danych) |
9. Gwarancja i wsparcie
EPEVER products are designed for reliability and performance. For technical assistance or warranty inquiries, please refer to the following:
- Wsparcie techniczne: EPEVER provides technical support through its local service centers. For assistance, please contact the authorized dealer or service center in your region.
- Informacje o gwarancji: Please refer to the warranty card included with your product or visit the official EPEVER webSzczegółowe warunki gwarancji można znaleźć na naszej stronie.
- Free Solar System Design: EPEVER's service centers may offer free solar system design assistance to help you optimize your setup.