1. Wprowadzenie
This manual provides essential information for the safe and efficient operation, installation, and maintenance of your Carrier Estrella Pro 2018 1.0 Ton 3 Star Window Air Conditioner. Please read this manual thoroughly before using the appliance and retain it for future reference. This air conditioner is designed to provide comfortable cooling for your indoor environment, featuring a 1.0 ton capacity and a 3-star energy rating.
2. Informacje dotyczące bezpieczeństwa
Aby zapobiec obrażeniom użytkownika lub innych osób oraz uszkodzeniom mienia, należy postępować zgodnie z poniższymi instrukcjami. Nieprawidłowa obsługa spowodowana ignorowaniem instrukcji może spowodować szkody lub uszkodzenia.
- Upewnij się, że parametry zasilania odpowiadają wartościom podanym na tabliczce znamionowej urządzenia.
- Nie obsługuj klimatyzatora mokrymi rękami.
- Nie wkładaj palców ani ciał obcych do wlotu lub wylotu powietrza.
- Trzymaj materiały łatwopalne z dala od urządzenia.
- Przed czyszczeniem lub serwisowaniem urządzenia należy zawsze odłączyć je od zasilania.
- Instalację musi wykonać wykwalifikowany personel, zgodnie z lokalnymi przepisami elektrycznymi.
- Nie próbuj samodzielnie naprawiać urządzenia. Skontaktuj się z autoryzowanym serwisem.
3. Funkcje produktu
Your Carrier Estrella Pro 2018 air conditioner is equipped with several features designed for enhanced comfort and efficiency:
- Filtr witaminy C: Disperses minute particles of Vitamin C into the air, which may help soften skin and reduce stress.
- Łatwe czyszczenie: Extra sensors built into the remote control inform the unit of the temperature in various parts of the room, ensuring optimal temperature delivery.
- Inteligentna diagnoza: In case of a fault, this function diagnoses the issue immediately, turns off the AC to protect it, and indicates a protection or error code for faster service.
- Tryb uśpienia: An energy-saving mode that gradually increases the temperature while you sleep, maintaining comfort while reducing energy consumption.
- Exhaust Command: Ensures a constant supply of fresh and healthy air in your room.
- Automatyczne ponowne uruchomienie: Retains settings and temperature levels during unexpected power outages, restarting with previous settings automatically when power resumes.
- Automatyczne obracanie: Evenly cools or heats every part of the room by automatically rotating/swinging the air deflector.
- Nexgen Dehumidifier: Reduces humidity in a specific room while retaining cooling capability, maintaining a comfortable temperature and preventing mold/mildew.
- Wyświetlacz LED: Bright LED display included in the control panel.
- Built-in Slinger: Condensed water is absorbed and recycled by the heat condenser for minimum energy use and zero drainage problems.
- Hydrophilic Blue Fins: Improve heat exchange by absorbing and spreading water on their surface, preventing droplet formation. The anti-corrosive epoxy coating improves heat transfer and prevents corrosion.
- 24hr Timer: Allows the unit to run on automatic mode, programming it to start and stop at a pre-assigned time.
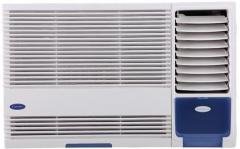
Rycina 3.1: Przód view of the Carrier Estrella Pro 2018 Window Air Conditioner, showcasinze względu na kompaktową konstrukcję.
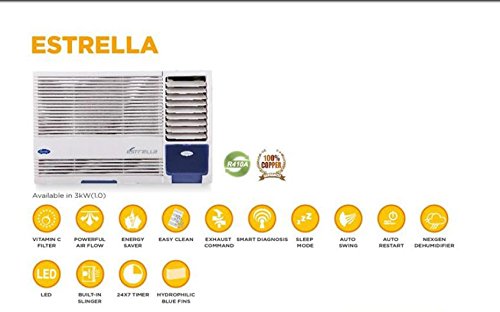
Rysunek 3.2: Ponadview of the Estrella Pro's key features, including Vitamin C filter, powerful airflow, energy saver, easy clean, exhaust command, smart diagnosis, sleep mode, auto swing, auto restart, Nexgen dehumidifier, LED, built-in slinger, 24x7 timer, and hydrophilic blue fins.
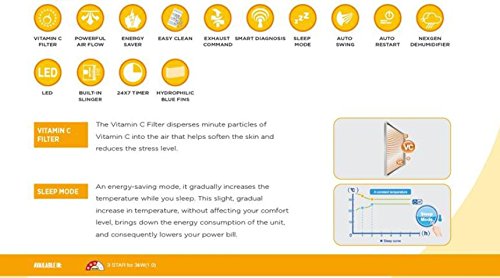
Figure 3.3: Detailed explanation of the Vitamin C Filter and Sleep Mode functionalities, including a graph illustrating temperature changes during Sleep Mode.
4. Konfiguracja
Proper installation is crucial for the performance and longevity of your air conditioner. It is recommended that installation be carried out by a certified technician.
4.1 Wybór lokalizacji
- Select a window that can support the weight of the unit.
- Ensure there are no obstructions to airflow both inside and outside the room.
- The unit should be installed with a slight downward tilt towards the outside to allow for proper condensate drainage.
4.2 Wymagania elektryczne
- Connect the unit to a dedicated power outlet with the correct voltagi i ampzgodnie ze specyfikacją na etykiecie produktu.
- Nie należy używać przedłużaczy ani rozgałęźników.
- Upewnij się, że gniazdko elektryczne jest prawidłowo uziemione.
4.3 Kroki instalacji (ogólne)
- Prepare the window opening, ensuring it is clean and free of debris.
- Carefully lift and place the air conditioner into the window opening.
- Zabezpiecz urządzenie za pomocą dołączonych uchwytów montażowych i śrub.
- Install the side panels to seal the gap between the unit and the window frame.
- Sprawdź, czy wszystkie uszczelki są szczelne, aby zapobiec wydostawaniu się powietrza.
5. Instrukcja obsługi
Your air conditioner can be operated using the control panel on the unit or the provided remote control.
5.1 Podstawowa obsługa
- Włączanie/wyłączanie: Naciśnij MOC przycisk, aby włączyć lub wyłączyć urządzenie.
- Wybór trybu: Naciśnij TRYB button to cycle through available modes: Cool, Fan, Dry (Dehumidifier).
- Regulacja temperatury: Użyj UP I W DÓŁ przyciskami strzałek ustaw żądaną temperaturę.
- Prędkość wentylatora: Naciśnij PRĘDKOŚĆ WIATRAKA przycisk do regulacji prędkości wentylatora (niska, średnia, wysoka, automatyczna).
5.2 Funkcje specjalne
- Tryb uśpienia: Activate this mode for quiet, energy-efficient operation during sleep. The temperature will gradually increase over time.
- Funkcja timera: Użyj REGULATOR CZASOWY button to set a specific time for the unit to turn on or off automatically within a 24-hour period.
- Automatyczne obracanie: Naciśnij HUŚTAWKA button to activate or deactivate the automatic louver movement for even air distribution.
- Tryb osuszania (suszenia): Select this mode to reduce humidity in the room without significant cooling.
6. Konserwacja
Regularna konserwacja zapewnia optymalną wydajność i wydłuża żywotność klimatyzatora.
6.1 Czyszczenie filtra powietrza
- Częstotliwość: Clean the air filter every two weeks, or more often if the unit is used frequently or in dusty environments.
- Kroki:
- Odłącz zasilanie urządzenia.
- Otwórz panel przedni i wyjmij filtr powietrza.
- Umyj filtr letnią wodą z dodatkiem łagodnego detergentu.
- Dokładnie wypłucz i pozostaw do całkowitego wyschnięcia przed ponownym montażem.
6.2 Czyszczenie zewnętrzne
- Wytrzyj obudowę urządzenia miękką, damp płótno.
- Nie należy używać silnych środków chemicznych, materiałów ściernych ani rozpuszczalników.
6.3 Konserwacja sezonowa
- Before long periods of non-use (e.g., winter), run the unit in fan-only mode for a few hours to dry the internal components.
- Clean the air filter and cover the unit to protect it from dust.
7. Rozwiązywanie Problemów
If you encounter issues with your air conditioner, refer to the following common problems and solutions. For more complex issues, utilize the Inteligentna diagnoza feature or contact customer support.
| Problem | Możliwa przyczyna | Rozwiązanie |
|---|---|---|
| Jednostka się nie włącza | Brak zasilania; Odłączony przewód zasilający; Przepalony bezpiecznik/wyłącznik awaryjny | Check power connection; Reset breaker/replace fuse. |
| Niewystarczające chłodzenie | Dirty air filter; Room too large; Doors/windows open; Temperature setting too high | Clean air filter; Close doors/windows; Lower temperature setting. |
| Nadmierny hałas | Loose installation; Fan hitting obstruction; Unit not level | Ensure secure installation; Check for obstructions; Level the unit. |
| Wyciek wody | Unit not tilted correctly; Drain pan clogged | Adjust unit tilt; Clear drain pan. |
If the problem persists after attempting these solutions, please contact Carrier customer service for assistance. The Smart Diagnosis feature can provide error codes to help service technicians identify the issue quickly.
8. Specyfikacje
The following table outlines the key specifications for the Carrier Estrella Pro 2018 1.0 Ton 3 Star Window Air Conditioner:
| Funkcja | Szczegół |
|---|---|
| Marka | Przewoźnik |
| Efektywność energetyczna | Ocena 3 gwiazdki |
| Pojemność | 1 tony |
| Typ instalacji | Okno |
| Cechy specjalne | Auto Restart, Dehumidifier, Sleep Mode, Vitamin C Filter, Easy Clean, Smart Diagnosis, Exhaust Command, Auto Swing, Nexgen Dehumidifier, LED, Built-in Slinger, Hydrophilic Blue Fins, 24hr Timer |
| Kolor | biały |
| Konsola kontrolna | zdalne sterowanie |
| Orzecznictwo | gwiazda energetyczna |
| Chłodziwo | R-32 |
| ASIN | B07BFXPZ2T |
| Data pierwszej dostępności | 13 Marzec 2018 |
9. Gwarancja i wsparcie
Your Carrier Estrella Pro 2018 air conditioner comes with a comprehensive warranty:
- Gwarancja na produkt: 1 rok na cały produkt.
- Gwarancja na sprężarkę: 5 lat na kompresor.
For warranty claims, technical support, or service requests, please contact Carrier customer service. Ensure you have your product model number and purchase date available when contacting support.
You can find contact information for Carrier customer support on the official Carrier webmiejscu lub w opakowaniu produktu.