
Wstęp
This manual provides comprehensive instructions for the installation, operation, and maintenance of your Techage Analog CCTV Camera HD 1080P Complete Security Bullet Camera Kit. Please read this manual carefully before using the product to ensure proper setup and functionality.

Figure 1: Techage Analog CCTV Camera HD 1080P Complete Security Bullet Camera Kit, showing the DVR and four bullet cameras.
Konfiguracja i instalacja
Follow these steps to set up your Techage security system.
1. Komponenty systemu
Your kit includes a Digital Video Recorder (DVR) and multiple 1080P bullet cameras. Each camera is designed for robust outdoor and indoor use with IP66 weatherproofing.

Figure 2: A single Techage 1080P bullet camera, featuring a 3.6mm lens and infrared LEDs for night vision.
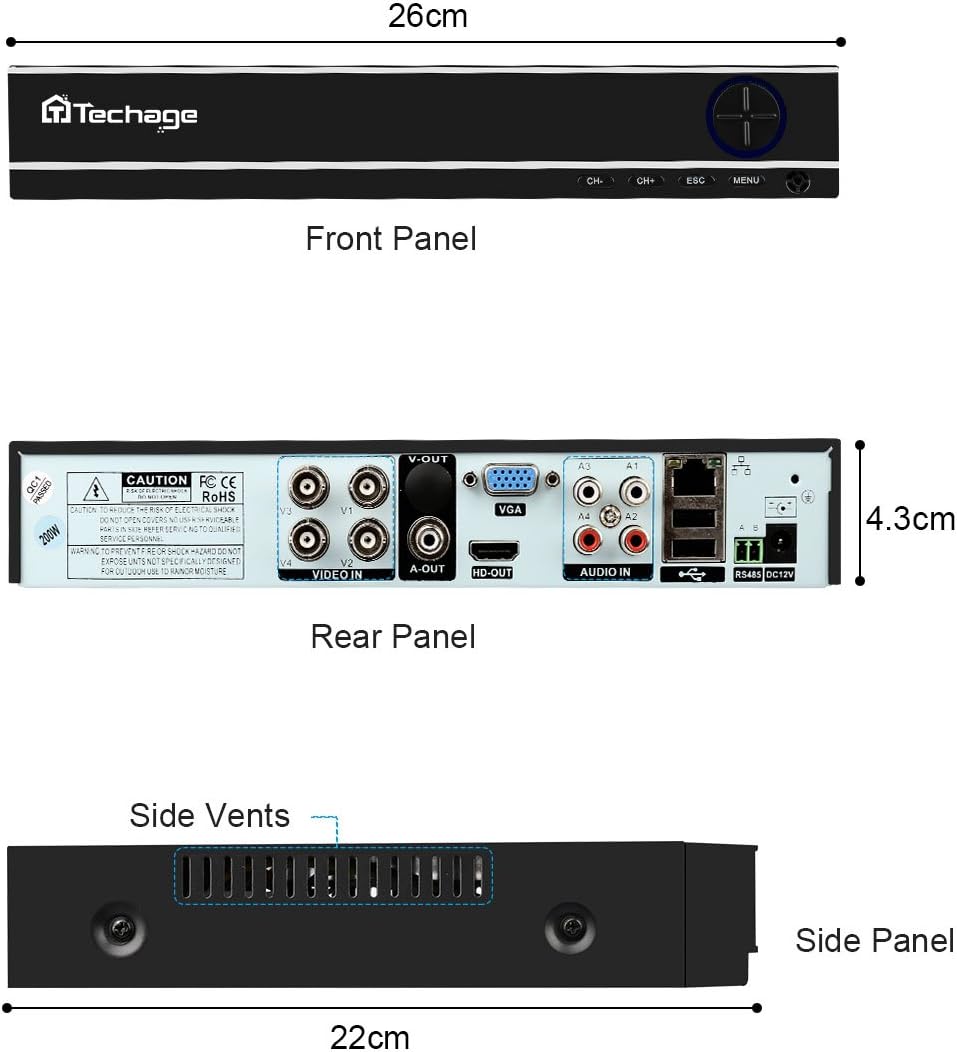
Figure 3: Front, Rear, and Side Panels of the Techage DVR, showing input/output ports and dimensions.
2. Połączenie sprzętowe
Connect all components as illustrated in the diagram below. Ensure all connections are secure before powering on the system.
- Connect each camera to the DVR using the provided power and video cables.
- Podłącz dekoder DVR do monitora lub telewizora za pomocą kabla HDMI lub VGA.
- Connect the DVR to your network router using an Ethernet cable for remote viewmożliwości.
- Connect the power supply to the DVR and cameras.

Figure 4: Installation and Connection Diagram. This diagram illustrates how to connect the cameras to the DVR, and the DVR to a monitor/HDTV and network for live viewing.
3. Mobile Settings for Remote Viewwchodzenie
Do view your cameras remotely on your mobile device, follow these steps:
- Install the Xmeye App: Scan the QR code or visit the links below to download the Xmeye mobile application for your device.
- Logowanie lokalne: Open the Xmeye app and select "Local Login".
- Dodaj urządzenie: Kliknij ikonę „+”, aby dodać nowe urządzenie.
- Wprowadź numer seryjny: Input the 16-digit serial number of your DVR. This can usually be found on the DVR itself or in the system information menu.
- Wybierz urządzenie: Select the device from the list to begin viewkamer.

Figure 5: Mobile Settings for Remote Viewing. This image illustrates the 5 steps to configure the Xmeye app for live camera viewna smartfonie.
Instrukcja obsługi
Na żywo View i nagrywanie
Po połączeniu możesz view żyćtage from your cameras on a connected monitor, or remotely via the Xmeye app on your computer, tablet, or smartphone. The DVR continuously records footage, which can be reviewpóźniej.
Day and Night Monitoring
The cameras are equipped with infrared (IR) LEDs for true day and night monitoring. During the day, the cameras provide full-color video. As light levels decrease, the cameras automatically switch to black and white night vision mode to ensure continuous surveillance.

Figure 6: Day and Night Vision Comparison. This image shows the difference in camera footage during daytime (color) and nighttime (black and white infrared).
Motion Detection and Email Notifications
Configure motion detection settings on your DVR to trigger recordings and send instant email notifications to your registered email address when activity is detected. This feature enhances security by alerting you to potential incidents in real-time.

Figure 7: Email Notifications for Motion Detection. This image depicts how the system can send email alerts to your mobile device upon detecting suspicious activity.
Konserwacja
- Obiektywy do aparatów: Okresowo czyść obiektywy aparatu miękką, niepozostawiającą włókien ściereczką, aby zapewnić wysoką jakość obrazu. Unikaj środków czyszczących o właściwościach ściernych.
- Połączenia kablowe: Regularly check all cable connections (power, video, network) to ensure they are secure and free from damage.
- Wentylacja DVR: Ensure the DVR's side vents are clear of obstructions to prevent overheating.
- Aktualizacje oprogramowania: Sprawdź producenta webodwiedź naszą witrynę, aby uzyskać dostęp do aktualizacji oprogramowania sprzętowego Twojego rejestratora DVR, dzięki czemu zapewnisz sobie optymalną wydajność i bezpieczeństwo.
Rozwiązywanie problemów
| Problem | Możliwa przyczyna | Rozwiązanie |
|---|---|---|
| No video display on monitor/TV. | Luźny kabel wideo, wybrano nieprawidłowe wejście na monitorze, dekoder DVR nie został włączony. | Check all video cable connections. Ensure monitor is set to the correct HDMI/VGA input. Verify DVR power supply. |
| Brak pilota viewing via mobile app. | DVR not connected to network, incorrect network settings, app not configured correctly. | Ensure DVR is connected to the internet. Verify network settings on DVR. Re-check mobile app configuration steps (Figure 5). |
| Niska jakość obrazu. | Dirty camera lens, low light conditions (if not in night mode), cable interference. | Clean camera lens. Ensure sufficient lighting or verify night vision is active. Check cable integrity. |
| Wykrywanie ruchu nie działa. | Motion detection settings not enabled, sensitivity too low, recording schedule not set. | Access DVR settings to enable motion detection, adjust sensitivity, and set recording schedules. |
Specyfikacje
| Funkcja | Szczegół |
|---|---|
| Marka | Techage |
| Technologia łączności | Przewodowy |
| Rozdzielczość przechwytywania wideo | 1080p |
| Funkcja specjalna | Wizja nocna |
| Liczba kanałów | 4 |
| Źródło zasilania | Elektryczny przewodowy |
| Kompatybilne urządzenia | Kamery |
| Format sygnału | Analog |
| Technologia słabego oświetlenia | Wizja nocna |
| Producent | Tinosec |
| Wymiary opakowania | 11.7 x 10 x 9.7 cala |
| Waga przedmiotu | 9.83 funta |
| ASIN | B07BB7FYKX |
| Data pierwszej dostępności | 6 listopada 2018 r. |
Gwarancja i wsparcie
W dostępnych danych nie ma szczegółowych informacji dotyczących gwarancji tego produktu. Prosimy o zapoznanie się z opakowaniem produktu lub oficjalną instrukcją producenta. webSzczegółowe warunki gwarancji można znaleźć na naszej stronie.
For technical support or further assistance, please contact Techage customer service through their official channels. Keep your purchase receipt and product serial number handy when contacting support.