1. Wprowadzenie
Thank you for choosing the JACK F4 Direct Drive Sewing Machine. This manual provides essential information for the safe and efficient operation, setup, and maintenance of your new sewing machine. Please read this manual thoroughly before using the machine to ensure proper function and longevity.

Figure 1: The JACK F4 Direct Drive Sewing Machine, showcasing its sleek design and integrated motor.
2. Instrukcje bezpieczeństwa
Aby zminimalizować ryzyko pożaru, porażenia prądem lub obrażeń ciała, należy zawsze przestrzegać podstawowych zasad bezpieczeństwa podczas korzystania z urządzeń elektrycznych.
- Ensure the machine is unplugged from the power outlet before cleaning, servicing, or when not in use.
- Trzymaj palce z dala od wszystkich ruchomych części, zwłaszcza igły, stopki dociskowej i pokrętła.
- Never operate the machine with the air openings blocked. Keep ventilation openings of the sewing machine and foot controller free from the accumulation of lint, dust, and loose cloth.
- Nie należy pracować w miejscach, w których stosuje się produkty w formie aerozolu (sprayu) lub podaje się tlen.
- Używaj wyłącznie akcesoriów zalecanych przez producenta.
- Urządzenie to nie jest przeznaczone do użytku przez osoby (w tym dzieci) o ograniczonej sprawności fizycznej, sensorycznej lub umysłowej, a także osoby nieposiadające odpowiedniego doświadczenia lub wiedzy, chyba że znajdują się one pod nadzorem osoby odpowiedzialnej za ich bezpieczeństwo lub otrzymały od niej instrukcje dotyczące korzystania z urządzenia.
3. Konfiguracja
3.1 Rozpakowywanie i umieszczanie
Carefully remove the machine from its packaging. Place the machine on a stable, level surface with adequate lighting. Ensure there is enough space around the machine for comfortable operation and material handling.
3.2 Połączenie zasilania
Connect the power cord to the machine's power input and then plug it into a suitable electrical outlet. The JACK F4 features a power-saving direct drive motor.

Rysunek 2: Strona view of the machine, showing the power cord connection point.
3.3 Instalacja igły
Ensure the machine is turned off and unplugged. Loosen the needle clamp screw, insert the new needle with the flat side facing the back of the machine, and push it up as far as it will go. Tighten the needle clamp dobrze przykręcić.
3.4 Nawijanie i zakładanie szpulki
Follow the winding path indicated on the machine for the bobbin thread. Once wound, insert the bobbin into the bobbin case under the needle plate. Refer to the markings for correct thread tension and direction.

Figure 3: Close-up of the needle and bobbin area, crucial for threading and maintenance.
3.5 Nawlekanie maszyny
Raise the presser foot and needle to their highest positions. Follow the numbered threading path from the spool pin through the tension discs, take-up lever, and finally through the needle eye. Pull both upper and bobbin threads to the back under the presser foot.
4. Instrukcja obsługi
4.1 Włączanie/wyłączanie
Locate the power switch, typically on the side or front of the machine. Press to turn the machine on or off. The integrated LED light near the needle plate will illuminate when the machine is on.
4.2 Regulacja prędkości
The JACK F4 features adjustable speed control. Use the control panel, usually with '+' and '-' buttons or a dial, to set your desired sewing speed. Start with a slower speed for beginners or intricate work.

Figure 4: The control panel and speed adjustment dial, allowing precise control over sewing speed.
4.3 Needle Position Adjusting/Locking Stitch
This machine allows for needle position adjustment and locking stitch functionality. Consult the control panel for specific buttons or settings to utilize these features, which enhance precision and finish.
4.4 Podstawowe szycie
Place your fabric under the presser foot. Lower the presser foot. Gently press the foot pedal to begin sewing. Guide the fabric smoothly, allowing the machine to feed it. To reverse stitch, use the reverse lever or button.

Rysunek 5: Szczegółowy view of the needle and presser foot, showing the working area.
5. Konserwacja
Regularna konserwacja zapewnia długowieczność i optymalną wydajność Twojej maszyny do szycia.
- Czyszczenie: Regularly clean lint and dust from the bobbin area, feed dogs, and tension discs using a small brush or vacuum cleaner. Always unplug the machine before cleaning.
- Smarowanie: Refer to the machine's specific oiling points (if any) and lubricate with high-quality sewing machine oil as recommended.
- Wymiana igły: Replace needles frequently, especially when working with new projects or if you notice skipped stitches or fabric damage. A dull or bent needle can cause significant issues.
- Składowanie: Gdy nie używasz urządzenia, przykryj je, aby ochronić je przed kurzem i przechowuj w suchym miejscu.
6. Rozwiązywanie Problemów
W tej sekcji omówiono typowe problemy, z którymi możesz się spotkać. W przypadku bardziej złożonych problemów skontaktuj się z obsługą klienta.
| Problem | Możliwa przyczyna | Rozwiązanie |
|---|---|---|
| Pominięte ściegi | Niewłaściwa igła, wygięta igła, nieprawidłowe nawlekanie. | Wymień igłę, ponownie nawlecz maszynę, upewnij się, że typ igły jest odpowiedni do rodzaju tkaniny. |
| Zrywanie wątku | Nieprawidłowe naprężenie, słaba jakość nici, zadziory na płytce ściegowej. | Wyreguluj naprężenie, użyj nici dobrej jakości, sprawdź, czy nie ma zadziorów. |
| Maszyna nie uruchamia się | Not plugged in, power switch off, safety mechanism engaged. | Check power connection, turn on switch, ensure presser foot is down. |
| Nierówne ściegi | Niewłaściwe naprężenie, zużyta igła, nierównomierne podawanie materiału. | Adjust tension, replace needle, guide fabric evenly. |
7. Specyfikacje
Key specifications and features of the JACK F4 Direct Drive Sewing Machine:
- Marka: PODNOŚNIK
- Model: F4
- Kolor: Niebieski
- Typ silnika: Direct Drive Motor (Power Saving, Power Efficient)
- Kontrola prędkości: Regulowana prędkość
- Oświetlenie: LED Light Near Needle Plate
- Needle Features: Needle Position Adjusting/Locking Stitch
- Wymiary produktu: 9.8D x 25.4W x 21.7H centymetrów
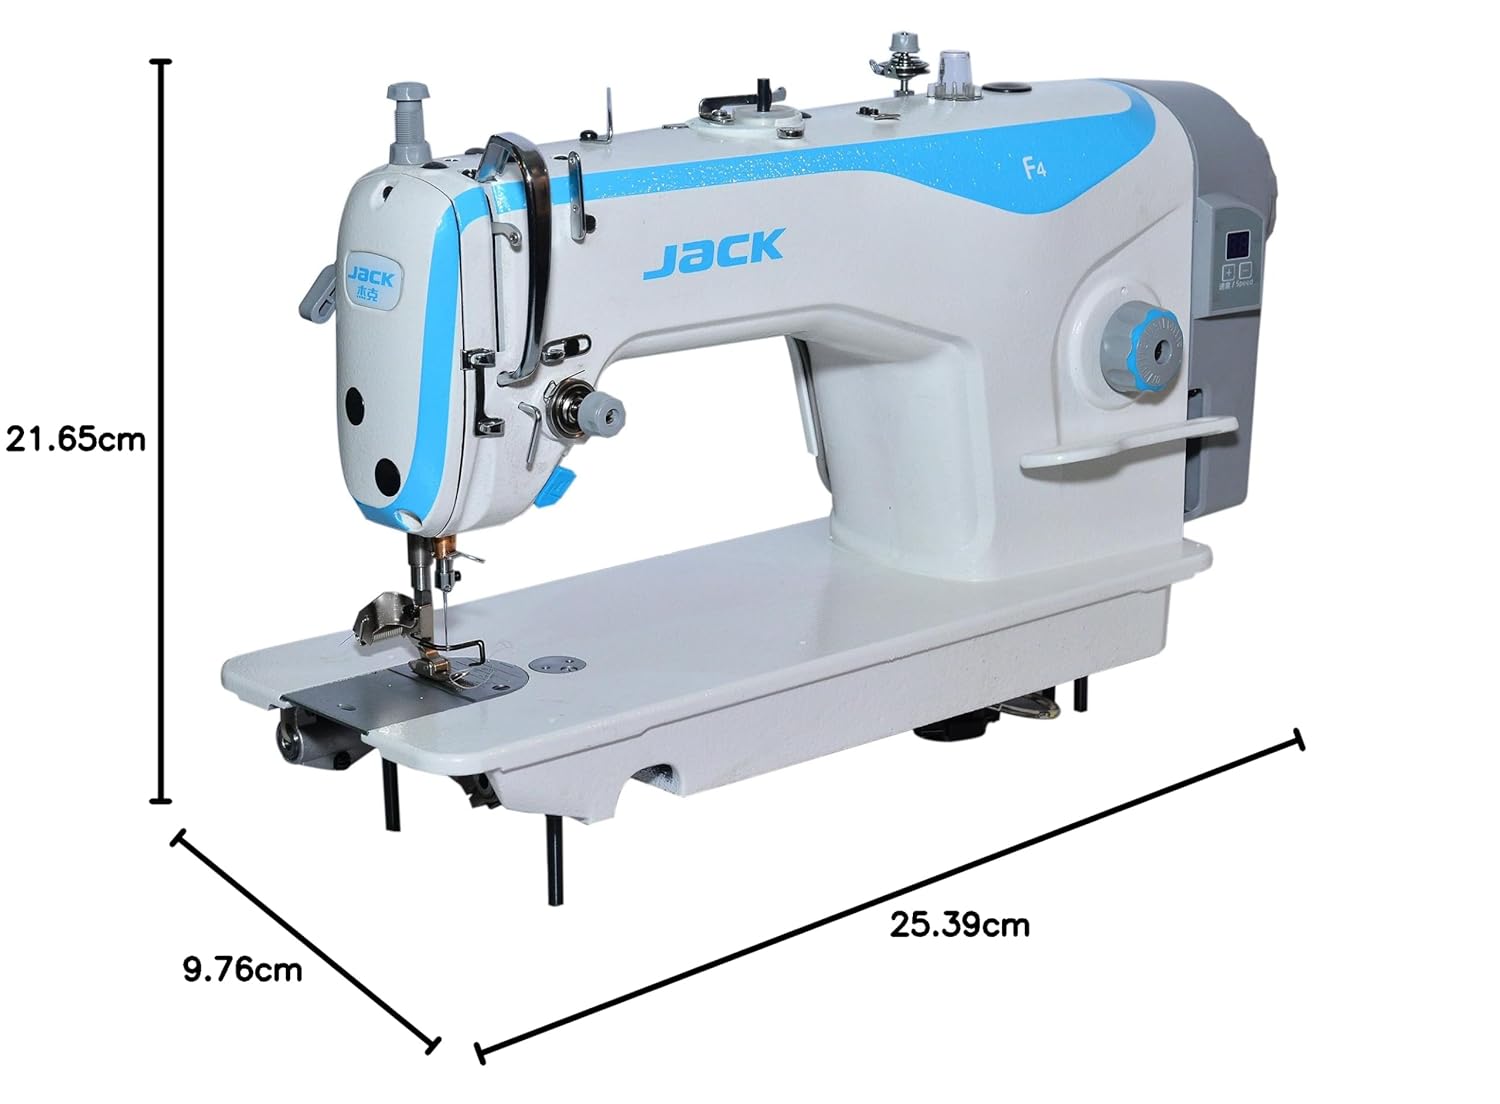
Figure 6: Product dimensions for the JACK F4 sewing machine.
8. Gwarancja i wsparcie
The JACK F4 Direct Drive Sewing Machine comes with a 1 rok gwarancji od daty zakupu. Niniejsza gwarancja obejmuje wady produkcyjne powstałe w wyniku normalnego użytkowania. Prosimy zachować dowód zakupu na wypadek roszczeń gwarancyjnych.
For technical support, service, or warranty inquiries, please contact your authorized JACK dealer or the customer service department. Provide your machine's model number and a detailed description of the issue to facilitate faster assistance.