
1. Wprowadzenie
Thank you for choosing the Electriq 6 Place Freestanding or Integrated Table Top Dishwasher. This manual provides essential information for the safe and efficient operation, installation, and maintenance of your appliance. Please read it thoroughly before first use and keep it for future reference.
This compact dishwasher is designed for small kitchens or households, offering convenience and efficiency for up to 6 place settings.
2. Informacje dotyczące bezpieczeństwa
Aby zmniejszyć ryzyko pożaru, porażenia prądem, obrażeń ciała lub uszkodzenia urządzenia, należy zawsze przestrzegać poniższych środków ostrożności.
- Ensure the dishwasher is properly earthed.
- Nie używaj zmywarki, jeśli przewód zasilający lub wtyczka są uszkodzone.
- Trzymaj dzieci z dala od zmywarki, szczególnie gdy jest włączona lub gdy drzwiczki są otwarte.
- Używaj wyłącznie detergentów i nabłyszczaczy przeznaczonych specjalnie do zmywarek.
- Nie otwieraj drzwiczek podczas pracy urządzenia, gdyż może wytrysnąć gorąca woda.
- Ostre przedmioty należy ładować czubkiem do dołu, aby zapobiec obrażeniom.
- Przed czyszczeniem lub konserwacją należy odłączyć urządzenie od zasilania.
3. Koniec produktuview
The Electriq 6 Place Table Top Dishwasher is a compact and efficient appliance designed to fit conveniently on your countertop or integrate into your kitchen space.

Rycina 3.1: Przód view of the Electriq 6 Place Table Top Dishwasher.

Figure 3.2: The compact dishwasher integrated into a kitchen countertop, next to a microwave.
Główne cechy:
- Pojemność nakrycia: 6 miejsc Ideal for small households, accommodating up to 66 pieces of crockery and cutlery.
- Kompaktowa konstrukcja: Freestanding or integrated, perfect for countertops or limited spaces.
- 6 Wash Programmes: Including Normal, Intensive, Eco, Glass, 90 Min, and Rapid cycles.
- Opóźnienie czasowe: Allows you to set the wash to start 2, 4, 6, or 8 hours later.
- Energooszczędny: Rated F for energy efficiency.
- Anti-flood and Anti-leak Protection: Enhanced safety features for your kitchen.
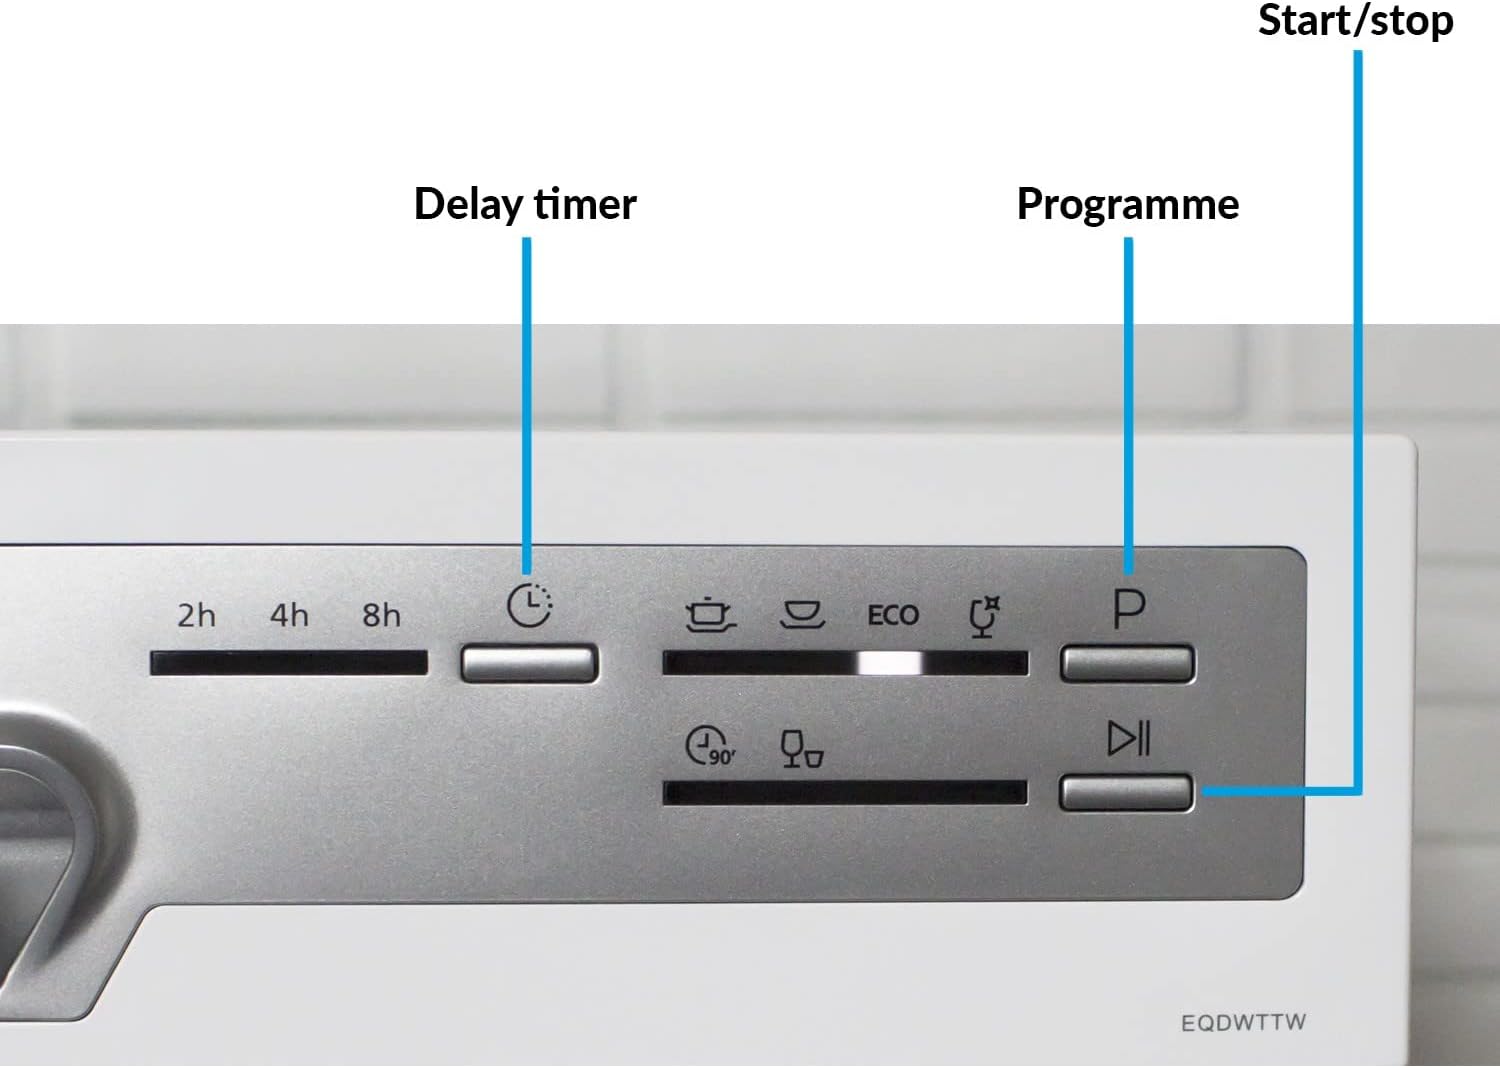
Rysunek 3.3: Szczegółowy view of the control panel, showing buttons for Delay Timer, Programme selection, and Start/Stop.
4. Instalacja i konfiguracja
4.1 Rozpakowanie
Ostrożnie usuń wszystkie materiały opakowaniowe. Sprawdź zmywarkę pod kątem uszkodzeń. Wszelkie uszkodzenia natychmiast zgłoś sprzedawcy.
4.2 Pozycjonowanie
The dishwasher can be placed freestanding on a stable, level surface or integrated into a suitable cabinet. Ensure there is adequate space for ventilation and door opening.

Figure 4.1: Dimensions of the dishwasher: Height 43.8cm, Width 55cm, Depth 50cm.
4.3 Podłączenie wody
Connect the water inlet hose to a cold water supply tap. Ensure all connections are tight to prevent leaks. The dishwasher features a cold water fill system.
4.4 Podłączenie odpływu
Connect the drain hose to a suitable drain pipe or sink. Ensure the hose is not kinked or blocked.
4.5 Podłączenie elektryczne
Plug the dishwasher into a grounded electrical outlet. Ensure the voltagNapięcie i częstotliwość odpowiadają wymaganiom urządzenia (230 V).
4.6 Initial Setup (Salt and Rinse Aid)
Before first use, fill the salt dispenser with dishwasher salt and the rinse aid dispenser with rinse aid. Refer to the specific sections in this manual for detailed instructions on filling these compartments. The dishwasher has salt and rinse aid warning indicators.
5. Instrukcja obsługi
5.1 Załadunek zmywarki
Load dishes carefully to ensure proper water circulation and cleaning. The dishwasher includes a cutlery basket for organized washing.

Rysunek 5.1: Wnętrze view demonstrating the capacity for larger items like pots and pans.

Figure 5.2: The dishwasher can accommodate plates up to 10.15 inches (25.8cm) in diameter.

Figure 5.3: The glass stand provides stable support for delicate glassware during the wash cycle.
5.2 Dodawanie detergentu
Dodaj odpowiednią ilość detergentu do zmywarki do dozownika. Zapoznaj się z instrukcją producenta detergentu dotyczącą dawkowania.
5.3 Wybór programu
Press the 'Programme' button to cycle through the available wash programmes. Indicator lights will show the selected programme.
- Normalna: Standard daily wash for normally soiled dishes.
- Intensywny: For heavily soiled dishes with tough, baked-on food.
- Echo: Energy-saving programme for normally soiled dishes.
- Szkło: Delikatne mycie delikatnych naczyń szklanych.
- 90 minuty: Do lekko zabrudzonych naczyń wymagających szybszego mycia.
- Szybki: A quick 30-minute wash for lightly soiled items without drying.

Figure 5.4: The Quick Wash feature provides fast and efficient cleaning.
5.4 Setting the Delay Timer
Press the 'Delay Timer' button to set a delayed start time of 2, 4, 6, or 8 hours. This allows you to run the dishwasher at a time that suits you, such as during off-peak energy hours.
5.5 Rozpoczęcie cyklu
Close the dishwasher door firmly. Press the 'Start/Stop' button to begin the selected wash cycle. The indicator light will illuminate.
6. Konserwacja i pielęgnacja
6.1 Czyszczenie systemu filtracyjnego
Regularly clean the filter system to ensure optimal washing performance. The dishwasher features an easy-clean filter system. Remove the filter, rinse it under running water, and remove any food debris. Reassemble correctly.
6.2 Uzupełnianie soli i nabłyszczacza
Monitor the salt and rinse aid warning indicators. Refill these compartments as needed to ensure effective cleaning and drying results.
6.3 Czyszczenie zewnętrzne i wewnętrzne
Wytrzyj zewnętrzną część zmywarki miękką szmatką.amp cloth. Clean the interior periodically with a dishwasher cleaner or a mixture of vinegar and water to prevent odors and build-up.
7. Rozwiązywanie Problemów
If your dishwasher is not functioning correctly, please consult the following table before contacting customer service.
| Problem | Możliwa przyczyna | Rozwiązanie |
|---|---|---|
| Zmywarka nie uruchamia się | Przewód zasilający nie jest podłączony; Drzwi nie są dokładnie zamknięte; Przepalony bezpiecznik. | Sprawdź podłączenie do zasilania; Upewnij się, że drzwi są zamknięte; Sprawdź bezpiecznik/wyłącznik automatyczny w domu. |
| Naczynia nie czyste | Improper loading; Insufficient detergent; Clogged spray arms/filter; Incorrect program. | Reload dishes correctly; Add more detergent; Clean spray arms and filter; Select appropriate program. |
| Woda nie spływa | Wąż spustowy jest zagięty lub zablokowany; Filtr jest zatkany. | Check and clear drain hose; Clean filter system. |
| Nadmierny hałas | Grzechoczące naczynia; Obcy przedmiot w pompie; Urządzenie nie jest wypoziomowane. | Rearrange dishes; Check for foreign objects; Level the appliance. |
| Białe plamy na naczyniach | Lack of rinse aid; Hard water. | Refill rinse aid dispenser; Adjust water softener setting if applicable. |
8. Specyfikacje
| Funkcja | Specyfikacja |
|---|---|
| Nazwa modelu | EQDWTTW |
| Pojemność | 6 nakryć do stołu |
| Wymiary (wys. x szer. x gł.) | Wymiary 43.8 x 55 x 50 cm |
| Waga | 21 kilogramów |
| Programy | Normal, Intensive, Eco, Glass, 90 Min, Rapid |
| Temperatury | 40, 45, 60, 65, 70°C |
| Opóźnienie czasowe | 2, 4, 6 lub 8 godzin |
| Klasa energetyczna | F |
| Zużycie wody (na cykl) | 6.5 litrów |
| Poziom hałasu | 49dB |
| Typ instalacji | Wolnostojące |
| Tomtage | 230 wolty |
| Zawarte komponenty | Koszyk na sztućce |
9. Gwarancja i wsparcie
This Electriq dishwasher comes with a 1-letnia gwarancja od daty zakupu. Zachowaj dowód zakupu na wypadek roszczeń gwarancyjnych.
For technical support, spare parts, or warranty inquiries, please contact Electriq customer service. Contact details can typically be found on the manufacturer's webwitryny lub dokumentacji zakupu.
Please have your model number (EQDWTTW) and serial number ready when contacting support.